I really like this process because it is cheap, easy, and less toxic than regular black and white reversal. I was invited to shoot 8x10 at a backstage party this week so I did some of these sepia reversals processed on the spot. Here is latin percussion legend Pete Escovedo:

-
Welcome to Photrio!Registration is fast and free. Join today to unlock search, see fewer ads, and access all forum features.Click here to sign up
You are using an out of date browser. It may not display this or other websites correctly.
You should upgrade or use an alternative browser.
You should upgrade or use an alternative browser.
I think I invented a new way to do reversal processing using sepia toner...
-
A
- Thread starter DavidJRobertson
- Start date


Recent Classifieds
-
Sold Kodak Ektar 203mm F 7.7 on flash supermatic shutter, mounted on 98x96 board
- Started by Gaston 012
-
For Sale 150mm f/8 Nikkor-SW - covers 8x10 and more
- Started by Steve Goldstein
-
Sold SUMMICRON 35mm F2 With Googles (8 elements) + M3 Double Stroke (For parts or repair)
- Started by Guillaume Zuili
-
Sold Hasselblad V Adapter To Linhof
- Started by Jessxi
Forum statistics
I was playing about with some sepia toner for the first time and had a lightbulb moment. Not sure if this has been documented before but it's possible to use the sepia toner (in the reverse order - redeveloper before bleach) to do reversal processing:
Works surprisingly well! I will probably use this in future to produce enlarged internegatives for cyanotype printing.
- Expose paper
- Develop to completion
- Stop bath (probably not essential, but I did it anyway)
- Rinse
- Sepia toner redevelopment bath
- Rinse
- Sepia toner bleach bath
- Rinse
- Fix
- Rinse
I mixed my sepia toner according to formula #144 "Formulary Thiourea Toner" in The Darkroom Cookbook, Steve Anchell - though I would expect any two-bath sepia toner to work.
Interesting method! The same method was used by jordan_w for film reversal way back in 2003 and he mentions two stops loss of speed and grey highlights as its drawbacks:
https://www.photo.net/discuss/threads/copper-sulphate-as-reversal-bleach.93066/
I also like this method very much, congrats!
I am used to make my own medium format black and white slides through reversal development (Rollei 400S or Ilford FP4+). I make them for the pleasure of projection but as you may guess, nobody understand why I cannot provide prints!
Therefore, I have started to build my darkroom to test the reversal sepia workflow with such slides and it did not go so well… The good part of it is that I have not experienced any fogging or unclear highlight yet a beautiful creamy sepia.
The bad part is that I face an unacceptably high contrast. I guess that it is very much normal as a slide is a more contrasty starting point than a negative. In my first attempt I had used a fix grade 2 RC paper. In a second one I used a RC variable contrast paper and put 2 Foma yellow filters so as to achieve a grade 00 (minimum contrast I know) but with no noticeable improvement!
May somebody give me a piece of advice? Is there any hope to use this method for slides or should I try something different? I wonder if there is some parameter like the fulfillment of the first development or the time spent in the bleaching or in the toning bath that I could try to change. I am totally new to darkroom printing…
May somebody give me a piece of advice? Is there any hope to use this method for slides or should I try something different? I wonder if there is some parameter like the fulfillment of the first development or the time spent in the bleaching or in the toning bath that I could try to change. I am totally new to darkroom printing…
Some of the color darkroom wizards around can probably give you some pointers for making a contrast mask. I think it would be a (very) low contrast contact negative registered with the positive you're printing from -- it will add density where there is little, and thus reduce the difference between highlights and shadows. Pin registration equipment recommended, but possibly not critical, and you'll want some slow ortho film so you can handle it under safelight (fortunately, Ilford offers Ortho 80 in 35mm, 120, and 4x5).
Thanks Donald, it really helps as I had not thought about a contrast mask. Sadly it also means that I am too far away from a normal contrast to get a result with a specific developer or filter…
I have used Ilford Ortho 80 once, but not in the darkroom, it may even become easier with a lower speed film like Rollei Ortho 25. Nevertheless, I think all orthochromatic films tend to have a harsh contrast which maybe a problem here? And for sure handling a panchro film without any light would make life difficult!
Would it also make sense to scan the slide so as to print a negative onto a translucid paper? I have no means to make a good quality scan and print but I wonder if the negative quality is paramount for it to be used as a contrast mask.
I have used Ilford Ortho 80 once, but not in the darkroom, it may even become easier with a lower speed film like Rollei Ortho 25. Nevertheless, I think all orthochromatic films tend to have a harsh contrast which maybe a problem here? And for sure handling a panchro film without any light would make life difficult!
In camera ortho films aren't as harsh as ortho lith films, and you can control contrast with development as you'd do with regular camera films like Foma 100 or HP5+. For this application, I'd consider something like Rodinal 1:100 and tray develop by inspection. And be prepared to use several sheets getting the contrast right; the mask negative is going to look really thin -- but once you have it, as long as you take care not to scratch it up, it should last as long as the original positive you're trying to print.
Another potential option, since ortho films come in sheet form (and ortho lith films are a legitimate candidate here, too) is to make an enlarged negative. Here, again, you can control contrast by development (use film strength Dektol, 1+9, rather than paper strength, to get long enough development time to exercise contrast control). Some say doing this with ortho lith films will give bad results, others do it regularly for things like contrast masks and unsharp masks (though you can't use ortho to make contrast masks for color, obviously).
interesting discoveryI was playing about with some sepia toner for the first time and had a lightbulb moment. Not sure if this has been documented before but it's possible to use the sepia toner (in the reverse order - redeveloper before bleach) to do reversal processing:
Works surprisingly well! I will probably use this in future to produce enlarged internegatives for cyanotype printing.
- Expose paper
- Develop to completion
- Stop bath (probably not essential, but I did it anyway)
- Rinse
- Sepia toner redevelopment bath
- Rinse
- Sepia toner bleach bath
- Rinse
- Fix
- Rinse
I mixed my sepia toner according to formula #144 "Formulary Thiourea Toner" in The Darkroom Cookbook, Steve Anchell - though I would expect any two-bath sepia toner to work.
I like this second plan… An enlarged negative looks easier to work with. As I try to make prints slightly bigger than 8x10, it seems that Arista Ortho Litho is the only affordable option. So I would use a film-strength slow development and in a second movement I would put my enlarged negative on top of the photo paper. Do I miss something? Do you think that some level of pressure between the negative and the paper for flatness or contact control is advisable?Another potential option, since ortho films come in sheet form (and ortho lith films are a legitimate candidate here, too) is to make an enlarged negative. Here, again, you can control contrast by development (use film strength Dektol, 1+9, rather than paper strength, to get long enough development time to exercise contrast control). Some say doing this with ortho lith films will give bad results, others do it regularly for things like contrast masks and unsharp masks (though you can't use ortho to make contrast masks for color, obviously).
You've got the general idea. Yes, you'll want something to press the negative to the blank print for exposure -- they call it a "contact print" for a reason. You can spend money on a contact printing frame (but one bigger than 8x10 will cost you), or you can just buy a pane of heavy glass from a local glazier and put a piece of fairly stiff open cell foam under the sandwich. Use your enlarger for a light source, if you're using enlarging paper; if you're sitting on a stash of Lodima or similar, you might want just the bulb out of an enlarger head (in a can fixture, if it doesn't have its own reflector).
I also like this method very much, congrats!
I am used to make my own medium format black and white slides through reversal development (Rollei 400S or Ilford FP4+). I make them for the pleasure of projection but as you may guess, nobody understand why I cannot provide prints!
Therefore, I have started to build my darkroom to test the reversal sepia workflow with such slides and it did not go so well… The good part of it is that I have not experienced any fogging or unclear highlight yet a beautiful creamy sepia.
The bad part is that I face an unacceptably high contrast. I guess that it is very much normal as a slide is a more contrasty starting point than a negative. In my first attempt I had used a fix grade 2 RC paper. In a second one I used a RC variable contrast paper and put 2 Foma yellow filters so as to achieve a grade 00 (minimum contrast I know) but with no noticeable improvement!
May somebody give me a piece of advice? Is there any hope to use this method for slides or should I try something different? I wonder if there is some parameter like the fulfillment of the first development or the time spent in the bleaching or in the toning bath that I could try to change. I am totally new to darkroom printing…
Can you show us how your prints look before and after reversal?
I am intending to try to reverse Orwo FO5 to make negatives for contact printing, and Wolfgang Moersch has an interesting manual for that. Basically he suggests pre-flashing the film quite intensively, which allows to bring down the contrast quite a lot. This process should work for paper, too:
http://www.moersch-photochemie.de/files/articles/FO5 Umentwicklung.pdf
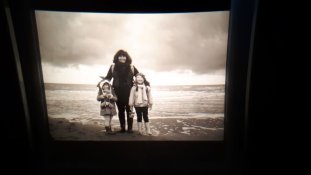
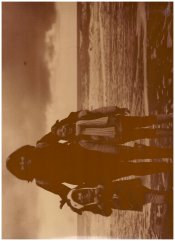
You can see here a transparency (4.5 cm x 6 cm format) that is the starting point (it is a photo of what appears on a little viewer, it does not pay justice to what we can see projected on a 2-m screen, bright and full of details) and a scan of the print (yes my scanner is terrible, sorry for your eyes) with overwhelming blocked shadows whereas the highlights are correct with some details. I have no picture from the process before the reversal but if I try again, I will make one to better answer your question.
If preflashing can solve the contrast issue, I would be very happy! Do you have some insight on what would be a good way to proceed and a suitable pre-flash duration? No that I believe that trials and errors can be avoided but a good starting point would be helpful. What does your Orwo FO5 starting picture look like? It is interesting to see so many different ways to use the sepia reversal idea.
Good luck for your attempts!
Attachments
Still about the excessive contrast and bloked shadows, isn't it a possibility to interrupt the sepia toning phase, e.g. letting 25% less time?
Still about the excessive contrast and bloked shadows, isn't it a possibility to interrupt the sepia toning phase, e.g. letting 25% less time?
This is probably better corrected in first development. First, fix contrast -- reduce first dev time a little -- then fix blocked shadows. Either increase exposure (which will tend to lead to empty highlights) or add a small amount of thiosulfate or thiocyanate to the first developer (a few grams per liter is enough, generally).
In general, all processes after first development should be carried to completion.
Thanks Donald and Raghu, I will concentrate on the first development, reducing time and putting an additive to reduce the contrast.
The fericyanide SLIMT method is impressive but I will start with what I have already. Donald, I have some potassium thiocyanate, is it OK? How much grams per liter would you put? According to what I read (Osbahr) you need two times less potassium thiocyanate than the amount of sodium thiosulfate you would put.
What would be a good starting point to reduce the development time?
I am sure that it is not a matter of insufficient exposure because my highlights are already very clear and were burnt in some of my attempts whereas the shadows were always blocked.
I've used 4 to 8 g/L of thiosulfate in the past with light exposure and a conventional developer (HC-110) for second developer.
The exposure/development rules are reversed in reversal -- expose for the highlights and first develop for the shadows. If your highlights are good, I'd try a little less first dev first, before adding a fixing agent -- because the fixing agent will also thin your highlights.
The exposure/development rules are reversed in reversal -- expose for the highlights and first develop for the shadows. If your highlights are good, I'd try a little less first dev first, before adding a fixing agent -- because the fixing agent will also thin your highlights.
Next time you do reversal prints, please check the paper negative you get after first development. Carefully examine the shadows (white halide regions on the negative). They should have some visible density. Otherwise the positive will have blocked shadows in those regions. Similarly examine the highlights (dark areas) on the negative. They should have some visible white halide else the positive will have burnt highlights.
Next time you do reversal prints, please check the paper negative you get after first development. Carefully examine the shadows (white halide regions on the negative). They should have some visible density. Otherwise the positive will have blocked shadows in those regions. Similarly examine the highlights (dark areas) on the negative. They should have some visible white halide else the positive will have burnt highlights.
Okay, I replied just above on the basis of film.
For paper reversal, you really can't/don't want to change development time because you'll get unevenness; paper is developed to completion. That was where the idea of a contrast mask was offered: if you're printing from a positive with too much contrast (00 filtration is still to hard), you need to mask.
the process is not new, but it´s an interesting re discover... but the guy is a princess...
OK I go back to the contrast mask and keep the development tips for the case I adopt an enlarged inter negative and contact printing.
Another interesting thread that has been resurrected, to be put on my, 'I must try this...' list of things to have a go at.
It definitely sounds like fun!
Terry S
It definitely sounds like fun!
Terry S
Interesting method! The same method was used by jordan_w for film reversal way back in 2003 and he mentions two stops loss of speed and grey highlights as its drawbacks
I can now confirm from my own experience that OP's method when used in film reversal results in significant speed loss and more critically, gives dull positives with very grey highlights as Jordan found out in 2003. I wouldn't encourage anyone to use it in film reversal processing. I've no idea why it supposedly works well for paper.
| Photrio.com contains affiliate links to products. We may receive a commission for purchases made through these links. To read our full affiliate disclosure statement please click Here. |
PHOTRIO PARTNERS EQUALLY FUNDING OUR COMMUNITY:  |