I think I invented a new way to do reversal processing using sepia toner...

Takatoriyama

D
Takatoriyama

  • 4
  • 1
  • 64
Tree and reflection

H
Tree and reflection

  • 2
  • 0
  • 62
CK341

A
CK341

  • 3
  • 0
  • 70
Plum, Sun, Shade.jpeg

A
Plum, Sun, Shade.jpeg

  • sly
  • May 8, 2025
  • 3
  • 0
  • 103
Windfall 1.jpeg

A
Windfall 1.jpeg

  • sly
  • May 8, 2025
  • 7
  • 0
  • 81

Recent Classifieds

Forum statistics

Threads
197,625
Messages
2,762,090
Members
99,423
Latest member
southbaybrian
Recent bookmarks
0
Joined
Nov 5, 2017
Messages
63
Location
Central Scotland
Format
35mm
I was playing about with some sepia toner for the first time and had a lightbulb moment. Not sure if this has been documented before but it's possible to use the sepia toner (in the reverse order - redeveloper before bleach) to do reversal processing:

  1. Expose paper
  2. Develop to completion
  3. Stop bath (probably not essential, but I did it anyway)
  4. Rinse
  5. Sepia toner redevelopment bath
  6. Rinse
  7. Sepia toner bleach bath
  8. Rinse
  9. Fix
  10. Rinse
Works surprisingly well! I will probably use this in future to produce enlarged internegatives for cyanotype printing.

I mixed my sepia toner according to formula #144 "Formulary Thiourea Toner" in The Darkroom Cookbook, Steve Anchell - though I would expect any two-bath sepia toner to work.
 

johnielvis

Member
Joined
May 21, 2010
Messages
966
Format
Medium Format
sounds like it should work great--and, tested, so, it apparently does work great. Wow--hey--this is maybe a way to make 2 color color photos--reversal tone one film red and reversal tone another green, say and put them together.

please show a pic of the results.
 

MattKing

Moderator
Moderator
Joined
Apr 24, 2005
Messages
52,025
Location
Delta, BC Canada
Format
Medium Format
I was playing about with some sepia toner for the first time and had a lightbulb moment. Not sure if this has been documented before but it's possible to use the sepia toner (in the reverse order - redeveloper before bleach) to do reversal processing:

  1. Expose paper
  2. Develop to completion
  3. Stop bath (probably not essential, but I did it anyway)
  4. Rinse
  5. Sepia toner redevelopment bath
  6. Rinse
  7. Sepia toner bleach bath
  8. Rinse
  9. Fix
  10. Rinse
Works surprisingly well! I will probably use this in future to produce enlarged internegatives for cyanotype printing.

I mixed my sepia toner according to formula #144 "Formulary Thiourea Toner" in The Darkroom Cookbook, Steve Anchell - though I would expect any two-bath sepia toner to work.

Is the entire process done in the dark or under safelight illumination, or is there any re-exposure involved?
 
OP
OP
Joined
Nov 5, 2017
Messages
63
Location
Central Scotland
Format
35mm
Is the entire process done in the dark or under safelight illumination, or is there any re-exposure involved?

Exposure, initial development in normal print developer, and then stop bath were all done under safelight. The rest of the process was carried out with normal room light, but the process does not depend on reexposure as such - you could do it entirely under safelight if you wanted.
 

MattKing

Moderator
Moderator
Joined
Apr 24, 2005
Messages
52,025
Location
Delta, BC Canada
Format
Medium Format
Exposure, initial development in normal print developer, and then stop bath were all done under safelight. The rest of the process was carried out with normal room light, but the process does not depend on reexposure as such - you could do it entirely under safelight if you wanted.
I'm surprised that, without re-exposure, the Sepia toner re-development bath would have any effect on unexposed silver halides.
But I'm curious to try.
Did the enlarger exposure match the amount of exposure you would need for a traditional print?
 
OP
OP
Joined
Nov 5, 2017
Messages
63
Location
Central Scotland
Format
35mm
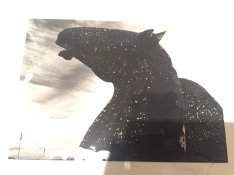
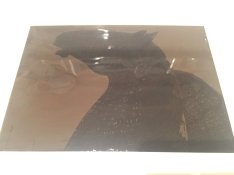
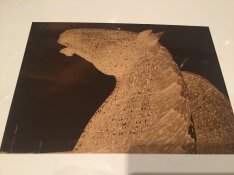
Here's some pics of the process (not my finest work! and please excuse the crappy iPhone pics).


After exposure, development in normal print developer, stop bath, and rinse:
IMG_0690.JPG

After sepia toner redeveloper bath & rinse:
IMG_0691.JPG

After sepia toner bleach bath & rinse:
IMG_0692.JPG

Final result after fixing and rinsing:
IMG_0693.JPG
 
OP
OP
Joined
Nov 5, 2017
Messages
63
Location
Central Scotland
Format
35mm
I'm surprised that, without re-exposure, the Sepia toner re-development bath would have any effect on unexposed silver halides.
But I'm curious to try.
Did the enlarger exposure match the amount of exposure you would need for a traditional print?


To be fair I haven't tested doing the whole thing under safelight... My darkroom is literally in a cupboard and I ran out of space for trays, so everything after the stop bath was done in my bathroom.However I think it should work -

Normally when using sepia toner, you use a rehalogenating bleach on a fixed print to convert the silver to silver bromide. Then the sulphide or thiourea in the toning bath converts the silver bromide into silver sulphide, which is brown.

So for this process, we develop a positive image but don't fix it, leaving silver bromide in the highlights. Then in the toner bath, the bromide is converted to sulphide. Then in the bleach bath, the original positive silver image is converted to bromide, which can be fixed away as usual, leaving a negative image.
 
OP
OP
Joined
Nov 5, 2017
Messages
63
Location
Central Scotland
Format
35mm
I'm surprised that, without re-exposure, the Sepia toner re-development bath would have any effect on unexposed silver halides.
But I'm curious to try.
Did the enlarger exposure match the amount of exposure you would need for a traditional print?

Haven't done much experimentation to find out exactly what is best to do re exposure, but see the above photos.
 

Ian Grant

Subscriber
Joined
Aug 2, 2004
Messages
23,234
Location
West Midland
Format
Multi Format
There's a problem with this because immersing the developed emulsion in the toner bath will actually cause some toning even with say a 30 second immersion so you will have some positive image left when you bleach and fix, meaning no clear highlights.

If you want to know how I can be sure of that it's because I did some tests on prints to see how well sepia toner immersion protects images, so tested 15 seconds, 30 second etc up to 5 mins in Toner (no pre bleach) and even the short immersions left a weak image after bleaching and fixing, the image was stronger with longer times as you'd expect.

So no this isn't a viable reversal process.

Ian
 
Joined
Apr 14, 2016
Messages
814
Location
Bavaria, Germany
Format
Medium Format
The effects used to achieve this "reversal" are known and not really new:

-> the first developer will develop the exposed part of the picture to silver which can be bleached afterwards
-> Sulfide redeveloper will chemically fog the undeveloped silver to form silver-sulfide which is unaffected by a bleach afterwards
-> when you bleach after applying the redeveloper, you bleach away the original negative leaving the silver-sulfide positive.

Problem: As Ian writes, the redeveloper does not only affect the unexposed silver, but to a certain extent also the exposed silver. Tim Rudman explains this in his Toning Book and recommends to apply (for toning) the redeveloper prior to toning in order to have better control of the bleaching (and thus achieve different tones). So as Ian explains, you will not get any clean highlights, you will always have a rather strong base fog (apart from a brown print). This will be more pronounced if you use sodium-sulfide as redeveloper, and a little weaker if you go for thiourea.
 

johnielvis

Member
Joined
May 21, 2010
Messages
966
Format
Medium Format
NO PROBLEM! So it's not perfect. Neither am I. If you're perfect and can only use a "true" reversal process--as judged by those that wrote old books--then you go ahead and use only those and stop trying to tell people what to think. The poof is in the pictures, and it sure looks like it works "good enough" to have some fun with.

For the rest of us, I'm all for finding methods to improve this alternative process and extend it to colour. I'd love to see if this can make 2-color transparancies like the original kodak process where 2 separate color images were sandwiched together.

I love the fact that you don't need to use dichromate or permaganate and I think that ALONE is enough reason to have at it.

GOOD WORK!
 

nmp

Member
Joined
Jan 20, 2005
Messages
1,995
Location
Maryland USA
Format
35mm
Here's some pics of the process (not my finest work! and please excuse the crappy iPhone pics).
Here is what I don't understand, chemistry-wise. after the redeveloper the original highlights, as would be expected, become darker because of formation of silver sulfide - almost midtone-like (Figure 2.) Then with subsequent bleach bath, they become much darker sepia (Figure 3.) I would expect the bleach to reduce density where there is silver metal, but it should not touch the silver sulfide, at least not make it darker. What am I missing? Is it because of the way the photos are taken (in safe-light vs room light?)

Curious....

:Niranjan.
 

esearing

Member
Joined
Aug 17, 2004
Messages
364
Location
North GA
Format
4x5 Format
Interesting - worth experimenting with longer and shorter exposures to see how the reversal negatives could be contact printed. I think this might be a viable option for pre-bromoil contact prints since you generally need some density (gelatin) in highlights for the ink to stick. May work for other oil print methods too. There was a technique similar to this that created mirror silver and black effects on glass, but I don't remember the specifics.
 
OP
OP
Joined
Nov 5, 2017
Messages
63
Location
Central Scotland
Format
35mm
Here is what I don't understand, chemistry-wise. after the redeveloper the original highlights, as would be expected, become darker because of formation of silver sulfide - almost midtone-like (Figure 2.) Then with subsequent bleach bath, they become much darker sepia (Figure 3.) I would expect the bleach to reduce density where there is silver metal, but it should not touch the silver sulfide, at least not make it darker. What am I missing? Is it because of the way the photos are taken (in safe-light vs room light?)

Curious....

:Niranjan.


Sorry, that was caused by inconsistent lighting conditions in photographing the process - you are correct in your expectation.
 
OP
OP
Joined
Nov 5, 2017
Messages
63
Location
Central Scotland
Format
35mm
For anyone attempting this, note that the rinse before and after the redevelopment bath (step 4 and 6 in my original post) must be done quite thoroughly - I had a few failed attempts caused by incomplete rinsing.

Another thing to note is that with thiourea sepia toners you can control the darkness of the brown tone, which will of course affect the final result. I'm sure you could easily get it darker than in the photos I posted.
 

MattKing

Moderator
Moderator
Joined
Apr 24, 2005
Messages
52,025
Location
Delta, BC Canada
Format
Medium Format
I wonder if this could be useful for preparing enlarged negatives for contact processes.
 

nworth

Member
Joined
Aug 27, 2005
Messages
2,228
Location
Los Alamos,
Format
Multi Format
This is fairly similar to the way some photobooths processed direct positive paper:

Develop
Rinse
Bleach (dichromate)
Rinse
Sepia redeveloper (sodium sulfide solution)
Rinse
Blow dry
Deliver damp paper strip to customer
 

vdonovan

Member
Joined
Jan 8, 2008
Messages
607
Location
San Francisco
Format
Traditional
IMG_5827.JPG

I tried your process and it works like a champ! This was shot in my 8x10 Sinar view camera on Ilford Multigrade RC paper. I used the Foma Sepia toning kit and it worked great! This is the positive image as it came out of the tray.
What I did:

Expose paper at about ISO 1 1/2
Develop paper in paper developer (PQ Universal in this case) for normal time (2 minutes)
Rinse
Process paper in toner. Tone for 4 minutes at 68 degrees
Rinse thoroughly.
Process paper in bleach. Bleach for at least 4 minutes at 68 degrees (longer if necessary)
Rinse
Fix
Wash.
 
Last edited:
OP
OP
Joined
Nov 5, 2017
Messages
63
Location
Central Scotland
Format
35mm
Thanks for sharing, Vince - nice work. I'm glad to hear that this is a viable process for large format with paper. I don't have any large format equipment, but I think I'll play about with a shoebox pinhole camera when I have the time...
 
OP
OP
Joined
Nov 5, 2017
Messages
63
Location
Central Scotland
Format
35mm
I've got to say, this is quite interesting. Especially for in camera prints. I use the stinky stuff though so it looks like I will have to pick up some thiorea.

I think the traditional sulphide toners should work too. Would be worth trying before buying more chemicals. Then again, thiourea is cheap, doesn't stink, and allows you to vary the tone.
 
Photrio.com contains affiliate links to products. We may receive a commission for purchases made through these links.
To read our full affiliate disclosure statement please click Here.

PHOTRIO PARTNERS EQUALLY FUNDING OUR COMMUNITY:


Ilford ADOX Freestyle Photographic Stearman Press Weldon Color Lab Blue Moon Camera & Machine
Top Bottom