I bought a stepwedge, now what?

Branches

A
Branches

  • 5
  • 0
  • 44
St. Clair Beach Solitude

D
St. Clair Beach Solitude

  • 10
  • 3
  • 151
Reach for the sky

H
Reach for the sky

  • 4
  • 4
  • 187
Agawa Canyon

A
Agawa Canyon

  • 4
  • 3
  • 227

Recent Classifieds

Forum statistics

Threads
198,892
Messages
2,782,645
Members
99,741
Latest member
likes_life
Recent bookmarks
0

hadeer

Member
Joined
Dec 30, 2006
Messages
166
Location
The Netherla
Format
Medium Format
A week ago I acquired a 21 field projection stepwedge (4.5x6cm) presuming that a handy manual to use it would be in the box. Alas, it wasn't. :rolleyes:
I want to determine the right exposure and paper grade for several kinds of paper. I suppose you will have to make a series of exposures with different times and gradation settings on the enlarger head (variable contrast head). I have a densitometer.
Can someone give me an idea how to proceed?
 

Mike Wilde

Member
Joined
Aug 10, 2006
Messages
2,903
Location
Misissauaga
Format
Multi Format
look at Ilford's data sheets as a start

You can see how they have shown the response of the paper. This should get you started -

Another approach is to help you fine tune your film negs. Contact print the thing on your paper of preference , at contrast(s) of your preference ( one contrast, or do a series of all). Then you can figure out how many stops that there are in your darkroom scenario between just past pure white, and the last dark to still show texture ( can be done visually, or with a transmission or reflection densitometer). This tells you how much density range you can deal with in a negative for that particular VC filter, paper, developer type, dilution, time, etc.

Then measure the density of your processed film between the frames. This tells you the film base plus fog density that will give you the black end range; the next step is to figure out how much EI to rate a particular film to get blacks you shoot to land a bit above this. Then shoot whites and figure out how much to develop the film ( developer, time, dilution, agitation) to large a density range above your almost clear in the negative black area to know that the whole of the tonal range will happily print within your own paper contrast tested response determined above.

I will pm you the unzone system document by the late barry thornton that I saved from the wayback machine archive after his web site was taken down that explains this in a much more controlled manner.
 

Mike Wilde

Member
Joined
Aug 10, 2006
Messages
2,903
Location
Misissauaga
Format
Multi Format
Attachment of Barry Thornton's The Unzone System

I got confused - i thought that I could attach to PMs.
 

Attachments

  • The Unzone System.doc
    59 KB · Views: 316

Bob F.

Member
Joined
Oct 4, 2004
Messages
3,977
Location
London
Format
Multi Format
Mike: Barry Thornton's site has been put back online (www.barrythornton.com).

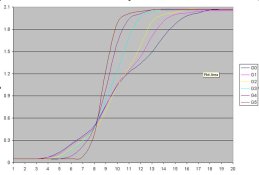
Just for an example, attached is a graph of MGIV-FB developed in Ilford Warmtone developer using Ilford's recommended "equal exposure" filter values for my colour head. X-axis numbers are 0.5 stop steps on my transmission step wedge (actual values not needed in this case as I'm only interested in relative values, not absolute ones) and y-axis numbers are the usual log density values read from the paper using my densitometer.

It shows how MGIV-FB reacts under these conditions. It shows Dmin & Dmax values and shows that the "equal exposure" occurs at about 0.5 above paper base + fog - i.e. in the highlights as you would expect for paper ("expose for the highlights, grade for the shadows").

Also note for example the clear humps in the response in the lower contrast grades. Doing the same plot in Ansco 130 shows a graph where the humps all but disappear. Proving at least, that not all developers are equal...

Have fun, Bob.

[edit: whoops - forgot to add graph.. now added]
 

Attachments

  • MGIV-FB.jpg
    MGIV-FB.jpg
    60.8 KB · Views: 160
OP
OP
hadeer

hadeer

Member
Joined
Dec 30, 2006
Messages
166
Location
The Netherla
Format
Medium Format
Hi Mike, Bob,
Thanks for the information. The article of Barry Thornton gives me a lot of useful directions, especially as it makes use of a fairly direct and simple printing of film test strips (which I use to do anyway). I have saved the article in my photo directory and will print it to keep it around.
Hans
 

rexp

Member
Joined
Oct 29, 2004
Messages
168
Location
Lincoln, Neb
Format
Med. Format RF
Here is a Simpleton method of using a stepwedge which has made my "first prints" pretty darn close, and has saved me a bunch-o-paper.

I put the wedge in the enlarger and adjusted the height to fill an 8x10. Using my Ilford EM10 exposure meter, I adjusted the aperture to make sure that the max & min ends of the wedge were both fully black or white. Using the EM-10, I measured the light in each step of the wedge (at the paper) & wrote it down. I set the timer to 16 sec (15 or 20 or 30 or whatever trips your trigger as a "normal" exposure time) and exposed a sheet of my "normal" paper, processed & dried. I did this again but exposed for 8 seconds stopped down one stop and again for 32 seconds and opened up one stop (you need to measure the readings again when you change the aperture). When the prints were dry, I wrote the readings next to the corresponding regions on the prints.

Now when I want to make a print, I compare the contact print with the test sheet to see which area from the step wedge looks close to some area I want on the print. You will get to know if you should start with the shorter or longer time sheets depending on if it is a big or small print, dense or thin negative, etc. I read the EM10 reading written on the sheet, adjust the height of the enlarger to where I want it, dial in the value on the EM10 and place the EM10 sensor on the easel in the area I chose in the negative. Then by adjusting the aperture on the enlarger to get the green LED to come on, I know that region will match the test print if exposed for the same length of time as the test print. If you can't open or close the aperture far enough, then use one of the sheets with longer or shorter exposure times to judge the region you chose to compare to.

I hope the explanation is understandable. Sometimes it is easier to show someone than to explain how do do it... certainly leaves me in awe of some of our fellow APUGers who have the "gift of explanation".

good luck
 
OP
OP
hadeer

hadeer

Member
Joined
Dec 30, 2006
Messages
166
Location
The Netherla
Format
Medium Format
Here is a Simpleton method of using a stepwedge which has made my "first prints" pretty darn close, and has saved me a bunch-o-paper.

good luck

Hi Rexp.
Thanks, this looks like a good way to work. I have a few questions though:
"....I adjusted the aperture to make sure that the max & min ends of the wedge were both fully black or white."
I suppose this is done by eyeballing the projection of the stepwedge. Am I right?

"...I did this again but exposed for 8 seconds stopped down one stop and again for 32 seconds and opened up one stop"
This would mean that you shift a full two stops down resp. up the scale of the stepwedge, taking the first exposure as a reference point. Right?

"....I compare the contact print with the test sheet to see which area from the step wedge looks close to some area I want"
This would also be done by judging the relevant parts of the contact print on face value. Are you using big negatives? I have medium format (1½x2¼') negatives. Small negatives might make this more difficult I suppose. Or is this generally not a problem?

"....Then by adjusting the aperture on the enlarger to get the green LED to come on"
I use a different meter (Durst Variolux), but I suppose it works more or less the same. It has to be adjusted until two LEDs light at the same time. To a certain degree I can do this by controlling the light output from the enlarger through the adjustment of a thumbwheel.
You have to calibrate the meter first for the particular paper you are using. Is that the same what you do with the EM10?

All in all a lot of questions, I hope you can find some time to answer them. Thanks a lot for your suggestions.
Greeting, Hans
 

rexp

Member
Joined
Oct 29, 2004
Messages
168
Location
Lincoln, Neb
Format
Med. Format RF
Hans-

I adjusted my time/aperture to have two things... a convenient exposure time (16 seconds in my case) and to have the print of the step wedge such that there are two or three or four "fully black" and "fully white" steps on the print. This insures you always have max black and max white on the reference print. Then when you change the exposure by 2x (or 1/2x) you still have max black and max white on the reference sheet. How many wedges this changes by depends on if you have a step wedge with 1/2 steps or 1/3 steps.

I shoot 35mm & 6x7. In either case I use a magnifying glass to inspect the contact print, and to select an area or two in the image to measure. If I want to keep texture in a dark shadow, I will meter that area and adjust the aperture to give the same exposure that it took to get "almost black" on my reference prints. Lighter black or darker black depending entirely on the image and what I want that shadow to look like. Sometimes I will then measure a different area to see about where it will end up, referring again to my reference print. If for example it shows that some other important area in the print will be far too light, I may fudge the exposure a litte. If things seem way out, at least it is a good starting point, and my first print gives me lots of information about where I need to work. Just make sure to expose your print for the same amount of time as the reference print you are judging against.

Sounds like your meter is similar to the EM10. If the dial is set "somewhere", you have to adjust the light to get the meter to indicate "OK". I find this much easier to predict than setting the aperture, measuring the light, and then looking up on a chart what the exposure should be to make that spot zone V.

Don't forget that this process depends on using the same grade of filter (or paper) all the way through. This has not been a problem as I find that I generally select the grade of paper after having my first "reasonably close" test print made at grade 2. You could repeat all of this at different grades of filtering (or paper), but I have not. The exposure changes at different grades are probably not much worse than my ability to accurately select the area of the negative to expose to in the first place.

I didn't bother "calibrating" my meter to my paper. The step wedge sort of does that for you. My time in the darkroom is somewhat limited, and I decided long ago that fewer variables are better. I "primarily" use Ilford HP5 in 35mm and FP4 in 120. Prints are always made on Ilford MGIV, RC or fibre, sometimes warmtone. When the day comes that I have more time in the darkroom, then I will start to experiment with some other papers (lith looks interesting). It isn't that I don't think there are other wonderful papers & film & chemicals out there, it is just that I would rather get fairly good with a limited set of materials than be mediocre using everything. I guarantee that others will argue that this calibrating must be sorted out to the finest detail, but I have enough trouble deciding when looking at a negative what area should be any particular zone that I just want to get a pretty darn close "test print" first. My system gives me a print that tells me what to do next. Sometimes that next step is framing!

Best of luck, & please don't hesitate to ask if you still have questions.
rexp
 
OP
OP
hadeer

hadeer

Member
Joined
Dec 30, 2006
Messages
166
Location
The Netherla
Format
Medium Format
Thanks a lot for the additional information. Now it's into the darkroom for me...
Your remarks about not to bother too much about calibrating fit with my own ideas about that. It's all too easy to get lost in all those variables. I have drawn the conclusion that not to be sentimental about throwing away a less than perfect print from time to time is a better way to reach good results.
Thanks again, Hans
 

dancqu

Member
Joined
Sep 7, 2002
Messages
3,649
Location
Willamette V
Format
Medium Format
Thanks a lot for the additional information.

Even more information. I'm long overdue in
submitting an article on how to calibrate and
use the EM-10 as a densitometer. In brief I
suggest the following procedure.

With the step wedge in the carrier set the
enlarger for an 8x10 enlargment. Note and mark
the exact position of the enlarger. The EM-10 is
not linear so should be calibrated for three stops;
eg, f8, 16, and 32. Doing so will allow 1/6 stop
accuracy from the least dense to very dense
areas of the negative. With each move allow
a few seconds for the EM-10 to settle in.

That's all there is to it. When ready to measure
densitities and determine a proper paper ES, pop
in a negative and take your readings.

Variables: The EM-10 battery condition, a varying
light source intensity, and something I've not
thought of yet. Re-test now and then. Dan
 
OP
OP
hadeer

hadeer

Member
Joined
Dec 30, 2006
Messages
166
Location
The Netherla
Format
Medium Format
Got results, but.....

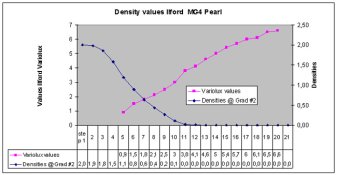
Yesterday I made a some testprints, using F/8 and 8 sec. as my standard settings. The results got me confused though.
In the diagram you can see for instance that to get a density of 0.43 in the testprint (step 8) the dial of the Durst Variolux must be set to 2.1 to get both LED's on. This density represents a medium grey zone on the testprint. But if I make a teststrips of a negative with normal contrast I have to put the meter at approx. 2.25 to get near black in that region (all metering with white light, filters turned out of the lightpath, densities measured on the testprint after developing and drying with a Heiland TRD 2 densito meter).
Step 1-4 and 21 are outside the metering range of the Durst Variolux at the used enlarger settings. Step 1 and 2 are black on the testprint. The Variolux btw seems to be reasonably linear over the total metering range.
Anyone that can give me an idea of what I am doing wrong (or am I interpreting the chart in the wrong way?).
My hunch is that I would have to turn up the light output of the enlarger (i.e. use a wider F-stop) so that the value range of the Variolux shifts to the right, giving a value of 2.1 at the first distinct gray value, density 1.86 or 1.58 in this case.
 

Attachments

  • Testchart Ilford MG4 Pearl.jpg
    Testchart Ilford MG4 Pearl.jpg
    69 KB · Views: 124
Last edited by a moderator:
Photrio.com contains affiliate links to products. We may receive a commission for purchases made through these links.
To read our full affiliate disclosure statement please click Here.

PHOTRIO PARTNERS EQUALLY FUNDING OUR COMMUNITY:


Ilford ADOX Freestyle Photographic Stearman Press Weldon Color Lab Blue Moon Camera & Machine
Top Bottom