


David Lyga
Member
Hopefully, this thread will prove to be valuable to both newcomers and those who are experienced. To me, this finding is both revelatory and useful, for to be able to process color film in such a way as to be able to attain quality B&W prints easily provides sufficient impetus for one to study, hone, and finally master these simple processing steps. In addition, an economic benefit might be provided as second distinct advantage, because color negative film is often less expensive to purchase than traditional B&W film is. A third incentive: old, heavily age-fogged color film, film that is essentially no longer useable within the C-41 paradigm, can now be usefully employed within this B&W transition, and without much sacrifice in print quality. Yes, this thread is going to be useful to all. Please read carefully.
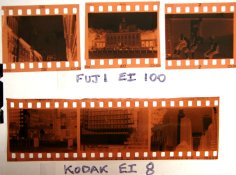
For this demonstration, I used two 35mm films: Fuji Super G+ (ISO 100) and Kodak Super 400. The Fuji expired in 1998 but is fresh. I had purchased a lot of it from Freestyle about a dozen years ago when they were selling 100 foot bulk rolls for about $10 each. I have since stored it in my freezer and, as evidenced by recently processing some of it via C-41, this brilliant film still shows no base fog and retains its full box speed of ISO 100. So, my Fuji is fresh film.
The Kodak Super 400 has an interesting history. About ten years ago a local Rite Aid was cleaning out its cabinets in preparation for digital. They dumped quite a bit of photo stuff on the sidewalk for the trash collectors to get. Walking by, I noticed that there were a few six-roll boxes of Kodak Super 400 film in the pile so I grabbed them. When home, I noticed that they were old 12 exposure rolls and tried exposing, then processing one in C-41 chemicals for twice the normal development time. Although I had given about five extra stops of exposure, the image that I got was extremely weak and, although shadow detail was not lacking, the whole film was an ugly black, or near black, mess. Only by holding the processed strip up to a light bulb and looking through it closely with a magnifying glass could I discern a weak image. Normal people would throw out such nonsense and go from there. But, David is not normal; he is frugal and obsessive. Truly, folks, there is not a better example of a worse age-fogged film that I could have chosen for this demonstration. Now, how to get this done.
Well, lets go back to the Fuji first. All you need do is expose the film as if you are shooting color (in this case, at EI 100) and then process in diluted B&W PRINT developer. For B&W, I use ambient temperatures for both film and print development (usually about 80F or 27C). Your process probably runs closer to 75F, so you might have to slightly increase my development times accordingly. For color negative film I dilute Dektol STOCK print developer 1+9. I have tried using FILM developer with greatly extended development times but cannot attain the needed contrast. Perhaps the high pH inherent in print developers is required in order to give C-41 film emulsions the needed kick-start.
So, using my diluted print developer at 80F, I find that processing fresh color negative film for SIX minutes with frequent agitation works fine. After the six minutes, I put the film into stop bath for about 15 seconds, then into film-strength fixer for the normal time. After this, the negative will appear to be rather dark, overall, but still clearly showing (low contrast) images. Base fog will appear quite high and frustrating, (enough to make you want to give up!). But now the true fun begins as you place the film into a modified Farmers Reducer.
The reducer used is made as follows: one part film-strength (fresh) fixer + one part bleach. Bleach (lasts forever) is made as follows: one gram of potassium ferricyanide in water to make each 50ml of bleach. Or, you can mix 20 grams to make one liter. (The convenient thing about potassium ferricyanide is that its mass is equivalent to its volumetric displacement, i.e., one gram = 1ml of volume. Thus, no scale is needed.) When mixed together, this reducer will last for only about 15 minutes, so do not mix the fixer with the bleach until you are ready to use the small amount needed for each short film segment (which I will next explain).
To be able to judge accurately how much to reduce the images I first cut the fully fixed (and rinsed) roll of film into short 4- or 5-frame segments. Then I mix only enough reducer to do one such film segment at a time in a small, flat-bottom, rectangular dish (that ideally conforms to the length and width of that segment strip). Keep the reducer volume very shallow and either use your moving fingers to keep the film immersed and agitated, or see-saw the film in a small cup of reducer. This prevents waste of reducer and provides a more accurate way of being able to judge when to stop. After reduction, wash. As you learn to determine the parameters of this reduction process you might not wish to burden yourself with cutting the film into the short lengths after fixation and, instead, keep the whole roll intact. I, however, like to retain the ability to scrutinize the process more carefully. (NOTE: Potassium ferricyanide is poisonous, but not unduly so. If you use your fingers, also use prudence and common-sense.) But, how much time for reduction?
When the fresh film is placed into the reducer nothing happens at first, but be careful when it starts. Agitate frequently to maintain uniformity. After maybe a minute or two, you will notice that the base of the film is getting more purely orange and that, miraculously, the image is slowly gaining both density and contrast. This BASE reduction is a to completion process, exclusive of the orange mask. The IMAGE reduction is not a process to completion (as it is within the C-41 BLIX process), thus, you must be careful, even, and consistent with the reduction of this B&W image lest you erase shadow detail and end up thinking that the films speed is less than you had originally thought that it was. At first you might go too far with reduction, or you might not go far enough. Inspect each negative up closely with a magnifying glass. The time to stop reducing is when you first attain a bright and clear orange mask, one with absolutely no remaining base fog. (Almost is not good enough here, as the film would remain dirty and grainy.) As soon as the base density is removed full shadow detail has yet to be compromised within the image. Stop reduction at this point, as further reduction would begin to attack the shadows of the image and you would end up incorrectly thinking that the film speed was lower that it really is. For ease and better predictability, you could dilute this reducer with an equal amount of water (for fresh film only), so that the reduction time will be extended, thus more manageable.
When finished, you should have a VERY clean negative; one that has somewhat more contrast than a normal B&W negative does. This extra contrast is needed if (and ONLY if) you are using VC paper to print. The orange mask seems to act as a low contrast filter and that extra contrast in the negative will bring the final print contrast back up to normal. You are going to have to experiment with my guidelines, as they pertain to MY work and MY workplace environment. If you use graded paper, normal negative contrast will be sufficient, so modify development accordingly, by timing your development as needed in order to accommodate your contrast needs. This is not rocket science. (And make certain that your film exposure is adequate. I have often found that 400 speed color film is not really faster than 200 with the C-41 process.)
For the Kodak Super 400 junk film I obtained spectacularly similar results. First I had to determine its speed (through clip testing). I found that the box speed of 400 had to be corrected downward to an amazing EI 8 which represents a more than five stop increase in exposure. Obviously, this mandates calling this film a tripod film, in that handholding for exposures becomes difficult in all but robust daylight. So what? It works!
I exposed at EI 8, and found that development should be about twice as long as for fresh film in order to get the proper image I wanted. So, I developed for TWELVE minutes, then used stop bath, then fixed for a good, long time: (about twice as long as for fresh film). In order to be able to cut the film precisely into 4- or 5-frame segments for the reduction process you will have to look at this old film up closely through a magnifying glass (with a light bulb in back of the negative) in order to be able to see the weak, low contrast images boundaries through the heavy, black base fog. Reducing this mess of apparent futility requires considerably more reduction time than for fresh film (and do not even think about being able to dilute the reducer as you could get away with doing when fresh film was used). However, you WILL be rewarded! After maybe five minutes of full-strength reduction (frequent agitation please) you will again see the miracle manifest: The brilliant orange mask will punch you in the face and that dastardly weak image will come to life with a vigor that will amaze you. Again, make certain that agitation is sufficient and even.
You might have to modify my timings somewhat (both development and reduction) in order to get the final image you desire. But developer dilution should always be able to remain one part Dektol STOCK plus nine parts water. (Of course, other B&W print developers can also be employed: use the relative dilution that I recommend, one that is about three times weaker than for processing B&W prints.)
If you do not get sufficient shadow detail, you either underexposed, underdeveloped, or you let the reduction last too long. NOTA BENE: To re-iterate: one of the pitfalls that cannot be stressed enough is this: if you reduce ALMOST enough, you will get a dirty negative which might not be readily apparent until you print. This dirt will manifest in terms of ugly, excessive grain. And do learn to examine negative images up closely with a magnifying glass against a light neutral background (like a white, blank piece of copy paper), or, if the film is especially dark, a light bulb.
Of course there is a learning curve here, but your knowledge of the B&W processing model will provide the foundation for this endeavor. Being able to resurrect that old color film (which has become useless) is only one aspect of this procedures value. Indeed, as I said from the onset, being able to buy fresh color film at a lower price than what traditional B&W is usually sold for just might come in handy, cost-wise. I recommend that you do not waste full rolls in order to etch your procedure in stone. Use clip testing here: far less than half a roll of film should be sufficient to determine proper exposure and processing times if you test only a frame, or a few frames, at a time. Write down data for repeatability! Use small trays or cups when feasible in order to economize on chemicals. (I use those tiny, disposable pudding or fruit salad cups that come in packages of six.) If fresh, film speed should usually match its box speed. With questionable age-fogged films, do clip tests first. You are going to have to learn that a roll of film does NOT have to have all frames exposed before you are permitted to remove that roll from the camera. And re-loading partial rolls in complete darkness will save you from wasting the few frames of unneeded leader. (I use masking tape to marry the film end to the take-up spool.)
Is there a drawback? A bit
Tonally, color negative film is largely unsurpassed, especially for daylight exposure. You will not need a yellow (or red) filter in order to capture cloud detail. However, I do find color negative films to be somewhat less sharp than traditional B&W films. My prints were scanned with a cheap Canon bridge camera, so do not use these images as a definitive evaluation for resolution.
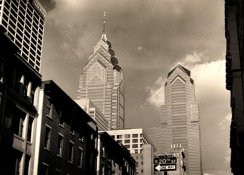
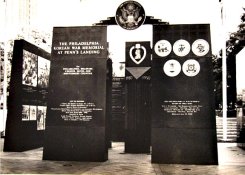
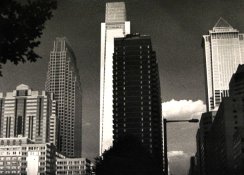
There are six photos here besides the negatives. Four are on the Fuji film: Liberty Place, Independence Hall, Korean War Memorial, and City Tavern. The Kodak negatives are: window flowers and Comcast Center.
Do this, be patient, be consistent and precise, and the emerging image will hit you in the face! - David Lyga
For this demonstration, I used two 35mm films: Fuji Super G+ (ISO 100) and Kodak Super 400. The Fuji expired in 1998 but is fresh. I had purchased a lot of it from Freestyle about a dozen years ago when they were selling 100 foot bulk rolls for about $10 each. I have since stored it in my freezer and, as evidenced by recently processing some of it via C-41, this brilliant film still shows no base fog and retains its full box speed of ISO 100. So, my Fuji is fresh film.
The Kodak Super 400 has an interesting history. About ten years ago a local Rite Aid was cleaning out its cabinets in preparation for digital. They dumped quite a bit of photo stuff on the sidewalk for the trash collectors to get. Walking by, I noticed that there were a few six-roll boxes of Kodak Super 400 film in the pile so I grabbed them. When home, I noticed that they were old 12 exposure rolls and tried exposing, then processing one in C-41 chemicals for twice the normal development time. Although I had given about five extra stops of exposure, the image that I got was extremely weak and, although shadow detail was not lacking, the whole film was an ugly black, or near black, mess. Only by holding the processed strip up to a light bulb and looking through it closely with a magnifying glass could I discern a weak image. Normal people would throw out such nonsense and go from there. But, David is not normal; he is frugal and obsessive. Truly, folks, there is not a better example of a worse age-fogged film that I could have chosen for this demonstration. Now, how to get this done.
Well, lets go back to the Fuji first. All you need do is expose the film as if you are shooting color (in this case, at EI 100) and then process in diluted B&W PRINT developer. For B&W, I use ambient temperatures for both film and print development (usually about 80F or 27C). Your process probably runs closer to 75F, so you might have to slightly increase my development times accordingly. For color negative film I dilute Dektol STOCK print developer 1+9. I have tried using FILM developer with greatly extended development times but cannot attain the needed contrast. Perhaps the high pH inherent in print developers is required in order to give C-41 film emulsions the needed kick-start.
So, using my diluted print developer at 80F, I find that processing fresh color negative film for SIX minutes with frequent agitation works fine. After the six minutes, I put the film into stop bath for about 15 seconds, then into film-strength fixer for the normal time. After this, the negative will appear to be rather dark, overall, but still clearly showing (low contrast) images. Base fog will appear quite high and frustrating, (enough to make you want to give up!). But now the true fun begins as you place the film into a modified Farmers Reducer.
The reducer used is made as follows: one part film-strength (fresh) fixer + one part bleach. Bleach (lasts forever) is made as follows: one gram of potassium ferricyanide in water to make each 50ml of bleach. Or, you can mix 20 grams to make one liter. (The convenient thing about potassium ferricyanide is that its mass is equivalent to its volumetric displacement, i.e., one gram = 1ml of volume. Thus, no scale is needed.) When mixed together, this reducer will last for only about 15 minutes, so do not mix the fixer with the bleach until you are ready to use the small amount needed for each short film segment (which I will next explain).
To be able to judge accurately how much to reduce the images I first cut the fully fixed (and rinsed) roll of film into short 4- or 5-frame segments. Then I mix only enough reducer to do one such film segment at a time in a small, flat-bottom, rectangular dish (that ideally conforms to the length and width of that segment strip). Keep the reducer volume very shallow and either use your moving fingers to keep the film immersed and agitated, or see-saw the film in a small cup of reducer. This prevents waste of reducer and provides a more accurate way of being able to judge when to stop. After reduction, wash. As you learn to determine the parameters of this reduction process you might not wish to burden yourself with cutting the film into the short lengths after fixation and, instead, keep the whole roll intact. I, however, like to retain the ability to scrutinize the process more carefully. (NOTE: Potassium ferricyanide is poisonous, but not unduly so. If you use your fingers, also use prudence and common-sense.) But, how much time for reduction?
When the fresh film is placed into the reducer nothing happens at first, but be careful when it starts. Agitate frequently to maintain uniformity. After maybe a minute or two, you will notice that the base of the film is getting more purely orange and that, miraculously, the image is slowly gaining both density and contrast. This BASE reduction is a to completion process, exclusive of the orange mask. The IMAGE reduction is not a process to completion (as it is within the C-41 BLIX process), thus, you must be careful, even, and consistent with the reduction of this B&W image lest you erase shadow detail and end up thinking that the films speed is less than you had originally thought that it was. At first you might go too far with reduction, or you might not go far enough. Inspect each negative up closely with a magnifying glass. The time to stop reducing is when you first attain a bright and clear orange mask, one with absolutely no remaining base fog. (Almost is not good enough here, as the film would remain dirty and grainy.) As soon as the base density is removed full shadow detail has yet to be compromised within the image. Stop reduction at this point, as further reduction would begin to attack the shadows of the image and you would end up incorrectly thinking that the film speed was lower that it really is. For ease and better predictability, you could dilute this reducer with an equal amount of water (for fresh film only), so that the reduction time will be extended, thus more manageable.
When finished, you should have a VERY clean negative; one that has somewhat more contrast than a normal B&W negative does. This extra contrast is needed if (and ONLY if) you are using VC paper to print. The orange mask seems to act as a low contrast filter and that extra contrast in the negative will bring the final print contrast back up to normal. You are going to have to experiment with my guidelines, as they pertain to MY work and MY workplace environment. If you use graded paper, normal negative contrast will be sufficient, so modify development accordingly, by timing your development as needed in order to accommodate your contrast needs. This is not rocket science. (And make certain that your film exposure is adequate. I have often found that 400 speed color film is not really faster than 200 with the C-41 process.)
For the Kodak Super 400 junk film I obtained spectacularly similar results. First I had to determine its speed (through clip testing). I found that the box speed of 400 had to be corrected downward to an amazing EI 8 which represents a more than five stop increase in exposure. Obviously, this mandates calling this film a tripod film, in that handholding for exposures becomes difficult in all but robust daylight. So what? It works!
I exposed at EI 8, and found that development should be about twice as long as for fresh film in order to get the proper image I wanted. So, I developed for TWELVE minutes, then used stop bath, then fixed for a good, long time: (about twice as long as for fresh film). In order to be able to cut the film precisely into 4- or 5-frame segments for the reduction process you will have to look at this old film up closely through a magnifying glass (with a light bulb in back of the negative) in order to be able to see the weak, low contrast images boundaries through the heavy, black base fog. Reducing this mess of apparent futility requires considerably more reduction time than for fresh film (and do not even think about being able to dilute the reducer as you could get away with doing when fresh film was used). However, you WILL be rewarded! After maybe five minutes of full-strength reduction (frequent agitation please) you will again see the miracle manifest: The brilliant orange mask will punch you in the face and that dastardly weak image will come to life with a vigor that will amaze you. Again, make certain that agitation is sufficient and even.
You might have to modify my timings somewhat (both development and reduction) in order to get the final image you desire. But developer dilution should always be able to remain one part Dektol STOCK plus nine parts water. (Of course, other B&W print developers can also be employed: use the relative dilution that I recommend, one that is about three times weaker than for processing B&W prints.)
If you do not get sufficient shadow detail, you either underexposed, underdeveloped, or you let the reduction last too long. NOTA BENE: To re-iterate: one of the pitfalls that cannot be stressed enough is this: if you reduce ALMOST enough, you will get a dirty negative which might not be readily apparent until you print. This dirt will manifest in terms of ugly, excessive grain. And do learn to examine negative images up closely with a magnifying glass against a light neutral background (like a white, blank piece of copy paper), or, if the film is especially dark, a light bulb.
Of course there is a learning curve here, but your knowledge of the B&W processing model will provide the foundation for this endeavor. Being able to resurrect that old color film (which has become useless) is only one aspect of this procedures value. Indeed, as I said from the onset, being able to buy fresh color film at a lower price than what traditional B&W is usually sold for just might come in handy, cost-wise. I recommend that you do not waste full rolls in order to etch your procedure in stone. Use clip testing here: far less than half a roll of film should be sufficient to determine proper exposure and processing times if you test only a frame, or a few frames, at a time. Write down data for repeatability! Use small trays or cups when feasible in order to economize on chemicals. (I use those tiny, disposable pudding or fruit salad cups that come in packages of six.) If fresh, film speed should usually match its box speed. With questionable age-fogged films, do clip tests first. You are going to have to learn that a roll of film does NOT have to have all frames exposed before you are permitted to remove that roll from the camera. And re-loading partial rolls in complete darkness will save you from wasting the few frames of unneeded leader. (I use masking tape to marry the film end to the take-up spool.)
Is there a drawback? A bit
Tonally, color negative film is largely unsurpassed, especially for daylight exposure. You will not need a yellow (or red) filter in order to capture cloud detail. However, I do find color negative films to be somewhat less sharp than traditional B&W films. My prints were scanned with a cheap Canon bridge camera, so do not use these images as a definitive evaluation for resolution.
There are six photos here besides the negatives. Four are on the Fuji film: Liberty Place, Independence Hall, Korean War Memorial, and City Tavern. The Kodak negatives are: window flowers and Comcast Center.
Do this, be patient, be consistent and precise, and the emerging image will hit you in the face! - David Lyga
Attachments
-
 Fuji and Kodak negatives.JPG533.2 KB · Views: 241
 -
 Liberty Place.JPG102.8 KB · Views: 254
 -
 Korean War Memorial (Penns Landing).JPG112.8 KB · Views: 226
 -
 City Tavern.JPG91.4 KB · Views: 232
 -
 Comcast Center (in rear).JPG98.8 KB · Views: 216
 -
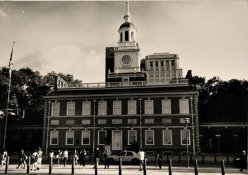 Independence Hall.JPG102.8 KB · Views: 240
 -
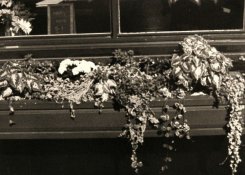 Window Flowers.JPG97.5 KB · Views: 228
Last edited by a moderator:

