• Welcome to Photrio!
    Registration is fast and free. Join today to unlock search, see fewer ads, and access all forum features.
    Click here to sign up

How I coat paper

Somewhere...

D
Somewhere...

  • 5
  • 2
  • 104
Iriana

H
Iriana

  • 7
  • 1
  • 169

Recent Classifieds

Forum statistics

Threads
202,750
Messages
2,845,073
Members
101,504
Latest member
Saturnuria
Recent bookmarks
0

Photo Engineer

Subscriber
Allowing Ads
Joined
Apr 19, 2005
Messages
29,017
Location
Rochester, NY
Format
Multi Format
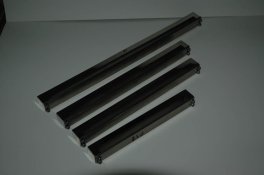
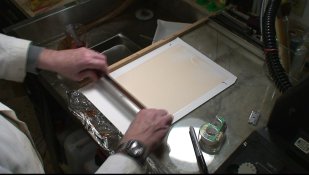
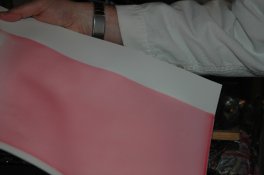
Here is an example of how I coat paper sheets. The example is using Strathmore Smooth paper on an 11x14 sheet to achieve an 8x10 usable size.

The emulsion used actually is a dye made to simulate an AgBrI emulsion that is orthochromatic. This is just approximate, but how it would look coated at the levels used for film, not paper.

I did this so that you can see the coating on the paper.

They are, in sequence, tempering the emulsion and coating blade, charging the blade with emulsion as it rests on the paper, and inspecting the finished sheet for defects.

I have a set on film coataing and plate coating coming soon.

PE
 

Attachments

  • Tempering the emulsion and blade.jpg
    Tempering the emulsion and blade.jpg
    177.3 KB · Views: 440
  • Injecting emulsion into the coating blade.jpg
    Injecting emulsion into the coating blade.jpg
    160.8 KB · Views: 442
  • Inspecting a sheet of paper for defects.jpg
    Inspecting a sheet of paper for defects.jpg
    127.2 KB · Views: 423
How thick can the emulsion layer be, using that coating blade? I am very interested in coating my own plates.
 
I use 5 mil (0.005 inches) gap for paper and up to 7 mil for film. The film is generally coated thicker. The blade allows coatings of up to 20 or 40 mil which is very thick and can be used for carbon tissue.

At 5 mil, you are coating roughly 12 ml per square foot.

PE
 
The coated thickness has nothing to do with the dry thickness when you think about it.

If you coated water alone (if possible) and dried it down, there would be zero thickess if there was nothing in it regardless of the coated thickness. And so, we do not know what their coating thickness was, just the dry thickness.

PE
 
Oh right, I see. I did not know it was the dried thickness, I assumed it was the wet thickness. Makes more sense now.

Thanks for the reply PE.

Phill
 
I have found in my coatings that 15% gelatin in water results in the dry thickness of about 15% of the wet thickness after drying :D
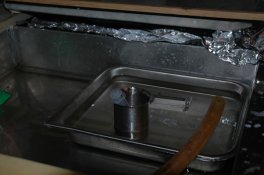
. This is very approximate but should give you a general idea what happens in drying...

I have used 300 um (12 mil) gap when I have coated my film coatings but it certainly IS a bit thick, and can take 5 minutes to clear in fixer.

I think I've always been too high in gelatin compared to silver, because of dilution in washing and addition of gelatin afterwards. Maybe a bit too high coating temperature, too, leading to need for more gelatin.
 
Ron , where would one find the coating blade you are putting the liquid into??
 
I have them made to my specification. They can be purchased from the Photographers Formulary. I am making no profit on these as opposed to several comments here to the contrary.

They serve several purposes in coating paper:

1. Heavy weight to reduce lift and chatter in order to give a smooth coating.

2. High heat retention to keep the melted gelatin melted! This reduces the problems with varying coating plate temperatures.

3. Stainless Steel (308 or 316) to prevent contamination and corrosion.

The doctor blade (as it is properly called) was used in the trough coater shown here on APUG in one of the videos. It was used to even out coating nonuniformity. Another design is used for film, and yet another for plates. These latter two are not currently available.

PE
 
Thanks Ron and Holmburgers

So Ron If I wanted one of these suckers to coat 30 inches wide would Photographers Formulary build one and do you think I would have to mortgage my lab to do so.
Looks like a very very useful device. pretty expensive at the 8x10 size , $1000. bucks
Actually not kidding about the larger size, I would be interested in 30 inch and 20 inch.
or am I out of my mind?
 
Bob;

What do you want to coat? Film or paper?? As width goes up, paper coating by this method becomes more difficult. At a given width, about 16" or wider, it is easier to move the paper than the blade. With film, that is not a real problem as you see from Jim Browning's web site. So, to date, the widest that I coat is 16" for 16x20 paper and I only have one of those blades. It would cost nearly $2000 but I have not costed it out so don't count on that price. You see, when you cut stainless bar stock, it warps and bends which means that the material has to be straightened and then polished to get the 0.001" tolerance that I need. This just about doubles the price as length goes up.

Also, the 16" blade weighs about 1.4 kilos, so a 36" blade would probably weigh in at about 2.8 kg. Have fun with that! Wow.

And, a 4" blade is not 1/2 the cost of an 8" blade. The cost goes up in a non-linear fashion.

So, with this method, unless you automate it somehow, you are out of your mind! :D

Sorry

PE
 
Hi Ron
I would be coating paper that is mounted to aluminum, and I could vacumn the mount so it would not move as you draw the blade over.. I don't think I would ever go over 30 inch but given that the paper would not move, and I actually am crazy commited, and I think your application kicks ass , do you still think it is possible for a couple of units to be made. There are more people in my group who would use this so we may be able to pull it off.

regards
Bob
Bob;

What do you want to coat? Film or paper?? As width goes up, paper coating by this method becomes more difficult. At a given width, about 16" or wider, it is easier to move the paper than the blade. With film, that is not a real problem as you see from Jim Browning's web site. So, to date, the widest that I coat is 16" for 16x20 paper and I only have one of those blades. It would cost nearly $2000 but I have not costed it out so don't count on that price. You see, when you cut stainless bar stock, it warps and bends which means that the material has to be straightened and then polished to get the 0.001" tolerance that I need. This just about doubles the price as length goes up.

Also, the 16" blade weighs about 1.4 kilos, so a 36" blade would probably weigh in at about 2.8 kg. Have fun with that! Wow.

And, a 4" blade is not 1/2 the cost of an 8" blade. The cost goes up in a non-linear fashion.

So, with this method, unless you automate it somehow, you are out of your mind! :D

Sorry

PE
 
Bob;

There is more to it than just what I said.

The current 16" blade will contain about 50 ml of emulsion to coat a 16x20 area or about 12 ml / ft square plus waste at top and bottom and selvedge.

Now, the problems are these.

1. At 16" you need to pull evenly over 2 feet of length for a 16x20 + waste. This is hard but not impossible. And, the well must be filled to cover that surface area.

2. At 32", the amount of liquid would be 100 ml, but might need a larger than 2.5 cm (1") well to contain enough liquid.

3. The design at this time is for 5 mil on paper so to get more laydown the well must be larger.

4. At 32" the draw is nearly 4 feet long. It is hard enough to draw steadily for 2 feet and at 4 feet the waste would go way up!

This is why Kodak and others automated the doctor blade method above 8". You draw the paper under a stationary blade and over a roller to keep it tightly held, or you use a well with tension. Also, fastening down paper as you describe does not allow the paper to expand. It does by quite a bit when wet and therefore, as size goes up, the tension must be relieved. At the 16" size, I cannot tape the paper down fully, just tack it at the edges and as it begins to swell, I release the taped edges quickly or it will buckle. This does NOT happen with film.

The largest paper I have coated is 30x40 using Jim Browning's machine. Film was no problem, but paper caused some problems which had to be worked out. We finally made a succession of 30x40 sheets on paper at Jim's. I have one here as a souvenier.

PE
 
Thanks Ron

I will look at Jim Brownings site , this is interesting to me to say the least.

Bob
Bob;

There is more to it than just what I said.

The current 16" blade will contain about 50 ml of emulsion to coat a 16x20 area or about 12 ml / ft square plus waste at top and bottom and selvedge.

Now, the problems are these.

1. At 16" you need to pull evenly over 2 feet of length for a 16x20 + waste. This is hard but not impossible. And, the well must be filled to cover that surface area.

2. At 32", the amount of liquid would be 100 ml, but might need a larger than 2.5 cm (1") well to contain enough liquid.

3. The design at this time is for 5 mil on paper so to get more laydown the well must be larger.

4. At 32" the draw is nearly 4 feet long. It is hard enough to draw steadily for 2 feet and at 4 feet the waste would go way up!

This is why Kodak and others automated the doctor blade method above 8". You draw the paper under a stationary blade and over a roller to keep it tightly held, or you use a well with tension. Also, fastening down paper as you describe does not allow the paper to expand. It does by quite a bit when wet and therefore, as size goes up, the tension must be relieved. At the 16" size, I cannot tape the paper down fully, just tack it at the edges and as it begins to swell, I release the taped edges quickly or it will buckle. This does NOT happen with film.

The largest paper I have coated is 30x40 using Jim Browning's machine. Film was no problem, but paper caused some problems which had to be worked out. We finally made a succession of 30x40 sheets on paper at Jim's. I have one here as a souvenier.

PE
 
You best bet would be to buy my travelling slot coater from Bud at the Formulary. Not sure, but I think that he doesn't use it. It has a 32" blade, made from 2 pieces of tool steel, so it is adjustable. Just the blades cost over $ 2000, as they had to be precision ground from annealed tool steel. The twist on the blades is low enough that it can hold to about 10% slot width at 10 mils, and that is with a 100:1 length to gap ratio! Not easy to do at all. The coater comes with a large aluminum jig plate with vacuum channels which is flat to 1 mil over the whole surface. Also comes with a nice HEPA filter drier which dries 10 sheets 30x40". I usually coated 8 sheets at a time.

Regards - Jim Browning
 
The equipment at the Formulary was installed and tested, but the potential for a market and the cost effectiveness of this method for this market was YTBD the last I was involved. Making glass plates is quite feasible, but they must be made as one sheet and then cut after drying which creates glass dust unless one has specialized equipment. The same is true for large sheets of paper, as described above in a previous post. Film coating is straightforward. Training is quite intensive and output is slow.

So, AFAIK, the use of this is still under consideration, considering costs, labor and training in the current market.

It would not hurt to contact Bud to see what his current thinking is.

PE
 
Historically, how were large plates/papers/films coated? As in, 100 years ago or more where such "surgical" precision would've been difficult to obtain. Or is it unfair to assume that they couldn't have reached similar tolerances?
 
Well, 100 years ago, plates were once coated by hand in rooms of individual coaters in dark red safelight and heavy lab smocks. Then they began coating with a cascade coater with sheets of glass passing under on a felt plate. A special cutter then cut the huge sheets into individual glass plates. Many coaters were similar to that of Jim Browning.

Film was not an early contender, but when it was, it was coated using a trough coater as shown here on APUG in a video. Paper was coated the same way. Later coaters added a doctor blade or air knife to reduce ripples and irregularities.

Drying of plates was difficult, but drying of film and paper was rather simple given enough room. The coated material was hung in festoons from the ceiling of the coating room and allowed to dry. However, each loop in the festoon introduced a "kink" or coating defect which limited the longest length of good coating to just a little less than the distance from floor to ceiling.

Accuracy and precision were pretty good, all things considered.

PE
 
For Bob Carnie

Bob;

Here are photos of several coating blades.

From left to right, 16", 12", 11" and 8". This is the width of usable coated area. The length is based on how well you can pull the blade at a constant rate. My max is about 22 - 24" for the 16" blade.

I've appended a photo of an 8" coating in progress showing the draw. This is a frame that I clipped from the DVD, so you will see raster lines. Sorry. The point of this photo is to show the draw and show the waste at the top. There is also selvege along both sides due to surface tension, and there is a defect at the end when you reach the limit of the coating plate.

PE
 

Attachments

  • mixed blades.jpg
    mixed blades.jpg
    54.3 KB · Views: 196
  • Coating in progress.jpg
    Coating in progress.jpg
    158.1 KB · Views: 188
Thanks Ron I appreciate you posting this.
Where can I see the Dvd?
regards
Bob
Bob;

Here are photos of several coating blades.

From left to right, 16", 12", 11" and 8". This is the width of usable coated area. The length is based on how well you can pull the blade at a constant rate. My max is about 22 - 24" for the 16" blade.

I've appended a photo of an 8" coating in progress showing the draw. This is a frame that I clipped from the DVD, so you will see raster lines. Sorry. The point of this photo is to show the draw and show the waste at the top. There is also selvege along both sides due to surface tension, and there is a defect at the end when you reach the limit of the coating plate.

PE
 
Bob;

It is not out yet. I plan to issue it with the book. I have many copies here, but none for sale yet.

PE
 
Photrio.com contains affiliate links to products. We may receive a commission for purchases made through these links.
To read our full affiliate disclosure statement please click Here.

PHOTRIO PARTNERS EQUALLY FUNDING OUR COMMUNITY:


Ilford ADOX Freestyle Photographic Stearman Press Weldon Color Lab Blue Moon Camera & Machine
Top Bottom