Horizontal scratches in negatives that seem to defy explanation/remediation

Rebel

A
Rebel

  • 0
  • 0
  • 0
Watch That First Step

A
Watch That First Step

  • 0
  • 0
  • 0
Barn Curves

A
Barn Curves

  • 0
  • 0
  • 0
img421.jpg

H
img421.jpg

  • Tel
  • Apr 26, 2025
  • 1
  • 1
  • 30

Forum statistics

Threads
197,483
Messages
2,759,782
Members
99,514
Latest member
cukon
Recent bookmarks
0

RobertW

Member
Joined
Jun 2, 2020
Messages
3
Location
NE Ohio
Format
35mm
Hello everyone,

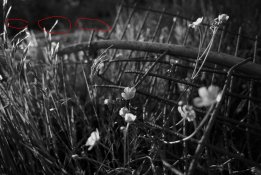
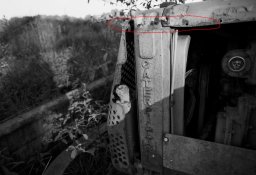
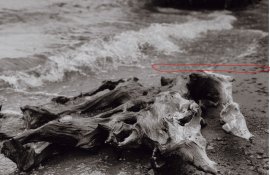
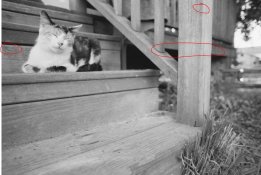
After a 20-year hiatus and growing disenchantment with digital photography, I'm trying to return to film and home developing/printing. I've been experiencing an amazing assortment of problems with film development, but I am most dismayed by the horizontal lines (almost certainly scratches) that appear in my negatives (see examples). I'm developing in a Paterson-style tank and am extremely precise with all steps of the workflow. Lately I've been using distilled water through the entire process, such that my hard well water never contacts the negatives. I handle the negatives very carefully and have tried drying them vertically and horizontally in different locations. I've searched for every forum thread I can find on this topic and none has led me to a solution. Here's what I know:
  1. Camera-caused scratching seems like the most likely explanation, but I have observed these lines with three different cameras (all Nikon). I attempted to clean two of the cameras, without obvious improvement.
  2. This seems to happen with every film type that I've used (PanF Plus, Delta 400, Delta 100), but maybe the problem is more severe with PanF Plus.
  3. It's not a scanner issue: I can see the lines when I inspect the negatives with a loupe. When looking at the negatives, I can make the lines change from light to dark by moving the negatives around. I think that this demonstrates conclusively that they are scratches rather than normal photographic artifacts caused by a light leak or some such.
  4. The lines are always horizontal (i.e., in the direction of film movement through the camera). However, they are variable with regard to exact position and length. They don't affect every frame. Some are more noticeable than others.
Any suggestions, ideas, or analysis that you can offer would be greatly appreciated. Film seemed so much easier when I was a teenager, but that's probably because I was a teenager and wasn't paying attention to details.

Thanks,
Robert
 

Attachments

  • example1_cropped.JPG
    example1_cropped.JPG
    42.8 KB · Views: 493
  • example2_fullframe.JPG
    example2_fullframe.JPG
    149.9 KB · Views: 922
  • example3_cropped.JPG
    example3_cropped.JPG
    29.6 KB · Views: 538
  • example4_fullframe.JPG
    example4_fullframe.JPG
    131.1 KB · Views: 442
  • example5_fullframe.JPG
    example5_fullframe.JPG
    160.5 KB · Views: 401
  • example6_fullframe.JPG
    example6_fullframe.JPG
    140.9 KB · Views: 523

cramej

Member
Joined
Dec 29, 2009
Messages
1,235
Format
Multi Format
Do you squeegee or sponge your negs?
 

glbeas

Member
Joined
Sep 25, 2002
Messages
3,913
Location
Marietta, Ga. USA
Format
Multi Format
Tell us your process steps including what the equipment is. From your comments you must be using factory load, not bulk loaded cassettes so thats rule out. Are you using a film guide to load the reels?
 
OP
OP

RobertW

Member
Joined
Jun 2, 2020
Messages
3
Location
NE Ohio
Format
35mm
Sorry, I should have mentioned that I do not squeegee or sponge the negatives. I try to avoid touching the image portion of the negatives in any way.

Correct, I am not using bulk-loaded cassettes. I don't know what a film guide is and presumably I am not using one. I load the plastic reels either by popping open the cassette or feeding the strip out of the intact cassette; both methods result in apparent scratches. When I use the intact-cassette method, which I find more convenient, I pull the film gently and slowly, and I'm careful to prevent any debris from coming into contact with the velvet feed slot. I'm using Ilford chemistry: DD-X, then water, then stop, then rapid fixer, then Ilford-style rinsing with distiller water. I either use or skip Photo-Flo depending on whether it appears to be solving or causing problems. For agitation, I have tried both inversion and rotating the agitator thing. I'm careful about temperature consistency.
 

Donald Qualls

Subscriber
Joined
Jan 19, 2005
Messages
12,073
Location
North Carolina
Format
Multi Format
Scratches that are perfectly parallel with the film's length, as you suggest, are almost certain to be in-camera in source. If they're intermittent, they're probably due to grit of some sort -- but grit can travel. Commercially loaded cassettes eliminate one of the biggest sources, but you could have something inside the camera that's not actually attached to the camera -- say a grain of sand (or smaller grit than that) that gets between the pressure plate and the film (base side scratches print white, because they scatter light and cast a shadow; emulsion side scratches are more prone to print black, because they cut through the image layer).

Random grit seems the likeliest explanation, to me. Going over the film chamber of the camera with a computer vacuum is the preferred way to try to solve this.
 

MattKing

Moderator
Moderator
Joined
Apr 24, 2005
Messages
51,945
Location
Delta, BC Canada
Format
Medium Format
Welcome to Photrio.
As the scratches are lighter in the positive print, they are almost certainly on the substrate back of the negatives, not on the emulsion front.
The pressure plate in your cameras is the first place to look, but anywhere else that might contact the back of the film should be looked at.
Are you using negative sleeves? Can you check the negatives before they are cut into strips and sleeved?
 

ic-racer

Member
Joined
Feb 25, 2007
Messages
16,484
Location
USA
Format
Multi Format
I'd start the inquisition by processing some film that was never in a camera.
 

laingsoft

Member
Joined
Apr 30, 2020
Messages
188
Location
Edmonton
Format
35mm
I'm going to throw my bets in the "dirt on the camera's pressure plate" pile. They all look like they're in rougly the same area. Maybe some debris or something got behind the film when you loaded it.
 

Bormental

Member
Joined
Mar 1, 2020
Messages
622
Location
USA
Format
Multi Format
Some random thoughts.
  • Camera pressure plate seems to be the most likely explanation, yet seeing the same result from three (!) different cameras makes it hard to believe. Maybe all three were stored in similar conditions for a long time and some microscopic debris got inside?
  • Similarly, you're saying these shots are from different rolls of different film stock. Again, is it possible that all these cartridges were stored in similar conditions and debris got under their light-trapping felt?
I would buy 4 cheap rolls of film (I saw someone selling 12-frame rolls, ultrafine?), load them into 3 different cameras and expose without opening the lens cap, then develop. Seems like the scratches are most visible over darker parts of the image. Develop the 4th roll unexposed.
 
OP
OP

RobertW

Member
Joined
Jun 2, 2020
Messages
3
Location
NE Ohio
Format
35mm
Thanks very much for the input, everyone. To answer Matt's question, I always scan the negatives before I put them in plastic sleeves. I suspect that negatives turn into dust magnets after they are extracted from a plastic sleeve. However, I haven't attempted to inspect the negatives before they are cut into strips. It's much easier to see the scratches in the scans, and I can't scan the negatives until they are cut. Regarding Bormental's comments, the cameras came from different sources, and all of the film has been purchased recently and was moved directly from the unopened box to the camera.

Per ic-racer's suggestion, last night I processed a roll of film that went straight from an unopened box to the processing reel. The horizontal lines seemed less common and prominent, but I wouldn't say that they were absent. At this point my feeling is that I'm dealing with two different problems: grit in the camera(s) and suboptimal handling of the film. In some cases I'm seeing scratches caused by grit, and in other cases I'm seeing scratches or some sort of crease caused by handling, and without careful inspection I don't naturally distinguish one type from the other. This would help to explain why I have observed some sort of horizontal artifact in film from three different cameras.

At this point, my plan is to thoroughly clean all three cameras, shoot a roll of film in each, develop them all while trying to be as gentle as possible, and then carefully compare the results from the different cameras.
 

Bormental

Member
Joined
Mar 1, 2020
Messages
622
Location
USA
Format
Multi Format
At this point, my plan is to thoroughly clean all three cameras, shoot a roll of film in each, develop them all while trying to be as gentle as possible, and then carefully compare the results from the different cameras.

Keep us posted, please! I feel there's a lesson to be learned here. Thank you.
 

David A. Goldfarb

Moderator
Moderator
Joined
Sep 7, 2002
Messages
19,981
Location
Honolulu, HI
Format
Large Format
I would definitely open the film cassette and load rather than feeding the film through the light trap. Be sure the working area where you load the film is clean and that your hands are clean or if you wear surgical gloves that they are powderless. You shouldn’t be getting scratches from Paterson reels, but maybe try stainless to see if there’s a difference.
 

MattKing

Moderator
Moderator
Joined
Apr 24, 2005
Messages
51,945
Location
Delta, BC Canada
Format
Medium Format
Do you wear jewelry or a watch while you load your reels?
 

Donald Qualls

Subscriber
Joined
Jan 19, 2005
Messages
12,073
Location
North Carolina
Format
Multi Format
What kind of bulk loader are you using? Since the scratches are not in the same place and there are different cameras involved I'd say your cassettes are dirty, or you have one of those "felt" light trap bulk loaders.

OP said, "I am not using bulk-loaded cassettes."
 

Mr Bill

Member
Joined
Aug 22, 2006
Messages
1,436
Format
Multi Format
At this point, my plan is to thoroughly clean all three cameras, shoot a roll of film in each, develop them all while trying to be as gentle as possible, and then carefully compare the results from the different cameras.

If you stop 4 or 5 frames from the end you'll have a section of film that's never been through the camera (or even the cassette light trap, for that matter). So if you find a consistent scratch that goes nearly to the unexposed end, then stops suddenly, you'll know it's most likely from the camera. Plus you can tell pretty nearly where in the camera it happened (just line up the last frame in the film gate).

Something else you can try is to inspect unprocessed film. Perhaps advance several frames through a camera, then open the back and remove the film (put a reference mark on it to indicate exactly where in the camera it was). Inspect the film carefully with a loupe. A hard light, like a bare filament, is good for this sort of thing. Examine the film at different angles to the light. If it's actually scratched you should be able to see it like this. I say "actually scratched" became you can also get "pressure marks" without actual scratching; if the film is being squeezed hard at some point this generally causes a "pressure sensitization" mark seen after processing.

Ps, I don't know if you like to play with your rewind knob, cinching up the film, etc. This can possibly put tiny scratches on the film. (All roll-up type films have some sort of matting material to allow "slip" when being wound up.) If this is a little out of spec you can get "cinch mark" scratches. So try to minimize any "snugging up" of the film until you nail down the source of scratching.
 
Photrio.com contains affiliate links to products. We may receive a commission for purchases made through these links.
To read our full affiliate disclosure statement please click Here.

PHOTRIO PARTNERS EQUALLY FUNDING OUR COMMUNITY:


Ilford ADOX Freestyle Photographic Stearman Press Weldon Color Lab Blue Moon Camera & Machine
Top Bottom