• Welcome to Photrio!
    Registration is fast and free. Join today to unlock search, see fewer ads, and access all forum features.
    Click here to sign up

Help - I need manual for Durst M305

Recent Classifieds

Forum statistics

Threads
201,238
Messages
2,820,980
Members
100,607
Latest member
nirmi
Recent bookmarks
0

Denis P.

Member
Allowing Ads
Joined
May 20, 2004
Messages
470
Location
Croatia
Format
Multi Format
Hi,

I wonder if anyone has a PDF manual for Durst M305 color enlarger...

It seems like Durst charges 22 EUR for the privilege of having the manual in PDF sent by e-mail :sad:

I got the enlarger recently, but no manual. It's not really that complicated, but a manual would be nice to have, anyway...

I can offer a manual for Meopta Magnifax 3 in return (I can scan it and prepare a PDF....) - but I think it can be found on Meopta's site, anyway....

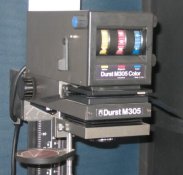
My enlarger is shown in the photo (I understand there's another version of M305, which has an extra lever and some kind of ND filter....)

Thanks in advance,

Denis
 

Attachments

  • Durst_M305.JPG
    Durst_M305.JPG
    31 KB · Views: 319

Jerevan

Member
Allowing Ads
Joined
Nov 19, 2004
Messages
2,258
Location
Germany/Sweden
Format
Large Format
Hello Denis,

I have a manual, unfortunately it's in swedish and I don't have a scanner handy, either... My Durst looks exactly like yours. Is there something you want to know about it - maybe I can help you out?

BTW, the "extra lever" is the one on the left side on your photo. It's used to temporarily reset the filter changes you do with the three knobs - when you push the lever you get white, unfiltered light, which is basically grade 2 if you work with variable contrast papers. The "ND filter" you refer to is probably the red filter you have underneath the lens, which is used to shield the paper from being exposed.
 
OP
OP
Denis P.

Denis P.

Member
Allowing Ads
Joined
May 20, 2004
Messages
470
Location
Croatia
Format
Multi Format
Jerevan said:
Hello Denis,

I have a manual, unfortunately it's in swedish and I don't have a scanner handy, either... My Durst looks exactly like yours. Is there something you want to know about it - maybe I can help you out?

BTW, the "extra lever" is the one on the left side on your photo. It's used to temporarily reset the filter changes you do with the three knobs - when you push the lever you get white, unfiltered light, which is basically grade 2 if you work with variable contrast papers. The "ND filter" you refer to is probably the red filter you have underneath the lens, which is used to shield the paper from being exposed.


Jerevan,

No, there's a model M305 which is different than ours - see here:

Dead Link Removed

it has an extra ND filter built-in, and also a white LED on front panel...

It's probably a different colour head...

Anyway, I tried mine with some Efke Varycon paper last night, and my exposures seemed rather short: 5-7 seconds at f8! (with the head racked up almost all the way to the top, giving about 20x30 cm print size...)
So I wanted to know if it's possible to use filtration to reduce the light output to make exposure a bit longer, without affecting the contrast too much...

I found some info already regarding this, but would still like to have some illustrations of the component parts, dismantling, bulb changing, etc...

Regards,

Denis
 

Jerevan

Member
Allowing Ads
Joined
Nov 19, 2004
Messages
2,258
Location
Germany/Sweden
Format
Large Format
I looked at the linked thread - as you say, the one pictured there is a different version. But the button on the front is used for extra filtration, when you need more contrast. (the "ND filter") That extra filtration knob is at the back of the enlarger head in our version. The white LED is the same thing as the lever on the left side.

The 5-7 second time for f8 sounds very short. Are you using the right halogen bulb? It should be 12v, 100w, no more. Are you sure you actually stop down to working aperture after doing the focus check (happened a few times for me)? The lever on the left should be in the "in" position to get filtration. Check for any light leaking out of the enlarger head or bellows, just to make sure that's okay. Either way, you probably have too much light coming out, which makes for very short times. Try stopping down further, to f11 or f16. You could of course use a separate ND filter, but I don't think that's a good idea.

I'll see if I can do anything about the pictures in the manual. Otherwise I can always walk you through changing bulbs, etc... Or I can send a few digital snaps to show you.
 
OP
OP
Denis P.

Denis P.

Member
Allowing Ads
Joined
May 20, 2004
Messages
470
Location
Croatia
Format
Multi Format
Jerevan said:
I looked at the linked thread - as you say, the one pictured there is a different version. But the button on the front is used for extra filtration, when you need more contrast. (the "ND filter") That extra filtration knob is at the back of the enlarger head in our version. The white LED is the same thing as the lever on the left side.

I'll see if I can do anything about the pictures in the manual. Otherwise I can always walk you through changing bulbs, etc... Or I can send a few digital snaps to show you.

Thanks for your help.

I managed to locate a button on the back of the head - it's red, and is not easily accessible. Is it used for extra filtration, ot is that a fuse?
What are the chrome knobs/screws on the underside of the head? Are those used for alignment? (There are two on the sides, and one in the center - at an angle of about 45 degrees...)

I can provide more photos, if necessary...

Thanks,

Denis
 

Jerevan

Member
Allowing Ads
Joined
Nov 19, 2004
Messages
2,258
Location
Germany/Sweden
Format
Large Format
Denis,
it's always nice to be of some help - I've gotten a lot of help here myself!

The red button at the back of the enlarger head is used for extra filtration. The fuse is in the transformer, the big heavy thing between the enlarger and the wall plug.

The two bigger knobs on the underside of the head is for getting off the enlarger head itself. Just unscrew them to loosen the head, lift it upwards to go free of the screws and turn it upside down and there you can see the halogen bulb.

The bulb is taken out by bending a bit on the metal lips and slowly lifting it upwards at the same time. Don't put any fingers on the bulb itself - that will ruin the bulb. I use cotton gloves when I change it. Probably overkill, but better safe than sorry. Detach the cable from the bulb, and now you know how to replace the halogen light - just do it in reverse! :smile:

The smaller screw in the center is for restitution, which means that you can correct a tilting horizon to be straight, or a tall house to not "fall over" in a photograph. I've never done this, so I can't be more of help regarding that. Experiment. Or do a search here in the APUG archives.

Let me know if you sort out the problem with the short exposure times.

Regards,
J
 
OP
OP
Denis P.

Denis P.

Member
Allowing Ads
Joined
May 20, 2004
Messages
470
Location
Croatia
Format
Multi Format
Thanks for the info, Jerevan - much appreciated!

Anyway, I guess it covers the most important stuff :smile:

Regards,

Denis
 

endroll

Member
Allowing Ads
Joined
Jan 27, 2012
Messages
1
Format
35mm
Durst m305 manual in English

If anyone needs a Durst m305 manual in english please let me know. I have scanned mine but I cannot post the link here as am too new to the forums.

regards...
 
Photrio.com contains affiliate links to products. We may receive a commission for purchases made through these links.
To read our full affiliate disclosure statement please click Here.

PHOTRIO PARTNERS EQUALLY FUNDING OUR COMMUNITY:


Ilford ADOX Freestyle Photographic Stearman Press Weldon Color Lab Blue Moon Camera & Machine
Top Bottom