Well, I tried to develop the roll normally, but I think it was too long. My negatives were pretty thick. I used Dilution E for HC110 at 7:15. I will probably shave 45 seconds off of the development next time - please let me know what you use. I have not edited these at all - even the dust is still there.
First, here is the cliche pier shot - long exposure then normal exposure. The long exposure was at around 1:30, I think. I did lose a some shadow detail (the morning sun was hitting that side of the pier pretty strongly), but I actually don't mind the look:


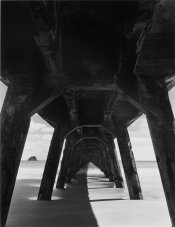
Next, I have a shot under the pier. I have lost all shadow information on the long exposure on this one. It was longer, at about three minutes, so the reciprocity adjustment would have been much more. I wanted to be one post closer, but I didn't have anything with me to keep the tripod from sinking as the waves hit:


Hopefully I won't make this mistake again. I doubt I'll even bother with long exposure on Tri-X because of the insane adjustments. Even for the normal exposures, I think I prefer Ilford. But the Tri-X does have a very classic look to it, somehow. Especially the very last picture. Very different from what I am accustomed to.
Thank you again to everyone for the advice. I thought you might like to see the comparisons.
First, here is the cliche pier shot - long exposure then normal exposure. The long exposure was at around 1:30, I think. I did lose a some shadow detail (the morning sun was hitting that side of the pier pretty strongly), but I actually don't mind the look:
Next, I have a shot under the pier. I have lost all shadow information on the long exposure on this one. It was longer, at about three minutes, so the reciprocity adjustment would have been much more. I wanted to be one post closer, but I didn't have anything with me to keep the tripod from sinking as the waves hit:
Hopefully I won't make this mistake again. I doubt I'll even bother with long exposure on Tri-X because of the insane adjustments. Even for the normal exposures, I think I prefer Ilford. But the Tri-X does have a very classic look to it, somehow. Especially the very last picture. Very different from what I am accustomed to.
Thank you again to everyone for the advice. I thought you might like to see the comparisons.