Help for newbie with burning

Rouse st

A
Rouse st

  • 4
  • 3
  • 46
Do-Over Decor

A
Do-Over Decor

  • 1
  • 1
  • 83
Oak

A
Oak

  • 1
  • 0
  • 68
High st

A
High st

  • 10
  • 0
  • 98

Recent Classifieds

Forum statistics

Threads
199,231
Messages
2,788,240
Members
99,837
Latest member
Agelaius
Recent bookmarks
0

drgoose

Member
Joined
Feb 4, 2014
Messages
115
Location
Florida
Format
4x5 Format
ImageUploadedByTapatalk1412713934.645851.jpg
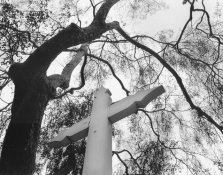
Hello everyone, I have a stupid question. I am pretty new at enlarging and I am still confused about some of the mechanics. The picture above on one side is a straight print with what I thought was the best exposure for the statue and on the second I tried to burn the background significantly.mmI took my test strip print and cut out the silhouette do the statue, espoused my basic exposure and then did another exposure while holding the cut out slightly above the paper and slightly shaking the cutout while the enlarger was on. my question is if this is the correct way of burning the area and how do you avoid the halo that I ended up with.

Second question is if you know of a book that explains this basic technics.m I just got a book on printing technic he's filled with really cool prints and printing diagrams but no illustrations of how to actually hold your hands to dodge etc, etc. the duck bill and duck's ass reference were not very helpful.

thanks in advance.

Joaquin Barbara
 
Joined
Jan 16, 2010
Messages
1,685
Location
Atlanta, GA
Format
Medium Format
Doing the silhouette thing does work but after about 2/3 stop of burning, you will start to see a halo. You obviously gained some exposure on the statue as well so maybe try adding some cardboard to the cutout.

You could start with a half stop of burning just the edges. Take a card, cut a sawtooth pattern in one side, and use that to burn. Then try the cut out.

Or, learn lighting and get it all right in camera. Then the negs print themselves. :cool:
 

jimjm

Subscriber
Joined
May 2, 2007
Messages
1,228
Location
San Diego CA
Format
Multi Format
Joaquin -

In this case, what you're actually doing is called dodging, since you're using the cutout to hold back light from reaching part of the image. As Parker noted, try using an opaque material like cardboard as it appears some additional light did spill thru to darken the statue. Don't let the shadow of the cutout go outside the edge of the statue - that's why you ended up with such a severe halo effect

There are tons of good books out there on darkroom printing technique - I could recommend Ansel Adams' "The Print", David Vestal's books, or Bruce Barnbaum's "The Art of Photography".

It does take practice, but you'll get better with time and develop your own technique. I also use a sawtooth pattern along the edges of many of the masks I cut out. I hold it a few inches or more above the easel, slowly moving during the exposure. Here's one image where I dodged the cross. It was much darker in the straight print and I wanted it to stand out more.
 

Attachments

  • 1933007447_1f78276d79_o.jpg
    1933007447_1f78276d79_o.jpg
    121.3 KB · Views: 188

pentaxuser

Member
Joined
May 9, 2005
Messages
20,022
Location
Daventry, No
Format
35mm
What jimjm said and get Tim Rudman's book The Photographer's Master Printing Course. One of the best, if not the best books on printing I have come across.

To dodge and burn competently, be prepared to use a lot of time and paper.

pentaxuser
 

Truzi

Member
Joined
Mar 18, 2012
Messages
2,656
Format
Multi Format
I'd never tried dodging that amount myself, so all I can offer is a joke:
In that picture an halo may be appropriate, lol.

It sounds like the silhouette you cut out was near the size of the image. I'd think making it smaller may help. You could see the area better while you worked, and it would be easier to keep the mask within the boundaries of the statue.
 

jimjm

Subscriber
Joined
May 2, 2007
Messages
1,228
Location
San Diego CA
Format
Multi Format
I'd never tried dodging that amount myself, so all I can offer is a joke:
In that picture an halo may be appropriate, lol.

It sounds like the silhouette you cut out was near the size of the image. I'd think making it smaller may help. You could see the area better while you worked, and it would be easier to keep the mask within the boundaries of the statue.

Yep - like Truzi mentioned, the cutout needs to be smaller than the corresponding area on your print. The smaller the cutout, the higher above the easel you can hold it, thus allowing you to watch the shadow it casts on your paper. Also, the edge of the shadow will be more diffuse and allow you to blend in your dodging/burning easier.
 
OP
OP

drgoose

Member
Joined
Feb 4, 2014
Messages
115
Location
Florida
Format
4x5 Format
thanks to everyone. I will keep trying. Just got my hands on 400 sheets of Ilford MG very cheap!! so right now paper is abundant [emoji2]


Sent from my iPhone using Tapatalk
 

bernard_L

Member
Joined
Feb 17, 2008
Messages
2,056
Format
Multi Format
+1 on what Parker Smith said. The paper you used for holding back the statue must have been partly translucent: in the second image, the statue is darker and lower contrast. I buy at an arts & crafts store some medium weight paper that is black on one side (to block the light) and white on the other (to see the projected image and help me position the cutout). Also, a sheet of photo paper, exposed to light, and developed, can be used for cutouts.
 

jimjm

Subscriber
Joined
May 2, 2007
Messages
1,228
Location
San Diego CA
Format
Multi Format
I'm one of those of the "it is what it is" school. In 50 years I can count on one hand the number of times I've done burning/dodging. I just don't do it. Make the best negative you can skill yourself to, and print straight. All this manipulation and paper waste may make for "the perfect print", but it's not repeatable. There's a lot more to be said for consistent quality, that one "perfect" print,which was more chance that ability. And whatever print that you end up with is what it is. If you're not happy, then it stands to reason you should be versed in how to make masking negatives. Just my take. I don't like haphazard technique. But I measure my success in how empty the trash can is at the end of the darkroom session. A full trash can and a perfect print to show for it is wasteful. Waste not, want not.

I agree it's important to start with the best negative possible, but I can very easily repeat the results of any burning, dodging or other modifications I make when I'm printing. I keep a worksheet of all burning/dodging done, times, filtration used, paper type, developer and chemical temps. If an image is important enough to waste more than a few sheets of paper I keep track of all the steps it took to get there. Nothing haphazard about it at all. I measure my success on whether I get a final print that I am proud of. If I have to use up some paper to get there, that's the cost of my hobby that I am more than happy to sacrifice. At the same time, I have many straight prints that were perfect (to me). If no manipulation is needed, I don't do it.

Each darkroom print is an individual piece of your art. No two are exactly perfectly alike, but you can get pretty darn close if you develop a routine process and keep notes. If you want perfect duplicates of a print, then go digital and use an inkjet printer instead. Dull, monotonous, repeatable perfect prints every time!

The important thing is to use the techniques you want to achieve the final print that you are happy with. If you're just starting out, focus on getting consistent quality in your prints and the basics of print exposure and filtration. The only rule is.. there are no rules (but no digital stuff - this is APUG after all!) This is your art and you should feel free to dodge, burn, bleach or tone to your heart's content. Have fun - learning new darkroom skills is part of the craft of analog photography. I've only been doing this for 40 years, but I'm learning new things in the darkroom all the time.
 

Xmas

Member
Joined
Sep 4, 2006
Messages
6,398
Location
UK
Format
35mm RF
First of all if you are learning use smaller paper until expert... saves $. It makes things more difficult sometimes but that is good training.
Don't try difficult negatives until you are en expert!
Get a metronome app for your smart phone, or steal real metro from music room of household.
Make up sets of cardboard holes.
Make up sets of cardboard shapes on piano wire holders.
If you need a cut template out print it half or 1/4 size and hold it high so you can see.
Read up two exposure i.e. split grace (VC) printing.

But expose more carefully in camera for shadows you need silver in shadows (or dye with XP2+) forget about pushing, over expose and under develop...
Develop to print scene on grade 2 filter settings.

I need to take several test prints step exposures even with a enlarging meter.

I also scan and gilee print encapsulate in plastic and write over the plastic all the exposure information from rescanning for relative density.

This saves me a few test prints i.e. a lot of time.

But the easiest printing I did was on cibachrome becaise the Kodachromes were all perfectly exposed...

Note all this failed when I showed a giilee proof to a lady photoj and said 'I need to burn in the shadows for silverprint', no she said 'the emphasis on subject is correct'!

Printing is an art form please be patient with yourself...
 

baachitraka

Member
Joined
Apr 6, 2011
Messages
3,568
Location
Bremen, Germany.
Format
Multi Format
I rather like the first print more and so I take it and edge burn a bit.

I don't think the Statue will stand out if background is dark, but you have done a great job by printing the negative.
 
Joined
Sep 10, 2002
Messages
3,596
Location
Eugene, Oregon
Format
4x5 Format
One thing not emphasized enough above is blending the edges when dodging or burning. I like dodging tools with sawtooth edges and I hold them high so there is a large penumbra (half-shadow where a bit of enlarger light gets through) and move them up and down when dodging to create a smooth transition from the dodged to the undodged area.

Still, it really helps to recognize conflicts between your visualization of the photograph and the actual reflectances in the scene before you expose the negative. This is what the Zone System is all about and will help you to decide how to expose/filter/develop the negative or maybe not to take the shot at all (or at least be prepared for a tough time in the darkroom...).

Dodging, burning, bleaching, etc. are all good tools, but usually using any of them to an extreme results in obvious manipulations and distracts from the expressiveness of the print. Sometimes it's better to accept the picture for what it is... If you don't like it, then move on to something else. Life is much to short to waste time on really impossible negatives, especially when there are so many great photos waiting to be made!

Best,

Doremus
 

Jim Jones

Subscriber
Joined
Jan 16, 2006
Messages
3,740
Location
Chillicothe MO
Format
Multi Format
I agree with Doremus. Burning and dodging are as much a part of photography as editing is a part of writing. Even beautiful women often feel the need for makeup. So it is with photography. An enlarging meter or experience can usually enable one to make a fairly well exposed work print. Based on the dry work print, one can fine tune the exposure and do moderate dodging and burning to optimize the image. With enough experience, one might not need the work print, and can anticipate the need for some dodging and burning.
 
Joined
Oct 29, 2006
Messages
4,829
Location
İstanbul
Format
35mm
Dont forget to pray to Hindu God Namankiri who whispered every night at the dreams of Indian Math Genius Ramanujan :smile:
 

baachitraka

Member
Joined
Apr 6, 2011
Messages
3,568
Location
Bremen, Germany.
Format
Multi Format
"Goddess Namagiri"
 

naeroscatu

Subscriber
Joined
Oct 15, 2004
Messages
1,031
Location
Newmarket On
Format
Multi Format
Dont forget to pray to Hindu God Namankiri who whispered every night at the dreams of Indian Math Genius Ramanujan
Last Sat I made prints in my darkroom; Alice Cooper was playing in the background... I wonder what's gonna happen with my prints, turn black?:munch:
 

Maris

Member
Joined
Jan 17, 2006
Messages
1,576
Location
Noosa, Australia
Format
Multi Format
Dont forget to pray to Hindu God Namankiri who whispered every night at the dreams of Indian Math Genius Ramanujan :smile:

The outside of my darkroom door bears a large image of Saraswati the Hindu goddess of creativity. This perhaps to warn me that the work on the other side of the door has rewards. Or, failing that, consequences.
 
Photrio.com contains affiliate links to products. We may receive a commission for purchases made through these links.
To read our full affiliate disclosure statement please click Here.

PHOTRIO PARTNERS EQUALLY FUNDING OUR COMMUNITY:


Ilford ADOX Freestyle Photographic Stearman Press Weldon Color Lab Blue Moon Camera & Machine
Top Bottom