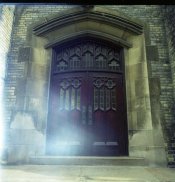
Hasselblad Light Leak

Couples

A
Couples

  • 0
  • 0
  • 21
Exhibition Card

A
Exhibition Card

  • 2
  • 0
  • 58
Flying Lady

A
Flying Lady

  • 5
  • 1
  • 84
Wren

D
Wren

  • 1
  • 0
  • 50

Recent Classifieds

Forum statistics

Threads
199,038
Messages
2,785,144
Members
99,787
Latest member
jesudel
Recent bookmarks
0

Shelley-Ann

Member
Joined
May 27, 2008
Messages
102
Location
Brampton Ont
Format
Multi Format
Hello.

I purchased a Hasselblad 500 CM off Ebay. I`ve noticed that I get what looks like white streaks of various sizes in my photos. At first I thought it was flare, but the photos I took today seems to indicate a light leak.

I`ve attached one below.

I`ve done a bit of research on the web to see what is causing it, but there seems to be different reasons (loading the film incorrectly, damaged back, etc). I`m hoping it is not the lens (50mm F4 C Chrome). I`m wondering if someone here could shed some light on this for me. Thanks.
 

Attachments

  • Iight leak colour467.jpg
    Iight leak colour467.jpg
    148.8 KB · Views: 196

CGW

Member
Joined
Apr 19, 2010
Messages
2,896
Format
Medium Format
I'm guessing light leak. You might consider contacting David Yau, a competent repair guy with considerable Hasselblad experience:

Dead Link Removed
 

Mark Fisher

Member
Joined
Dec 13, 2003
Messages
1,691
Location
Chicago
Format
Medium Format
I would think the likely culprit would be the light seal on the back. It is pretty easy to replace yourself from the kit listed on ebay. I have 2 backs and both needed light seal replacements when I got them.
 

fschifano

Member
Joined
May 12, 2003
Messages
3,196
Location
Valley Strea
Format
Multi Format
I agree. The light seals in the magazines need replacing every now and then. Simply Google "Hasselblad Light Seal repair" and you'll find plenty of information about how it's done and where to get the parts.
 

wibing

Member
Joined
Jun 7, 2010
Messages
5
Format
Multi Format
I have had that exact leak before and for me it was caused by the light seal not being installed correctly. If the seals stick out by even a bit, the back will be slightly warped and lifts a corner which becomes this triangular light leak when you take a photo. Just got to replace or fix the light seals... :smile:
 
OP
OP

Shelley-Ann

Member
Joined
May 27, 2008
Messages
102
Location
Brampton Ont
Format
Multi Format
Thanks, everyone! I`ll try to find that kit on the bay, and if all else fails, David Yau will be getting a call from me!
 

chioque

Member
Joined
Feb 16, 2009
Messages
203
Location
Kuala Lumpur
Format
Multi Format
Previously I also had similar problem, look (there was a url link here which no longer exists). I then bought a light seal from ebay and installed it myself which was rather easy. And the problem was gone. Have a look on ebay, they are quite common and rather inexpensive. Or you can certainly do it yourself using some foam material.
 
Last edited by a moderator:
Joined
Sep 1, 2008
Messages
145
Location
Toronto, Can
Format
Medium Format
The nice thing is that David will also do a complete CLA and ensure that the gap between images is even, great guy.
 

Q.G.

Member
Joined
Jul 23, 2007
Messages
5,535
Location
Netherlands
Format
Medium Format
It pays to learn how to do it yourself.

Changing seals is something you need to do in regular intervals.
You could have a repair person check the back every time a seal is replaced, but that is both not necessary and far too expensive.

You will notice when a back needs seeing to. As long as there is no problem, having a repair person check it serves very little (none at all, i'd say) purpose.
Provided that the back is in good shape to begin with. Else you might want to have it serviced (have the only part that really wears - though slowly- replaced: a nylon stop. Once replaced, good for many decades of use) and then you do not have to have it looked at until you begin to notice something might not be quite right.

So find a good supply of seals (i make my own from a very cheaply available, but perfectly good foam), remember that you only need to change the mylar foil part if it is damaged, and just do it yourself.
It's easy enough, and doesn't take long.
 

JDP

Member
Joined
Feb 15, 2009
Messages
76
Location
Bedfordshire
Format
Medium Format
When you guys talk about a light seal, do you mean where you insert the dark slide? That is where I had a light leak on my A12 back. Fixed it with a bit of foam and a piece of black (over exposed!) film (unscrew the 'front' of the back).
 
Joined
Sep 1, 2008
Messages
145
Location
Toronto, Can
Format
Medium Format
Hey Shelley-Ann!

I have a few extra light traps I bought on eBay last year. I'd gladly give a couple to you.

PM me if you'd like them, I'm in the Annex.

Marek
 

Sirius Glass

Subscriber
Joined
Jan 18, 2007
Messages
50,391
Location
Southern California
Format
Multi Format
Light leak. The light enters from the left and shines on the right, but since the image is inverted the leak appears on the left of the negative/slide. Follow what QC said. There are two light trap replacement videos on Hasselblad Historical if I remember correctly. If you cannot find them, PM me and I will send you the links tonight.

Steve
 

TSSPro

Member
Joined
Feb 15, 2010
Messages
376
Location
Colorado
Format
Multi Format
Never torn apart a hassy before, but I know the light baffles for the dark slide can come out or become damaged. Hope that you get it remedied.

All the best.
 

Sirius Glass

Subscriber
Joined
Jan 18, 2007
Messages
50,391
Location
Southern California
Format
Multi Format
Light leak. The light enters from the left and shines on the right, but since the image is inverted the leak appears on the left of the negative/slide. Follow what QC said. There are two light trap replacement videos on Hasselblad Historical if I remember correctly. If you cannot find them, PM me and I will send you the links tonight.

Steve

http://www.hasselbladhistorical.eu/HT/HTSeal.aspx

and at no additional cost:
http://www.youtube.com/watch?v=op6hDyMmkqA
http://www.dmin-dmax.fr/photoe2b.htm
http://photoweb.net/pw_tech/hassy_unjam.html
http://www.youtube.com/watch?v=CkKcbyh2CrA :smile:

Enjoy!
 

Q.G.

Member
Joined
Jul 23, 2007
Messages
5,535
Location
Netherlands
Format
Medium Format
Shelley-Ann,

Keep a record of when you replace the seal.
That will help you decide when it will be time for a next fresh seal, without having a failed seal ruining photos alert you that that time has come and gone already.

Depending on your readiness to gamble, you will have to change seals every year or so. Once a year is perhaps overly cautious, but also very safe. Once every two years is already beginning to push it.

The foam ages and deteriorates all by itself, independent of use. But keeping it compressed by keeping the dark slide inserted will help speed it up a bit (or if it does not actually speed it up, it will help press the stuff into a permanent, flat state you need to have light leak in.)
So store empty magazines with the dark slide out.

I cut my own foams from a black closed cell foam sold in sheets in hobby/craft stores (it is sold here under the German name for the stuff: "Moosgummi". That would translate to a generic "foam rubber". I don't know what the particular stuff would be called in English.) Extremely cheap, but also extremely suited for the job. Being dirt cheap, and quick and easy to do, i change seals probably far too often.
I'm sure you can find the same, or similarly suited, black foam in crafts/hobby shops everywhere on the world. See if you can find any, and then start changing seals far too often too.
:wink:

The original foam bits have a 'metalized' piece of plastic stuck to it, to give it a curve along its length. That curve makes a thin piece of foam fill a thicker gap, and provides some 'springiness' to allow room for the slide without compressing the foam too much (part of the pressure is taken up by flattening this plastic blade spring, instead of compressing the foam.)
Any replacement foam will not have that spring backing and needs to be thick enough to fill the gap by itself. Which is not a problem; you can get foam in many 'thicknesses'. The foam will then be more compressed when the dark slide is in, compared to the original. And there will be a bit more resistance when you insert the dark slide. But apart from perhaps ageing a bit quicker (no problem: just change seals more often), i can't see any disadvantage in that.

As i said before, you only need to change the foam. The foil that is folded over the foam only needs replacing when it is torn. So reuse it until it does show signs of imminent failure. (The foil serves to protect the foam against the sharp edge of the dark slide. Nothing more.)
I haven't found a suitable (and cheap) replacement for that foil material yet. I forgot who it was, but on page 1 of this thread someone mentioned using a bit of film cut to size.

Oh, and to give you an idea about the savings: i'm not sure what original seals go for now, but assume it's in the $10 - $20 range.
One A4 sheet of that Moosgummi costs about $2, and is good for an awfully large amount of foam pads.
 

pentaxpete

Member
Joined
Sep 23, 2010
Messages
635
Location
Brentwood, England
Format
Multi Format
Yes: I had the same problem with an E-Bay A24 and an A16 back ! I had to get help from a fellow camera Club member who is retired Professional with a 'workshop' and we put some oil on the 8 screw heads, then he gave me some black foam, and I took it all home and loosened the 8 screws (put them into a developing dish in case I sneezed and lost them !) then cut out a new foam seal with a razor blade and made a new plastic bit from a bit of 120 film and it all WORKED and out in the bright Sunshine (yes, UK had some SUN the other week !) there were no more leaks on a test bit of film .
http://www.flickr.com/photos/25850987@N03/4920742868/in/set-72157624790754324/
 

Q.G.

Member
Joined
Jul 23, 2007
Messages
5,535
Location
Netherlands
Format
Medium Format
Just a note, so that Shelley-Anne doesn't think it's difficult to do:

There usually is no need to put oil on the screws.
I never encountered a back that had them so tight that you would need anything but a screwdriver to get them out.

(There are nine of them, by the way. :wink:)
 

PVia

Member
Joined
Oct 3, 2006
Messages
1,057
Location
Pasadena, CA
Format
Multi Format
I'm glad that replacing seals DIY worked for all of you but it didn't for me, so it was off to David Odess (who is an incredible repair technician in his work and in customer service). I needed the nylon stop/gear/thingie replaced as well as the light seal, plus he tuned the body as well (the whole brake assembly fiasco, see his site for more details)...camera is now an awesome piece of manual photography goodness.
 
Photrio.com contains affiliate links to products. We may receive a commission for purchases made through these links.
To read our full affiliate disclosure statement please click Here.

PHOTRIO PARTNERS EQUALLY FUNDING OUR COMMUNITY:


Ilford ADOX Freestyle Photographic Stearman Press Weldon Color Lab Blue Moon Camera & Machine
Top Bottom