Has anybody got a successful calotype negatave?

3 Columns

A
3 Columns

  • 5
  • 6
  • 94
Couples

A
Couples

  • 4
  • 0
  • 83
Exhibition Card

A
Exhibition Card

  • 6
  • 4
  • 122
Flying Lady

A
Flying Lady

  • 6
  • 2
  • 135

Recent Classifieds

Forum statistics

Threads
199,050
Messages
2,785,402
Members
99,791
Latest member
nsoll
Recent bookmarks
0
OP
OP

Fulvio

Member
Joined
Jan 15, 2005
Messages
216
Location
Italy
Format
Multi Format
Success!

it was indeed the paper...
I got a block of 120 crob' art sheets for 10 euros... With one sheet I can make six 4x5" negs :smile: that makes a supply for over 700 calotypes :D

It worked very easy this time. I used the Greenlaw variant, as the elemental iodine is useful to tell when the sheet is correctly sensitized.

I'm attaching the scan of my very first calotype, including its digital inversion (desaturated). It was middle afternoon and there wasn't much available light. Yes, it's a bathroom, but that's the place with most light I could use in that moment... :rolleyes: Now imagine if Talbot first photo pictured his bathroom instead of a window....

The exposure took 10 minutes at f8 with a 4x5" camera and a 90mm lens. The negative was dry when exposed and sensitized with 12% silver nitrate solution (1 drop of acetic acid was added each 5 drops of silver nitrate).

Development required 5-10 minutes with gallic acid and small quantity of silver nitrate (every 30 drops of gallic acid: 2 drops of silver nitrate, 1 drop of acetic acid).

Probably that scene called for 30' exposure if not more.
 
Last edited by a moderator:
OP
OP

Fulvio

Member
Joined
Jan 15, 2005
Messages
216
Location
Italy
Format
Multi Format
this is totally different thing...

Since the sunlight was over, I decided to move the camera in front of the computer and re-photograph an old image of mine... I just picked a random one

Same kind of negative, exposure was 30' minutes, F8 with a 210mm lens.

Development was quite longer, say 10-15'...

This paper is really weak, doesn't tear apart in water, but it's difficult not to get traces and marks over it...
 
Last edited by a moderator:

Jerevan

Member
Joined
Nov 19, 2004
Messages
2,258
Location
Germany/Sweden
Format
Large Format
Good to know that it worked out in the end, Fulvio! The second one of the photos looks promising.
 
OP
OP

Fulvio

Member
Joined
Jan 15, 2005
Messages
216
Location
Italy
Format
Multi Format
thanks Jerevan... that was actually a test, there's a long road ahead

In fact, the new difficulty is now how to print such nice negatives.

I tried salt printing and also a gelatin-chloride emulsion (sorta of self made POP). I can't post the scans because the "prints" are still wet.

There isn't much to see anyway... The image won't print, at least under my usual UV lights. It is like the whole negative is shielding UV rays: there are black borders, in the sensitized areas outside the negative, but no image in the middle, under the negative.

I thought it wasn't translucent enough, so I've immersed it in plain olive oil. After blotting, washing and drying the paper, I tried another exposure... The calotype now looks much more transparent and has definitively a better "negative look". But still, even after 1 hour exposure I haven't got a positive print. Salt prints and POP paper usually are ready in 5-10 minutes.

Tomorrow is sunday and I will try using sunlight instead of artificial lighting. Maybe is the wavelength of my lamps.

The negative highlights are yellowish in color; even though they look like transparent, perhaps the calotype wasn't cleared enough...
 
OP
OP

Fulvio

Member
Joined
Jan 15, 2005
Messages
216
Location
Italy
Format
Multi Format
here's a sample of one of the prints

this one was exposed for 30', whereas an ordinary negative would take only 5' to produce a positive print (it's a salt print)

I have made other attempts up to 60' exposure with the same results.

The tiny dark spots on the negative area appeared only after I oiled the negative (obviously the negative has been blotted, rinsed and dried before exposure by contact).

The long streak in the middle and a tear in the bottom of the negative area were already there right after negative development (my mistake, the paper is very fragile).

Tomorrow I will try an exposure with sunlight.

My UV unit features 8*60w philips large tubes placed at about 30-40cm from the contact frame. Can't remember their precise wavelenght, but they have been doing pretty good with any process I've tried so far.
 
Last edited by a moderator:

TheFlyingCamera

Membership Council
Advertiser
Joined
May 24, 2005
Messages
11,546
Location
Washington DC
Format
Multi Format
here's a sample of one of the prints

this one was exposed for 30', whereas an ordinary negative takes only 5' to produce a positive print (it's a salt print)

I have made other attempts up to 60' exposure with the same results.

The tiny dark spots on the negative area appeared only after I oiled the negative (obviously the negative has been blotted, rinsed and dried before exposure by contact).

The long streak in the middle and a tear in the bottom of the negative area were already there right after negative development (my mistake, the paper is very fragile).

Tomorrow I will try an exposure with sunlight.

My UV unit features 8*60w philips large tubes placed at about 30-40cm from the contact frame. Can't remember their precise wavelenght, but they have been doing pretty good with any process I've tried so far.

First suggestion- move your printing frame closer to the tubes- try about 15 cm instead. That will get you a big gain in printing speed.
 
OP
OP

Fulvio

Member
Joined
Jan 15, 2005
Messages
216
Location
Italy
Format
Multi Format
First suggestion- move your printing frame closer to the tubes- try about 15 cm instead. That will get you a big gain in printing speed.

can't be done... maybe I should post a picture of my UV box; anyway it's designed so that the contact frame is on top, placed on a wooden frame "holder", while the lights are placed on the bottom facing the print. Reducing the distance between printing plane and lights would require so much work almost as building a brand new box :smile:

The UV tubes I use are larger than common ones, 60cm long but quite thick. They're 40w each, for a total of 8 = 320w. I was afraid that so much power could produce irregular banding on the print if this were placed too close to the lights. Also, designed this way, it's easier to open the frame and eventually have a look at the print while printing is in progress: I can turn off the machine, open a section of the contact frame and check the exposure, without turning the frame upside down. The frame is one from Bostick & Sullivan, very well machined.

I'd say this UV unit it's fine the way it is. It's the second one I built in my life. It delivers cyanotypes print in 15-25', salt prints in 3-8', gelatin-chloride prints in 5-15', van dykes in 5-10'. They're all acceptable printing speeds with either conventional or digital negatives.

Tomorrow I will try using sun (weather permitting...) and we will see if it's a matter of wavelenghts or unbelievable long printing time.
 
OP
OP

Fulvio

Member
Joined
Jan 15, 2005
Messages
216
Location
Italy
Format
Multi Format
ok... I left this morning the contact frame with the same calotype as yesterday under sunlight... We don't have much sunlight here today, but I can see that the border of the print outside the negative turned quite dark after 20-30min. The area under the negative is blank. The exposure lasted 1 hr 30 min so far. I rarely print with sunlight but the times I did, it never took so long... This thing shields uv light better than a rubylith masking film!

Perhaps the negative wasn't fixed/cleared enough and a potassium iodide layer is still there.
 
Last edited by a moderator:
OP
OP

Fulvio

Member
Joined
Jan 15, 2005
Messages
216
Location
Italy
Format
Multi Format
it finally printed, but after 3 hrs and half of exposure!! I think my longest exposure ever for a contact print (excluding some funny anthotype experiment)...

the print looks ok, a little too flat (the negative was underexposed anyway)

It could be a combination of wavelenght and UV masking issue.

I will try fixing for longer time my next calotypes. The potassium iodide stain might be the cause of such printing difficulties.
 

argent42

Member
Joined
Mar 28, 2005
Messages
6
Location
Ithaca, NY
Format
Large Format
<<...the new difficulty is now how to print such nice negatives.>>

Fulvio: I have been having similar problems with some of the more "far-out" versions that fill the pages of period manuals and Journals. Sometimes it is because a particular process described there simply doesn't work, or that it is theoretically possible but in reality it just does not work. I have boxes filled with attempts to get some of these to work. Or, it can be because of the sensitizing chemistry being a fraction of a percentage weak, and like other processes like Daguerreotype and Collodion, the picture will simply fail. (see Rev Charles Dodgson/Lewis Carroll's parody of The Song of Hiawatha, the hero being a wet-plate photographer like the author)

<<I thought it wasn't translucent enough, so I've immersed it in plain olive oil.>>

Waxing is the preferred method of making paper negatives translucent; you'll find that oils, etc., can and do affect the contrast of the image over time, and are messy to exasperation.


<<Tomorrow is sunday and I will try using sunlight instead of artificial lighting. Maybe is the wavelength of my lamps.>>

Sunlight is the preferred light; we call the process "salt printing" referring to its "wet-side" but in the old days it was called "Sun Printing," referring to the source of all photography's possibilities: the Sun. A UV box has to have Black Light bulbs for some of these sun-based processes, but, again: not all work as well.

<<The negative highlights are yellowish in color; even though they look like transparent, perhaps the calotype wasn't cleared enough...>>

A yellowish color indicates that you have not cleared out the KI from the paper. Use fresh 15% hypo for up to an hour (where temperature is a factor) to clear yellow highlights.
 
Last edited by a moderator:

Photo Engineer

Subscriber
Joined
Apr 19, 2005
Messages
29,018
Location
Rochester, NY
Format
Multi Format
Reading this thread, I wonder if conventional silver halide in gelatin might come to this pass in about 20 - 50 years, with no one able to make an emulsion or a coating.

PE
 

argent42

Member
Joined
Mar 28, 2005
Messages
6
Location
Ithaca, NY
Format
Large Format
Hello:
Probably not, as long as there are photographers and artists who are willing to hand over good currency for the product. In fact, in recent years, it appears that small companies in places like Hungary and the Ukraine with access to the old factories will continue making film and paper for an increasingly small but devoted clientele. When Kodak stopped making Azo last year, it was just such a small photographic materials manufacturer that stepped up to the plate, and satisfied the very high standards and demands of ultra-large format photographer Michael Smith. And who can forget the old Zone VI papers, made in France to Fred Picker's specifications?
The way commercial photography is going now, the rift between traditional, darkroom-based photography and digital imaging is pretty well complete, and we will continue to see time-honored products disappear under the corporations' profit-margin axe. However, to date, digital materials have not equalled the sharpness nor the tonal gradations of silver-based materials, and there will always be some who will insist on this level of quality despite the continued decline of the public taste. All that is needed to ensure the survival of gelatin-based film and paper is to continue to have traditional darkroom-based photography taught in the schools, for it is in this study that students can see for themselves the world of difference between the two media.

Christopher
 

Photo Engineer

Subscriber
Joined
Apr 19, 2005
Messages
29,018
Location
Rochester, NY
Format
Multi Format
I don't disagree as to the quality of analog photography.

That said, support of quality photo production is not easy and these old plants are not getting younger. Michael has already commented on the fact that the plant they use has problems with production in the summer and winter due to air conditioning problems.

So, the question remains, can these companies offer long term quality product production? IDK, and no one else can know until it happens.

As I see it, only Ilford, EK and Fuji produce top notch photo products, and all of the rest follow. The remaining products are good, but may not measure up to everyones. quality levels. IDK that either. Only the people using these products can tell us. Will Michael's efforts succeed? Again, only time will tell. Lets wait.

My comments were in the nature of a question.

PE
 
OP
OP

Fulvio

Member
Joined
Jan 15, 2005
Messages
216
Location
Italy
Format
Multi Format
Reading this thread, I wonder if conventional silver halide in gelatin might come to this pass in about 20 - 50 years, with no one able to make an emulsion or a coating.

PE

Oh well, I have a recipe for that and I made once my own bromide paper :D

Now I have found I way to make calotypes, they can also stop production of films and papers I wouldn't care ha!

As I see it in my eyes, it looks everything turning backwards, like photography in the good early days and with a difference that it won't spread that much as masses are busy with "something else".
 
OP
OP

Fulvio

Member
Joined
Jan 15, 2005
Messages
216
Location
Italy
Format
Multi Format
Small update...
(no images though, I didn't scan anything...)

The Greenlaw method so far has given best results. This kind of calotype is not as fast as the others, but you won't have as many bad surprises in the final image (spots, streaks, weird densities). Requires an exposure of 5-10' in sunlight and development ought to be carried out as soon as possible. It's also a good idea to use the negatives within 24-48hrs after silver nitrate sensitization. To improve transparency in a negative, waxing looks better than oiling. If a negative takes too long to print to a positive, that often means it wasn't cleared/fixed enough. To clear iodide stains in a negative, fixing bath temperature should be risen to above 24°C (say 30-32°C, I didn't want to go further to avoid damaging the paper).

I made some experiment to improve negative speed. The problem is that 5'-10' is way too long exposure for "ordinary" people. 15" to 1' would be much more acceptable; use of artificial lighting would be possible.

So far, adding an extra coating of silver nitrate after 1st sensitization produced little extra speed, but also spots and stains on the developed negative. On another experiment, I added a layer of silver nitrate before iodizing, although Greenlaw method doesn't prescribe it. The results were very odd. Conclusion: better not messing up with original, long time tested processes. Wet exposure appears to be the only way to increase speed, but the advantages of having a dry paper for use in the next 24-48hrs are obvious.
 
Last edited by a moderator:

argent42

Member
Joined
Mar 28, 2005
Messages
6
Location
Ithaca, NY
Format
Large Format
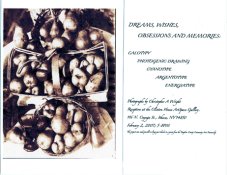
CALOTYPE EXHIBITION

Hello:
After several years of day-in/day-out, 24/7 work on making Calotypes, etc. (funding in part with a grant from the New York State Council on the Arts), I have mounted an exhibit at the ArtSpace Gallery in the historic Clinton House, 116 N Cayuga St., Ithaca, NY 14850. The show, "Dreams, Wishes, Obsessions, and Memories: Calotype, Photogenic Drawing, Cyanotype, Argentotype, Energiatype," will be up for the month of February. Also, during this month, I will offer a presentation on the making of Calotypes at The History Center of Tompkins County, E State St., Ithaca, NY. (Notice will be made when the date is decided.)

Examples of recent work in Calotype are published in an International Anthology of Alternative Processes:
http://www.alternativephotography.com/artists/christopher_wright.html

Also, please visit my website for examples from over 25 years' of large-format work: www.visionsinsilver.com

Christopher A Wright
 

Attachments

  • ShowPoster copy3.jpg
    ShowPoster copy3.jpg
    182.9 KB · Views: 236
OP
OP

Fulvio

Member
Joined
Jan 15, 2005
Messages
216
Location
Italy
Format
Multi Format
calotypes are negatives; the original photograph taken with this process is a negative, in fact the most ancient way of achieving a negative image in camera

you can make calotype positives by contact printing a calotype negative against another calotype sheet. However is preferable to contact print against something more suitable for a positive print (ex. salt paper, albumen paper, etc.)
 

argent42

Member
Joined
Mar 28, 2005
Messages
6
Location
Ithaca, NY
Format
Large Format
Calotypes are Negatives

Thank you both for your input.

Fulvio is absolutely correct: calotypes are properly negatives only. Earliest period positives were usually a salted paper process (like Talbot's original Photogenic Drawing), although the early years were also a time of very fruitful experimentation in positive print materials on paper (eg.: Herschel's iron and iron-silver processes) and glass (lantern slides come to mind).

Rippo, in answer to your question: Yes, showing the Calotypes as they are is an artistic statement as well as an accurate statement. In fact, some of the early Calotypists were encouraged to exhibit their negatives. Being visually trained in the appearance of engravings, these artists knew the value of "negative spaces," and strove to present visually interesting images in both positive and negative forms. However, by the time of the French dry-waxed paper ascendancy during the 1850's, the positive on paper reigned, the negative being of interest mostly to practitioners.

Christopher A Wright
www.visionsinsilver.com
www.alternativephotography.com/artists/christopher_wright.html
"To make a good photograph, one must be in love with the subject."
 

Peter Schrager

Subscriber
Joined
Jul 19, 2004
Messages
4,171
Location
fairfield co
Format
Large Format
try the Bienfang 360 paper...it should work but is difficult as to wet strength
Best, Peter
 

Peter Schrager

Subscriber
Joined
Jul 19, 2004
Messages
4,171
Location
fairfield co
Format
Large Format
I checked out your photo on flickr...ok I guess. Alan Greene is teaching this fall at the ICP in New York so you might want to go and do the workshop with him. We made callotypes with him but he had already prepared the paper and we made the exposures...none were as good as the negative I brought with me and then printed with salt...that's what I do now...we have the advantage of using film so I do
good luck with your quest; Peter
 

donbga

Member
Joined
Nov 7, 2003
Messages
3,053
Format
Large Format Pan
I will tell you that the image I got was not a great one, however there is a good image. The problem was in adding the different layers with the Buckle brush. I need to learn how to do that and make a nice even layer. Streaks appeared on the paper that were very bad because of my inconsistant application.

http://www.flickr.com/photos/rickl69/4873078766/

Why not use a glass rod (a.k.a. puddle pusher) instead of the buckle brush?
 
Photrio.com contains affiliate links to products. We may receive a commission for purchases made through these links.
To read our full affiliate disclosure statement please click Here.

PHOTRIO PARTNERS EQUALLY FUNDING OUR COMMUNITY:


Ilford ADOX Freestyle Photographic Stearman Press Weldon Color Lab Blue Moon Camera & Machine
Top Bottom