Graphex #3 Shutter Question

A window to art

D
A window to art

  • 0
  • 0
  • 25
Bushland Stairway

Bushland Stairway

  • 4
  • 1
  • 72
Rouse st

A
Rouse st

  • 6
  • 3
  • 110
Do-Over Decor

A
Do-Over Decor

  • 1
  • 1
  • 117

Recent Classifieds

Forum statistics

Threads
199,241
Messages
2,788,416
Members
99,840
Latest member
roshanm
Recent bookmarks
0

rjbuzzclick

Member
Joined
Jan 30, 2010
Messages
379
Location
Minneapolis
Format
Multi Format
Hello,

I posted this over on LFPF, and it was suggested that I might have better luck over here.

I have just finished a complete disassembly, clean, and rebuild, of a Graphex #3 shutter with the help of the Graflex Repair Manual. The shutter now works wonderfully except for one remaining issue:

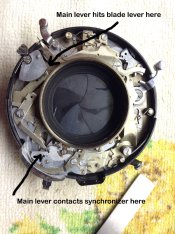
Normally, the end of the main lever is supposed to hit the blade lever to open the shutter blades, and this is what happens when the synchronizer is set to any position (F-X, red-M, black-M) except "off". The problem arises with the flash synchronizer set to "off". The main lever just skims the blade lever, and the blades barely open at all. This happens on all speeds. Speeds are otherwise correct with all synchronizer settings.

If I trip the shutter with the synchronizer set to "off", while holding the cocking lever, and slowly let the shutter release, the main lever contacts the blade lever just fine. It seems that with the synchronizer set to "off" the main lever moves fast enough that it doesn't drop quick enough from the release lever to hit the blade lever. With the synchronizer engaged, there is just enough extra drag on the main lever for it to drop and hit the blade lever fully.

Has anybody ever run into this and found a solution? Obviously, the easiest solution, which I'll do for now, is to just leave the synchronizer on the "F-X" setting and use the shutter normally.

Thanks for any help you can offer.
 

BrianShaw

Member
Joined
Nov 30, 2005
Messages
16,594
Location
La-la-land
Format
Multi Format
There is a guy over at graflex.org that might be able to help.
 
OP
OP
rjbuzzclick

rjbuzzclick

Member
Joined
Jan 30, 2010
Messages
379
Location
Minneapolis
Format
Multi Format
Thanks for the responses.

I've done one of these, but it's been maybe a year or more. Wish you had posted a photo or something to spark my memory. But as it is, I would have to do all that internet searching all over again to be of any help. Sorry.

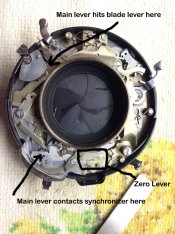
The shutter currently assembled, but here's a photo of it opened up I made during disassembly. Unfortunately, the point where the main lever hits the blade lever is underneath the retarding weight assembly, but maybe this will help jog your memory.

IMG_1096.JPG
 
OP
OP
rjbuzzclick

rjbuzzclick

Member
Joined
Jan 30, 2010
Messages
379
Location
Minneapolis
Format
Multi Format
I had a chance to open the shutter back up and I've found the problem. I've updated the previous photo. The problem is with the zero lever. With the synchronizer in the "off" position, the lower tang of the zero lever rides over a stud on the main lever. This is causing enough drag so that the main lever doesn't hit the blade lever hard enough to fully open the blades. With the synchronizer set to "F-X", that same stud on the main lever rides in the slot of the zero lever, not under the tang. The zero lever moves with the stud on the main lever so it doesn't add any resistance. There seems to be a fine middle ground where the lower tang can ride over the stud, but also fully catch on it when on the "F-X" setting.

In the "black-M" and "red-M" settings on the synchronizer, the zero lever lower tang again rides over the stud on the main lever, but in this case, the main lever is held just long enough by the synchronizer delay that the slight extra resistance doesn't effect anything. Which is why I wasn't having problems in both "M" setting.

Thanks APUGuser19 for your input.

IMG_1096.jpg
 

shutterfinger

Member
Joined
Feb 25, 2013
Messages
5,020
Location
San Jose, Ca.
Format
4x5 Format
Adjust the levers as needed to obtain correct operation.
I have had similar with #2 Graphex shutters.
Why are the flash contacts removed?
A similar problem can occur with the flash contacts, they'll make in one position and not the others and be open in the off position.
Adjustments of .0005 inch are usually approiate.
 
OP
OP
rjbuzzclick

rjbuzzclick

Member
Joined
Jan 30, 2010
Messages
379
Location
Minneapolis
Format
Multi Format
Adjust the levers as needed to obtain correct operation.
I have had similar with #2 Graphex shutters.
Why are the flash contacts removed?
A similar problem can occur with the flash contacts, they'll make in one position and not the others and be open in the off position.
Adjustments of .0005 inch are usually approiate.

Thank you. It's turning out to be a little inconsistent still, so I've got some work to do yet. I'm going to back up a few steps and remove the main lever, reinstall, and run the manual checks again at that point.

I'm curious, the repair manual said nothing about lubricating the pivot point for the main lever. Is this correct? It seems like there should be a spot of grease there.

FYI, the flash contacts were removed because I was in the process of disassembling the shutter when I took this photo. They're installed again now.
 

shutterfinger

Member
Joined
Feb 25, 2013
Messages
5,020
Location
San Jose, Ca.
Format
4x5 Format
The "common" Graphex Full Sync service manual has the reassembly steps out of sequence for the #1, all steps in order for the #2 so it would not surprise me to find the #3 out of sequence or missing a step.
Yes I always put a thin layer of grease under the mail lever assembly as well as a trace of oil on the inside of the bushing that fits over the mount stud. The #2 and #3 are very similar so just refer to the #2 instructions for clarification.
Some of these shutters have to be partially disassembled and reassembled 2 or 3 times to get all the quirks out. It usually depends on how close to total stoppage it has been run before servicing.
 
OP
OP
rjbuzzclick

rjbuzzclick

Member
Joined
Jan 30, 2010
Messages
379
Location
Minneapolis
Format
Multi Format
What's that dampness on the shutter blades? Inconsistent? I don't see how that can be. Slow, I understand, but "inconsistent"?

And another thing--you didn't expect to have to take it apart only once, did you? GL

Actually, what I meant by inconsistent is that minor adjustments to one thing are effecting something else. That's why I'm going to backpedal a few steps and take another run at it. The dampness is some oil on the blades which has since been cleaned off. This photo was from the start of disassembly.

As far as taking it apart again goes, one can always hope, right? :wink:
 
OP
OP
rjbuzzclick

rjbuzzclick

Member
Joined
Jan 30, 2010
Messages
379
Location
Minneapolis
Format
Multi Format
The "common" Graphex Full Sync service manual has the reassembly steps out of sequence for the #1, all steps in order for the #2 so it would not surprise me to find the #3 out of sequence or missing a step.
Yes I always put a thin layer of grease under the mail lever assembly as well as a trace of oil on the inside of the bushing that fits over the mount stud. The #2 and #3 are very similar so just refer to the #2 instructions for clarification.
Some of these shutters have to be partially disassembled and reassembled 2 or 3 times to get all the quirks out. It usually depends on how close to total stoppage it has been run before servicing.

That's the service manual that I have (I have all three shutters too). I'll disassemble back to the main lever and do what you suggest. I can also start there getting it to hit the blade lever fully. should I put anything on the blade lever? The service manual didn't mention it so I didn't put any there the first time in.

Oh, one more question regarding the spring on the blade lever. It seems to trip/snap when the lever is about halfway pressed. Does that sound right, or should it trip a little earlier?

Thanks for your response.
 
OP
OP
rjbuzzclick

rjbuzzclick

Member
Joined
Jan 30, 2010
Messages
379
Location
Minneapolis
Format
Multi Format
The blade lever does not require luberication. The blade lever should cause the blades to snap open when pushed with a screwdriver, page 31 paragraph 34 step g. If I remember correctly the blades should snap open quickly, less than 30% not 50% open.

OK, great. I'll pick at this over the next few days or so when time permits and report back. Thanks very much for the assistance.
 
OP
OP
rjbuzzclick

rjbuzzclick

Member
Joined
Jan 30, 2010
Messages
379
Location
Minneapolis
Format
Multi Format
Just an update...After a bit of adjustment to the end of the main lever that hits the blade lever, everything is working as it should except for the 1/200 speed. The blades still don't quite open fully at that speed. A little more work at that end of the main lever should clear it up. Thanks again for your assistance.
 
Photrio.com contains affiliate links to products. We may receive a commission for purchases made through these links.
To read our full affiliate disclosure statement please click Here.

PHOTRIO PARTNERS EQUALLY FUNDING OUR COMMUNITY:


Ilford ADOX Freestyle Photographic Stearman Press Weldon Color Lab Blue Moon Camera & Machine
Top Bottom