- Joined
- Feb 17, 2008
- Messages
- 2,190
- Format
- Multi Format
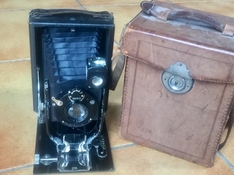
I inherited my grandfather's 9x12 plate camera many years ago. Made a few pictures with it. Then the diaphragm turned into a mess of blades. Inspection showed that two blades had lost a small part, something like a stud or small puck to guide its motion. I kept postponing a repair, because I had no idea how to machine the missing puck (1.5mm diameter, 0.7mm high). Decades passed. Now a new attempt.
Diagnostic
Each diaphragm blade has two pucks. One is captive in a circular hole in a ring (not pictured) that rotates to set the aperture, while the other one rides in a fixed radial slot. First pic shows max aperture position (two defective blades missing). As the diaphragm is adjusted to intermediate values, the second puck moves inwards. Second picture. Looks like the guiding rails do not extend far enough inwards; the puck is derailed, and will not enter the slot when it wants to move out. Probably the pucks were torn off from the two defective blades for that reason. But how did it come about that the guiding slots were too short? My grandfather used that camera without problem in the 1930's (I have some of his glass plates). Did the diaphragm blades shrink???


Repair
I had available a nice, modern iris from some defunct Olympus zoom lens. Aperture was right, outer diameter also, but too thick. So need to do a repair.
Step 1 : prepare a ring of suitable OD/ID from 0.18mm thick plastic foil, then glue it with cyanoacrylate.

Step 2. With an X-acto knife, guided by the metal slot edges, cut the slots into the plastic foil.

Step 3. Remove excess obstructing plastic, and spray with matte black paint. Re-install blades. Since there were 9 blades, to maintain some symmetry, I leave out not 2 but 3 blades, keeping 6 in a 3x2 pattern. Close the clamshell and verify operation. Now the pucks are guided even at their innermost excursion. The iris shape is not too bad... and anyway I'm not into that bokeh thing.

Re-assembly and test
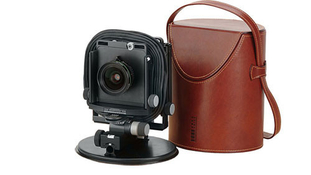
The camera has a 13.5cm f:6.3 Boyer Topaz triplet in a Gauthier Pronto shutter (T, B, 25, 50, 100; ideally simple mechanism)
It is carried, together with a few holders, in an elegant leather case. Almost like an Arca-Swiss Misura


Results
I use film in the available holders with a dummy glass plate in place, and the sheet film slid just in front of the plate. First image, on 1977 expired Agfapan 200 (not aero, just agfapan) rated 25 ASA. Some light leak, but at least it works.

Diagnostic
Each diaphragm blade has two pucks. One is captive in a circular hole in a ring (not pictured) that rotates to set the aperture, while the other one rides in a fixed radial slot. First pic shows max aperture position (two defective blades missing). As the diaphragm is adjusted to intermediate values, the second puck moves inwards. Second picture. Looks like the guiding rails do not extend far enough inwards; the puck is derailed, and will not enter the slot when it wants to move out. Probably the pucks were torn off from the two defective blades for that reason. But how did it come about that the guiding slots were too short? My grandfather used that camera without problem in the 1930's (I have some of his glass plates). Did the diaphragm blades shrink???
Repair
I had available a nice, modern iris from some defunct Olympus zoom lens. Aperture was right, outer diameter also, but too thick. So need to do a repair.
Step 1 : prepare a ring of suitable OD/ID from 0.18mm thick plastic foil, then glue it with cyanoacrylate.
Step 2. With an X-acto knife, guided by the metal slot edges, cut the slots into the plastic foil.
Step 3. Remove excess obstructing plastic, and spray with matte black paint. Re-install blades. Since there were 9 blades, to maintain some symmetry, I leave out not 2 but 3 blades, keeping 6 in a 3x2 pattern. Close the clamshell and verify operation. Now the pucks are guided even at their innermost excursion. The iris shape is not too bad... and anyway I'm not into that bokeh thing.
Re-assembly and test
The camera has a 13.5cm f:6.3 Boyer Topaz triplet in a Gauthier Pronto shutter (T, B, 25, 50, 100; ideally simple mechanism)
It is carried, together with a few holders, in an elegant leather case. Almost like an Arca-Swiss Misura
Results
I use film in the available holders with a dummy glass plate in place, and the sheet film slid just in front of the plate. First image, on 1977 expired Agfapan 200 (not aero, just agfapan) rated 25 ASA. Some light leak, but at least it works.