Graflex Super D Focal Plane Shutter Servicing

Recent Classifieds

Forum statistics

Threads
200,633
Messages
2,811,285
Members
100,324
Latest member
ishelly404
Recent bookmarks
0

horsemilk

Member
Joined
Oct 15, 2014
Messages
19
Format
Medium Format
I bought a Super D 3x4 with the intention of converting it to 4x5, but it has some problems with the shutter. Unfortunately no one here in London, England seems to have any experience with them at all. If anyone here has some expertise (or knows someone else who does) I'd appreciate it.


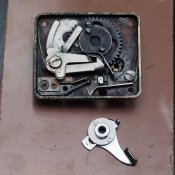
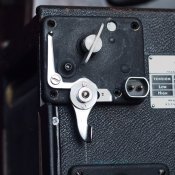
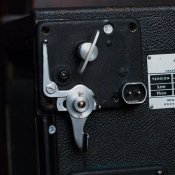
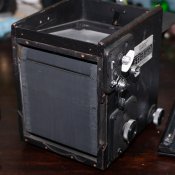
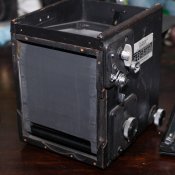
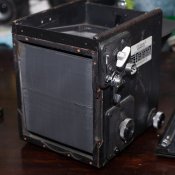
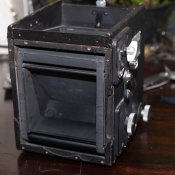
The shutter aperture wasn't winding (anti-clockwise) at all, so I removed the shutter assembly and loosened the big nut (see attached picture) a couple of turns with a flathead screwdriver. This stopped impeding the shutter wingnut, and I reassembled it.
lOBJuQi.jpg


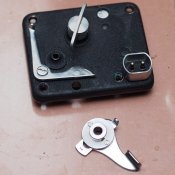
I managed to get the shutter curtain in the right place so that O, T, A, B, C and D on the mechanism all line up with the correct apertures. The speeds seem correct too, all except for 1/30, which is a curtain aperture of A, and Low tension. This speed runs seemingly correctly, but the aperture doesn't quite complete it's run to the bottom of the focal plane. It stops about 1-2cm short. It seems this is a problem with the spring tension, rather than the positioning of the focal plane cloth, as the placement seems correct for all other speeds and settings (such as A and High tension). As well as this, the spring tension seems weak at this setting, and the wingnut needs a little nudge to move on to O from T.

rmlN47O.jpg


Is there a simple way to adjust the spring tension or solve this problem?

In addition, if anyone has any simple guide to attaching a 4x5 Graflok back to this camera, while maintaining as much frame coverage as possible, that would be my next line of inquiry.

Thanks for any help!
 

Old-N-Feeble

Member
Joined
Feb 22, 2012
Messages
6,805
Location
South Texas
Format
Multi Format
PM shutterfinger.
 

shutterfinger

Member
Joined
Feb 25, 2013
Messages
5,020
Location
San Jose, Ca.
Format
4x5 Format
I wrote the Graflex Servicing Instructions from rough information provided by an experienced service person when he retired. Leave me a PM with your email address and I'll send you a copy of the PDF.

With the back removed, the curtain at O, and tension at low lift the wind plate up and position the bottom curtain stay of the O opening 1/8 to 1/4 inch above the top curtain guide roller when meshed with the wind plate at the curtain rundown stop and O in the window. Attach the wind plate with 2 screws, diagonally from each other, then wind to aperture D. Operate the M lever and observe each aperture. The lead aperture stay should be above the top curtain guide roller (1/4 to 3/8 inch above the film plane opening) then upon releasing the curtain with the M lever back as it will be until the mirror is reset the trail curtain aperture stay should be below the lower guide roller by 1/4 inch. If any aperture is low when wound up to that aperture increase the O start position 1 top curtain roller gear tooth up. If the lower aperture stay is on the lower guide roller or higher with the M lever in the release position lower the starting position 1 top curtain roller gear tooth.
When all apertures appear correct set the tension to high then wind to Aperture D and run the curtain down to closed after O 8 to 10 times then recheck the aperture positions again. A loose curtain on the rollers can shift 1 top curtain roller gear tooth when packed.

Correct tension is:
1. With the tension on Low and the curtain at O the curtain shall close and lock with the camera in any position. Lock is the wind key at its stop. Increase tension in 1 turn increments if needed to achieve proper closing.
2. With the tension set to High the curtain should wind to its smallest aperture. If this requirement fails and the curtain will wind to its smallest aperture at a lower tension reduce the initial tension. If the curtain will not wind to its smallest aperture at any tension setting then the curtain is incorrectly attached to the lower curtain roller or stuck to itself from heat and non use.


To adjust/set initial tension:
Remove the nut in the lower left of the tension plate.
Run the tension setting to its lowest position.
remove the screws from the perimeter of the tension plate.
With a screw driver in the slot in the opening revealed by the nut removal (tension roller shaft) lift the tension plate up. Slowly release the tension if disassembling.
Correct initial tension starting point is 8 to 10 turns from a zero state. Turn the tension as needed to mesh with the tension plate gear at the low setting.
Example of what over tensioning will do.
the-spring.jpg

A good spring
A copy.jpg
 
OP
OP

horsemilk

Member
Joined
Oct 15, 2014
Messages
19
Format
Medium Format
With the back removed, the curtain at O, and tension at low lift the wind plate up and position the bottom curtain stay of the O opening 1/8 to 1/4 inch above the top curtain guide roller when meshed with the wind plate at the curtain rundown stop and O in the window.

This first sentence alone... I can't even...

Thanks for the help guys, but this seems too much. I don't want to disassemble the entire camera to fix a 5mm gap at one speed only. All other speeds and settings work perfectly, this is a lot of work (and the risk of making things worse) for me. I think I will learn to live without the 1/30th speed.
 

fotch

Member
Joined
Mar 16, 2005
Messages
4,774
Location
SE WI- USA
Format
Multi Format
This first sentence alone... I can't even...

Thanks for the help guys, but this seems too much. I don't want to disassemble the entire camera to fix a 5mm gap at one speed only. All other speeds and settings work perfectly, this is a lot of work (and the risk of making things worse) for me. I think I will learn to live without the 1/30th speed.

Wise decision. Another thought, it might be easier to cut 4x5 film to fit the 3x4 holders since you won't be using all of the 4x5 film after conversion.
 

shutterfinger

Member
Joined
Feb 25, 2013
Messages
5,020
Location
San Jose, Ca.
Format
4x5 Format
I very surprised you did not do serious damage to the camera when you twisted on the screw with the blue circle and arrow. They are usually staked in place and attempting to turn them usually results in them breaking or twisting off.
Then there is the taper pin in the H lever that has to be removed to get the wind plate off, its usually stuck and if one is not careful driving it out the mirror shaft is bent or broken but you miraculously managed to do these things but removing 8 flat head screws and 4 oval head screws, lifting the back off, meshing the curtain to the wind gear correctly you have already removed once is tooooooo much. Amazing.

P.S. Did you loose the shim off the end of the top curtain roller when you lifted the wind plate off? Sometimes they stay on the roller other times they stick in the wind plate.
 
Last edited by a moderator:
OP
OP

horsemilk

Member
Joined
Oct 15, 2014
Messages
19
Format
Medium Format
there is the taper pin in the H lever that has to be removed to get the wind plate off, its usually stuck and if one is not careful driving it out the mirror shaft is bent or broken

I removed the pin in the 'H' lever using a thin mini-screwdriver and tapping it with a hammer. This was not easy, though would have been if I had used a auto centre punch. I subsequently purchased one and used this to reinstall the pin when I reassembled it.

I very surprised you did not do serious damage to the camera when you twisted on the screw with the blue circle and arrow. They are usually staked in place and attempting to turn them usually results in them breaking or twisting off.

The screw you point out needed to loosened in my case. For some reason on my camera, the green bit here wasn't able to turn completely, as it was impeded by the arm highlighted in red:

GXUscow.jpg


I played with it for an hour trying to figure out how it's supposed to work and what was wrong. Loosening the screw fixed the problem. I hope that was the right thing to do.

Did you loose the shim off the end of the top curtain roller when you lifted the wind plate off? Sometimes they stay on the roller other times they stick in the wind plate.

I'm not sure about the shim off the top curtain roller. I didn't notice anything fall out, it may have been stuck in there or it may have been already missing. What does it look like?

but you miraculously managed to do these things but removing 8 flat head screws and 4 oval head screws, lifting the back off, meshing the curtain to the wind gear correctly you have already removed once is tooooooo much. Amazing.

You sound frustrated that I wasn't able to use your instructions to service the shutter curtain. I really appreciate that someone is making an effort to keep this kind of information alive, surely there can't be many (if any) trained Graflex technicians left, and the already sparse info on servicing these machines is disappearing. However, to someone not already versed in repair of these cameras, phrases such as "meshing the curtain to the wind gear" are not automatically understood. Without explanation, or (even better) visual documentation, the instructions are quite opaque to someone such as me.
 

shutterfinger

Member
Joined
Feb 25, 2013
Messages
5,020
Location
San Jose, Ca.
Format
4x5 Format
It sounds harder than it it is. With the back removed and the curtain run down to O it is easy to grasp the curtain roller and turn it by the bushing end. When the gears mesh is when the teeth of one gear goes into the valleys of the other which is what is necessary for the wind plate to attach to the camera.
If and when you reopen it put a drop of light weight oil, clock, gun or similar, on the screw you turned, the M lever screw (trying to turn it will break the screw), and the wind key shaft. Put a trace of grease, light to medium weight, at the spring ends where they contact the lever and frame, the ears on the rotation lock aka the green part, and the teeth of the big gear.

You have to rotate the back 45° to access the inner flat head screws. An while you have the back off a drop of oil on the rotation lock lever pin and a trace of the light grease in the lock slots then rotate the back a full 360 to spread will improve its operation also.

The wind gearing is linear. The top curtain roller diameter constantly changes as the curtain is wound or run down. The distance between the aperture openings is different along the length of the curtain, they vary from 6 inches to 7 1/2 inches. Depending on format the 1 1/2 inch or the 3/4 inch ( A and B apertures) will be the one that is high, bottom edge of film exposed when the curtain should be closed, or low, top edge of film exposed when the curtain should be closed, when the curtain is off 1 top roller gear tooth. Alignment is always done at the O aperture as it is larger than the film plane and on low tension as that is the easiest to work with.

Factory shutter curtain material is .008 inch thick. The rubber coating will swell with age and allowed to dry out from poor storage. The shutter will operate correctly with the curtain swollen to .02 inches thick, above that it varies from model to model as some have less roller clearance openings than other models. I have encountered 100+ year old curtains that were .01 inch thick and 40 year old curtains that were .05 inch thick, dried and cracked beyond use.
 

Sirius Glass

Subscriber
Joined
Jan 18, 2007
Messages
50,623
Location
Southern California
Format
Multi Format
I have edited and combined the emailed instructions from Bert Saunders to clarify his instructions. Send me your email if you would like a copy.
 
OP
OP

horsemilk

Member
Joined
Oct 15, 2014
Messages
19
Format
Medium Format
Thanks for all your advice, Shutterfinger. I am trying to wrap my head around this as I don't understand a lot of the terms. I wondered if I could tell you how my camera is behaving, perhaps you could advise whether it's the position of the curtain or the tension that needs attention.

On my camera with the A setting (and low tension), the aperture is here at the beginning of it's run:

attachment.php


At the end of it's run, it's here, though the key is not turned quite all the way to T and if it's turned manually the aperture runs to the bottom roller correctly.

attachment.php


At the B setting and all others, the aperture begins it's run at a higher point, I assume this is correct:

attachment.php


At the B, C and D settings it completes it's run past the lower curtain guide roller.

I should also note that when the shutter or the lever is released from T, it doesn't quite make it to the O setting, and the key needs to be turned to help it along.

However, with the tension set to high, the A curtain aperture starts in the same place, but completes it's run successfully. The T to O run as also successful.

Would you say my curtain is in the right place, and just the tension needs tightening, or vice versa?
 

Attachments

  • L_000745.jpg
    L_000745.jpg
    277.2 KB · Views: 487
  • L_000746.jpg
    L_000746.jpg
    288.9 KB · Views: 565
  • L_000747.jpg
    L_000747.jpg
    268.9 KB · Views: 505

removed account4

Subscriber
Joined
Jun 21, 2003
Messages
29,832
Format
Hybrid
horsemilk

my experience is that if you remove the bottom tensioner
and tighten the spring a few turns ... if the shutter ( top winder ) isn't at "0"
to begin with, when you finish the operation + put everything back together
the curtain will not rest in the right spot
also ... if the metal " thingies "
(that keep the shutter "holes" rigid ) are bent / not straight, they can keep the shutter curtain from traveling where
it is supposed to be as well ...

could that be your problem ?
 

shutterfinger

Member
Joined
Feb 25, 2013
Messages
5,020
Location
San Jose, Ca.
Format
4x5 Format
Increasing the tension to compensate for dried out lubrication only causes the spring, roller shafts and bushings to wear out faster.

Increasing the tension may make the curtain open fully from T and close as it should from O at low setting but it will do nothing for the curtain position unless it is so loosely packed on the rollers that the curtain is rubbing against the body in the roller sections.

What terms do you need clarifying? What is your native language?
Post a picture with the curtain at O and the wind key at its run down stop even if you have to help it get there.
 
OP
OP

horsemilk

Member
Joined
Oct 15, 2014
Messages
19
Format
Medium Format
Increasing the tension to compensate for dried out lubrication only causes the spring, roller shafts and bushings to wear out faster.

Increasing the tension may make the curtain open fully from T and close as it should from O at low setting but it will do nothing for the curtain position unless it is so loosely packed on the rollers that the curtain is rubbing against the body in the roller sections.

What terms do you need clarifying? What is your native language?
Post a picture with the curtain at O and the wind key at its run down stop even if you have to help it get there.

My native language is English, I guess I'm just not familiar with a lot of the mechanical terms, or with visualising your instructions.

Here is the curtain at O, and yes it needed some help to get there on low tension. On high tension it's no problem.

attachment.php


So the tension needs tightening, but would you say the shutter curtain positioning is a problem? Is the aperture too low at the A setting, and could this cause light leaks?
 

Attachments

  • L_000750.jpg
    L_000750.jpg
    291.7 KB · Views: 528

shutterfinger

Member
Joined
Feb 25, 2013
Messages
5,020
Location
San Jose, Ca.
Format
4x5 Format
Yes, the shutter curtain is out of position. It needs to be raised 1 roller gear tooth which will put the top aperture stay, some call them aperture stiffeners, to the top of the roller. Yours is currently 2/3 the way up the top roller, moving it up 1 roller gear tooth will raise the top stay of the O aperture to the top center to top rear of the top roller. The A aperture at its start is low enough to cause light fogging. On the Super D I recently CLAed the taper pin holding the H lever on to the mirror shaft pushed out from the top. All other Graflex SLR's the pin pushes out from the bottom of the shaft/H lever. With the shutter at O and Low tension remove the H lever, the thing you pull on to reset the mirror, remove the screws holding the wind plate onto the camera body, lay the camera on its left side (from picture taking position), hold the top roller in position by putting pressure on the lower edge of the roller flange then lift the wind plate off the camera. Turn the roller until the top O aperture stay is top center of the roller, it will be directly under the camera top. Holding the wind key against its stop, it will not turn in the opposite direction of the wind arrow, sit the wind plate onto the camera. Turn the top roller upward as needed to get the top roller gear to engage with the wind plate and the plate sits flush against the body. Reinstall the screws and H lever.
Check the curtain position at each aperture, it should now be correct for all apertures.

You should remove the roller bushings, clean, fill with graphite grease, and reinstall each, one at a time as they are worn to their respective rollers.
Look at the left side of the camera. You will see a small circular piece in line with the roller. It has a small hole in the center and two notches 180° apart in the outer edge. This is the roller bushing. They have a wood screw thread and screw into/out of the body like a screw. Use an adjustable spanner wrench adjusted to fit into the notches and unscrew them from the body.

Once you have done this test the curtain. If it does not run down fully from O on low tension increase the initial tension 1 to 2 turns at a time until it does. Initial tension should be 8 to 12 turns from no tension. 20 turns or more indicates there is a problem with the curtain transport.
 
OP
OP

horsemilk

Member
Joined
Oct 15, 2014
Messages
19
Format
Medium Format
Thanks for your help Shutterfinger. I adjusted the curtain position as you suggested, all apertures are correct now, but the shutter at Low and A still didn't complete it's run, so the tension needed adjusting.

I removed the tension plate slowly, but predictably I lost grip of the tension screw and it all wound down, so I now have to set the tension from scratch. The problem I'm having is that with the tension plate removed, no matter how much tension I add to the spring (turning it clockwise, I assume this is correct), the bottom roller doesn't want to budge. I think the spring is fine, as the more I turn the harder it gets, and the toothed shaft snaps back when I release it. However, even when there is slack in the curtain from the top roller and tension in the spring, the bottom roller doesn't want to budge unless I kind of 'jiggle' it, then it picks up the slack in a stop-start kind of way. This is with 10, 15, even 20 turns of tension.

At this point I wish I never had've opened it :smile: Is there something impeding it, or have I done anything stupid you can think of?
 
OP
OP

horsemilk

Member
Joined
Oct 15, 2014
Messages
19
Format
Medium Format
The spring tensions counterclockwise.
Take the bottom plate off and inspect the tension roller compartment for foreign material.
Have you lubed the bushings yet?
Want my address and servicing fee?

Thanks, when I removed the bottom plate it was obvious that I should have been setting the tension counterclockwise. I guess I just took the old 'righty-tighty, lefty-loosey' too dogmatically.
After correcting my winding direction, I then learned that the roller needs to be positioned perfectly to roll freely. With the camera on it's left side, I was holding the tension with a screwdriver pushing down on the tensioning rod, which was also restricting the roller. Instead of this I inserted it back into the tensioning plate for testing. The tension is now set seemingly correctly, the A aperture completes it's run.

I opened up the bushings, only one had gunk in it, which I cleaned out. Lacking graphite grease or any other dry lubricant, I used a small dab of Singer lubricant grease in each. This has made things a little smoother.

Since your knowledge is so complete on this, I wondered if I could ask one more thing. I have a problem where the mirror does not slap shut completely on the 'I' setting. There is a gap around 5mm. I tried adding a little more tension to the mirror spring, but this doesn't affect it. It closes completely on the 'T' setting, and it seems the M lever or something else is interfering with the H lever closing completely. Any hints here?
 

shutterfinger

Member
Joined
Feb 25, 2013
Messages
5,020
Location
San Jose, Ca.
Format
4x5 Format
Post a picture of the H lever in the mirror set position with the I/T lever in each position. Sounds like the lever is bent and not allowing the M lever to fully return to its position.
The mirror spring only affects the mirror opening and the amount of tension required to reset it.
The front lip of the mirror frame may be deformed and not catching the release latch properly. The frame is aluminum and easy to reform. Remove the lens board and observe its interaction with the latch/release.
 
OP
OP

horsemilk

Member
Joined
Oct 15, 2014
Messages
19
Format
Medium Format
Post a picture of the H lever in the mirror set position with the I/T lever in each position. Sounds like the lever is bent and not allowing the M lever to fully return to its position.
The mirror spring only affects the mirror opening and the amount of tension required to reset it.
The front lip of the mirror frame may be deformed and not catching the release latch properly. The frame is aluminum and easy to reform. Remove the lens board and observe its interaction with the latch/release.

I don't think it's the lip of the mirror, it catches and releases properly, the mirror just doesn't quite reach the top of the box. This is only in 'I' mode, in 'T' mode it hits the top of the box correctly.

The shutter winder is currently disassembled while I try to work this out, I've taken pictures of it apart as well as back on the camera, though not properly screwed in. Does this help?

attachment.php
attachment.php
attachment.php
attachment.php
 

Attachments

  • L_000777.jpg
    L_000777.jpg
    406.8 KB · Views: 482
  • L_000780.jpg
    L_000780.jpg
    355.7 KB · Views: 496
  • L_000781.jpg
    L_000781.jpg
    478.4 KB · Views: 503
  • L_000783.jpg
    L_000783.jpg
    461.2 KB · Views: 500
OP
OP

horsemilk

Member
Joined
Oct 15, 2014
Messages
19
Format
Medium Format
As long as the mirror is out of the image path it does not matter if it does not touch the base of the view opening. It is due to the travel of the M lever.
I thought you were referring to it latching.

The gap is about 5-10mm, potentially enough to block the light path as I'm using a 4x5 back (on this 3x4 camera) and need as much space as possible to get maximum coverage. I've also tested this on another 4x5 Graflex Super D and it's not a problem. Is it a bent lever or something?
 
Photrio.com contains affiliate links to products. We may receive a commission for purchases made through these links.
To read our full affiliate disclosure statement please click Here.

PHOTRIO PARTNERS EQUALLY FUNDING OUR COMMUNITY:


Ilford ADOX Freestyle Photographic Stearman Press Weldon Color Lab Blue Moon Camera & Machine
Top Bottom