Talk about old school! I had to take it apart to clean the lenses, and the shutter is an ingeniously simple but elegant system. Nice and consistent. I will likely be adapting it to 120 film, because of the vastly easier availability. It'll be nice to have a camera that you cannot futz with too much. It's either it's regular shutter, or it's bulb mode. That's it. No aperture, no meter, no ratcheting advance lever. It's raw. Very very raw. I like it that way.
-
Welcome to Photrio!Registration is fast and free. Join today to unlock search, see fewer ads, and access all forum features.Click here to sign up
- Home
- Forums
- Analog Workflow Forums (100% Analog/Traditional)
- Analog Equipment
- Medium Format Cameras and Accessories
You are using an out of date browser. It may not display this or other websites correctly.
You should upgrade or use an alternative browser.
You should upgrade or use an alternative browser.
Got an Agfa PD16 Clipper today!
-
A
- Thread starter trevis_o
- Start date


Recent Classifieds
-
Want to Buy Vivitar Bellows Part
- Started by binglebugbob
-
For Sale Mamiya 7/7ii 135 Panoramic Adapter Kit [unused in box]
- Started by Timothy Hyde
-
Want to Buy Leica M4 Chrome
- Started by samuelphoto
-
For Sale Sunpak 522 Thyristor
- Started by Chrismat
-
For Sale PENTAX 67 55MM F:3.5
- Started by Guillaume Zuili
Forum statistics
- Joined
- Aug 31, 2009
- Messages
- 177
- Format
- 8x10 Format
For additional futzing track down an Agfa "Clipper Special" which allows limited focusing, more shutter speeds and a couple of aperture settings.
http://camera-wiki.org/wiki/Agfa_Ansco_Clipper_Special
Have fun!
Jonathan
http://camera-wiki.org/wiki/Agfa_Ansco_Clipper_Special
Have fun!
Jonathan
I have an Ansco Clipper, pretty much the same thing. Belonged to my older sister and I got to use it as a youngster. Also have the case and flash.
I have a "new in box" PD16 and another used one. Just because I could, I took the whole lens/shutter assembly off and mounted it on a lens board to shoot on a 4x5 - to see what the coverage was like. It covered the entire sheet, but with some wild distortion outside the sweet spot that was about 1.5 inches across. I haven't shot the camera itself, but the used one came with some images and negatives in the box, a couple's travel's to FL, I think. Seems that distortion was part of the PD16 experience, or at lest with this particular one.
It's good to see that there is a little bit of a following for these older classics.  Interesting timing too, as I just purchased one myself! Well, an Agfa Clipper Special to be exact - I couldn't resist the "special" as I was curious to see just how good its performance might be with its focusable and more "upscale" anastigmat lens. Actually, refurbishing (and sometimes modifying) simple old roll film cameras has become sort of a hobby of mine lately. The 120 conversion is something I will be doing for the first time with this one though, so I will be curious to hear any discussion of others' experiences with that little project, or any other tricks, modifications, lessons learned, etc., about the camera in general.
In any event, congratulations on the new camera - old point-and-shooters can be a lot of fun!
Jeff
Interesting timing too, as I just purchased one myself! Well, an Agfa Clipper Special to be exact - I couldn't resist the "special" as I was curious to see just how good its performance might be with its focusable and more "upscale" anastigmat lens. Actually, refurbishing (and sometimes modifying) simple old roll film cameras has become sort of a hobby of mine lately. The 120 conversion is something I will be doing for the first time with this one though, so I will be curious to hear any discussion of others' experiences with that little project, or any other tricks, modifications, lessons learned, etc., about the camera in general. In any event, congratulations on the new camera - old point-and-shooters can be a lot of fun!
Jeff
- Joined
- Mar 7, 2006
- Messages
- 22
- Format
- 35mm
Agfa Clipper was my first camera in about 1950 when 616 film was easy to come by, even in a tiny town. I picked up an old one in the $1 box at a photo show. To adapt the 120 spool to the 616 swing-out holder in the Clipper, a crimp connector, available in a hardware store with electrical supplies, works nicely-- one on each end of the spool gives good positioning. That said, I still haven't actually put film in the Clipper and shot pictures; but, I'm pretty sure that I can--maybe I need to make a mask. Anyway, I wanted to mention the crimp connectors in case you hadn't heard about them.
What does the crimp connectors normally connect? 2 or 3 wires? Having trouble visualizing this although I am familiar with most electrical items.
Billdelle, I'm guessing that by electrical crimp connector you mean one of these?
http://www.larpro.com.au/larpro/images_cat/150.jpg
I am curious to know exactly which type you used - intriguing that you found a doodad that works as-is, without even having to modify it!
Two other ways I have heard of for making adapters would be as explained in the following links:
kodak.3106.net/download/616panoramicconversion-RevBE.pdfSimilar
http://www.filmwasters.com/forum/index.php?topic=4742.0
The first one is technically for an old Six-16 folder, but the idea would be the same. Basically it involves cutting up spare 616 spools (maybe 620 spools would work too?), and modifying the ends so they can fit into the 120 spool ends and thus make up the difference in length. If you happen to have the spools available it seems like it would be a very clean way of adapting to 120. If anything, I think it would be easier for the PD16/Clipper cameras, as you wouldn't need to trim the 120 spool afterwords as they did - at least on my Clipper Special, a 120 spool pops into the chamber just fine without need for trimming.
In the second link they talk about using trimmed screw anchors as adapters, among other ideas. Again, this is for different cameras (like old Brownie 116/616 and other box cameras), but the idea may still apply. I'm not sure how stable a screw anchor would be by just pressing into the end of the spool, but it may still be an idea worth exploring. Also, there is also a brief discussion in the comments at the end of that article which is interesting; discussing variants of the Clipper camera and locations of the red window(s).
Jeff
- Joined
- Mar 7, 2006
- Messages
- 22
- Format
- 35mm
Hello, Denverdad:
My Clipper is not a Special so my experience may not apply; I say this because you said that a 120 spool just slips into the filmholder: not so on my Clipper, the 120 spool is too short. Anyway, here are the answers to your questions. (I'm hoping that APUG allows image posting.)
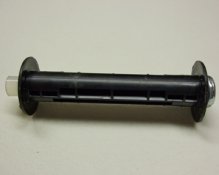
It would be quite surprising if the crimp connectors I use are unusual: I find them in a small, neighborhood hardware store that has a bit of everything and not a lot of anything. They are in the familiar slide-out trays with little boxes inside, in the electrical accessories shelves. I haven't taken the time to look at your link; I hope that you will see the following photo of the connectors against a steel rule:
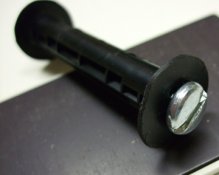
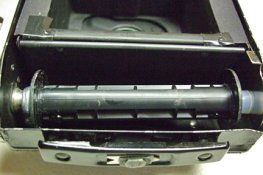
In the next photo you can see a 120 spool installed in my clipper. It is on the feed side; using the crimp connectors a 120 spool will also fit in the takeup side.
Next to the Clipper pressure plate you can see another view of the connectors; this may help in identification.
Please let me know something doesn't work in this post. I don't use APUG often. It is doesn't work, I'll send you an email if you like.
I have used the screw anchor method on a Kodak 616 folder; it worked but the fit was not as good as these connectors in a Clipper.
Billdele in St. Paul
My Clipper is not a Special so my experience may not apply; I say this because you said that a 120 spool just slips into the filmholder: not so on my Clipper, the 120 spool is too short. Anyway, here are the answers to your questions. (I'm hoping that APUG allows image posting.)
It would be quite surprising if the crimp connectors I use are unusual: I find them in a small, neighborhood hardware store that has a bit of everything and not a lot of anything. They are in the familiar slide-out trays with little boxes inside, in the electrical accessories shelves. I haven't taken the time to look at your link; I hope that you will see the following photo of the connectors against a steel rule:
In the next photo you can see a 120 spool installed in my clipper. It is on the feed side; using the crimp connectors a 120 spool will also fit in the takeup side.
Next to the Clipper pressure plate you can see another view of the connectors; this may help in identification.
Please let me know something doesn't work in this post. I don't use APUG often. It is doesn't work, I'll send you an email if you like.
I have used the screw anchor method on a Kodak 616 folder; it worked but the fit was not as good as these connectors in a Clipper.
Billdele in St. Paul
Like wire nuts except they are crimped to connect. Great idea. Only thing I don't understand is on the take up side, doesn't it need a key or key-way to have the force needed to wind and advance the film? Maybe if I had the connectors in front of me the answer would be self evident. Very inventive.
- Joined
- Mar 7, 2006
- Messages
- 22
- Format
- 35mm
Hello, Fotch:
At this point, I have only wound dummy film through it with a 616 spool as takeup to see how the film unrolled with the connectors on the supply side; that worked. I think I will stick with that, modifying if the film doesn't take up neatly. As you say, to use the connectors on both sides something will have to be done to engage the 120 spool to power advancing of the film-- should be possible. By the way, I can't take credit for using crimp connectors: I'm sure that I read it somewhere-- don't remember where. I'm glad that some people on this forum are working on a way to use this camera; I really liked it years ago and am eager to figure out a way to use it again for a roll or two.
At this point, I have only wound dummy film through it with a 616 spool as takeup to see how the film unrolled with the connectors on the supply side; that worked. I think I will stick with that, modifying if the film doesn't take up neatly. As you say, to use the connectors on both sides something will have to be done to engage the 120 spool to power advancing of the film-- should be possible. By the way, I can't take credit for using crimp connectors: I'm sure that I read it somewhere-- don't remember where. I'm glad that some people on this forum are working on a way to use this camera; I really liked it years ago and am eager to figure out a way to use it again for a roll or two.
I have not looked at it yet, however, I would think by drilling a small hole and screwing in a set screw, say 8-32, you could make it fit a keyway. Interesting project.
Agreed - very inventive solution - it is so cool that you found a doodad that happens to be sized so perfectly for the job! And, you're right - I'm pretty sure that particular connector is common. In fact I plan to pick up a few next time I am at the hardware store so i can try them out with my Clipper.
As for the 120 spool being able to "slip in" or not, I was actually referring to the diameter of the spool not it's length. The link I referenced referred to a different camera entirely (not a PD16/Clipper at all), for which they apparently did have to trim down the diameter of the spool ends. But neither of our Clippers require doing that; and my guess is that none of the other PD16/Clipper variants do either.
As for the 120 spool being able to "slip in" or not, I was actually referring to the diameter of the spool not it's length. The link I referenced referred to a different camera entirely (not a PD16/Clipper at all), for which they apparently did have to trim down the diameter of the spool ends. But neither of our Clippers require doing that; and my guess is that none of the other PD16/Clipper variants do either.
- Joined
- Mar 7, 2006
- Messages
- 22
- Format
- 35mm
Progress Report
Earlier discussions in this thread convinced me that I should finish my attempt to use 120 film in the Agfa Clipper. I'm not done yet; but, I thought that it might be useful to report what I did and the results. I used 120 film on a 120 spool as the supply, fitting it to the Clipper's supply side using the crimp connectors I mentioned in an earlier post. For takeup, I used the original 616 spool. To keep alignment, I built up each end of the spool inside by 3mm with some sticky foam product that I had on hand. I masked the film gate slightly, about 3mm top and bottom with black card stock. Using a dummy roll, I figured out (imperfectly, as it turns out) a winding scheme to get 12 frames and assure no overlaps. I didn't get overlaps, but only got 10 & 1/2 frames because I miscalculated how far to wind to get to the start of the film. The mechanics of taking the photos worked smoothly and the camera does a good job, I think. I will post a few small images which have been scanned, given Shadows and Highlight adjustment, and Unsharp Mask @ 20%. Judging from some variations in focus (see, e.g., the tree in scene showing the State Capitol) and wavy horizontals, there is some film movement at work. I haven't thought this through yet (other people's thoughts would be welcome), but my hunch is that this arises from some flexing of the card mask or, seems less likely, a fluctuating misalignment from slop on the takeup spool. Here are the examples:


One additional note: I think that a 1/4 x 20 machine screw with round head and single slot at 3/8" length at the top of the takeup compartment, screwed into a 120 takeup spool, with the threads held by pressure against the plastic "wings", might work to advance the film straight from the 120 supply. I haven't found a 3/8" length yet (they are made); the 1/2 inch one that I have is just a bit too long. Apologies if the first photo attached is too large; though I have resized it at the source, it doesn't seem to change-- I hope the post still goes through.
Billdele
Earlier discussions in this thread convinced me that I should finish my attempt to use 120 film in the Agfa Clipper. I'm not done yet; but, I thought that it might be useful to report what I did and the results. I used 120 film on a 120 spool as the supply, fitting it to the Clipper's supply side using the crimp connectors I mentioned in an earlier post. For takeup, I used the original 616 spool. To keep alignment, I built up each end of the spool inside by 3mm with some sticky foam product that I had on hand. I masked the film gate slightly, about 3mm top and bottom with black card stock. Using a dummy roll, I figured out (imperfectly, as it turns out) a winding scheme to get 12 frames and assure no overlaps. I didn't get overlaps, but only got 10 & 1/2 frames because I miscalculated how far to wind to get to the start of the film. The mechanics of taking the photos worked smoothly and the camera does a good job, I think. I will post a few small images which have been scanned, given Shadows and Highlight adjustment, and Unsharp Mask @ 20%. Judging from some variations in focus (see, e.g., the tree in scene showing the State Capitol) and wavy horizontals, there is some film movement at work. I haven't thought this through yet (other people's thoughts would be welcome), but my hunch is that this arises from some flexing of the card mask or, seems less likely, a fluctuating misalignment from slop on the takeup spool. Here are the examples:
One additional note: I think that a 1/4 x 20 machine screw with round head and single slot at 3/8" length at the top of the takeup compartment, screwed into a 120 takeup spool, with the threads held by pressure against the plastic "wings", might work to advance the film straight from the 120 supply. I haven't found a 3/8" length yet (they are made); the 1/2 inch one that I have is just a bit too long. Apologies if the first photo attached is too large; though I have resized it at the source, it doesn't seem to change-- I hope the post still goes through.
Billdele
Isn't 120 film thinner than 116 was? If that is the case, the backing plate needs modified a bit to hold the film on a stable, flat plane. Those pics look cool, though. I was wondering just what I would get out of it. I'm looking forward to eventually getting to try this thing out!
- Joined
- Mar 7, 2006
- Messages
- 22
- Format
- 35mm
Months later I've pretty much finished my work with the Ansco Clipper discussed above. Using a modified 616 spool as a takeup continued to produce slippage and loss of focus in the center of the frame. Once I bought a 1/4 x 20 pan head machine screw in 3/8" length, I was able to use a 120 spool for takeup. (See earlier post for details and see photos that follow). Length can be adjusted by how far the screw is driven into the 120 spool; at first I thought the spool was binding because of end width and I clipped it around the margins slightly; probably this wasn't necessary because (I think) the binding came from tightness top to bottom; making it shorter (by driving it farther into the spool) is probably all that's necessary. At the end, I'll add two photos made with this most recent modification of the Clipper. It's a nice camera and can make a sharp, contrasty picture-- more than I remembered from 61 years ago. I still have things to figure out (a simpler system for measuring film advance, especially) but I can recommend the method described here for adapting 120 film to the Clipper.
Attachments
| Photrio.com contains affiliate links to products. We may receive a commission for purchases made through these links. To read our full affiliate disclosure statement please click Here. |
PHOTRIO PARTNERS EQUALLY FUNDING OUR COMMUNITY:  |