Going white tone blind!

Recent Classifieds

Forum statistics

Threads
198,716
Messages
2,779,812
Members
99,689
Latest member
Luis Salazar
Recent bookmarks
0

Tom Stanworth

Member
Joined
Sep 4, 2003
Messages
2,021
Format
Multi Format
One of the hardest things in printing IMO is to produce subtle high values without them blowing under lighting or looking leaden... while getting all your other values where you want them. I often find I have to go through the hassel of printing a number of shades, quick washing and then drying to allow me to observe the subtle variations that seem to have a huge effect on the balance of the final print.

When I print a number of slight variations I often find myself becoming blind to the changes in highlihgt density when observing the wet images in the tray. The ability to distinguish the variations in highlght density comes back when I take time away from the prints and the lights and see them afresh. Does anyone else find they become snow blind when working on prints with lots of high key tones, or bright subtle highlights?

I often find myself printing lighter and lighter only to find that the later, lighter prints, ended up too light. I invariably find the earlier (more dense) prints (printed according to values ascertained from dried test prints) were spot on and I keep getting led astray by what my eyes tell me when the prints are wet. Note that this is the opposite of drydown i.e. my eyes somehow imagine/see more density than is really there with the wet prints.
 

hadeer

Member
Joined
Dec 30, 2006
Messages
166
Location
The Netherla
Format
Medium Format
Wirelessly posted (Palm TX: Mozilla/4.0 (compatible; MSIE 6.0; Windows 98; PalmSource/Palm-D050; Blazer/4.3) 16;320x448)

I have the experience that the one print that turned out to be the best looked too dark when still in the tray.
 

rternbach

Member
Joined
Dec 30, 2006
Messages
276
Location
Western Mass
Format
Med. Format RF
I often find myself printing lighter and lighter only to find that the later, lighter prints, ended up too light. I invariably find the earlier (more dense) prints (printed according to values ascertained from dried test prints) were spot on and I keep getting led astray by what my eyes tell me when the prints are wet. Note that this is the opposite of drydown i.e. my eyes somehow imagine/see more density than is really there with the wet prints.

Sounds like a retinal fatigue factor at work. I don't do this type of wet darkroom printing myself but it sounds like if you took more frequent breaks, in low light conditions, or did fewer prints at a time you might correct this. Wearing deep red filter glasses to re-adapt your eyes might also help.

Best,

Rudy
 

Wade D

Member
Joined
Feb 15, 2006
Messages
897
Location
Jamul, CA
Format
Multi Format
I know what you mean about whites being hard to judge in the darkroom. If there is detail in a white area most of the time it will not be evident in the wet print. Only after the print is dry and viewed in room light will the detail appear. The problem is not the eyes but the subtle variation of tones in the light areas. Much harder to judge than mid or dark tones.
 

bill spears

Member
Joined
May 30, 2007
Messages
565
Location
Cornwall Eng
Format
Multi Format
Yes, this is probably the biggest struggle I too have with my prints. As mentioned above, some highlights don't become visible until after drydown, esp with fibre paper. I've come to expect that my first session when printing new negs will not be succesful and I often trash my prints the following morning ! The second session is usually much better.
A simple trick I use to judge highlight tone is to snip a small corner off the print border - which is paperbase white - then place it right next to the brightest highlight in the image. Its quite suprising how what looks like a blown high value in the print does actually have some tone in it when you see it next to paperbase white. This works on both wet and dry prints.

The more you compare and the longer you stare the worse it gets !!!
 
OP
OP

Tom Stanworth

Member
Joined
Sep 4, 2003
Messages
2,021
Format
Multi Format
I guess it makes sense mathematically. The doubling in density of a very, very light tone still results in a very light tone, so substantial variations are still barely if at all perceptible, whereas add even 10% to a mid tone and it is very obvious. My solution is to make sure all my chemicals are at a stable temperature and to trust my settings derived from prints dried in the airing cupboard/boiler closet. The high key prints often look still too dark in the tray, but end up looking fine when dry and under the right lighting. Its one of those instances when I have to over-ride what my eyes tell me, because normally I am pretty good at assessing wet prints for density.
 

rternbach

Member
Joined
Dec 30, 2006
Messages
276
Location
Western Mass
Format
Med. Format RF
So if I understand what's being said here, judging the final tone in high value areas is difficult when viewed in the darkroom and while the the print is wet. Obviously there are skills to be learned through experience and one is to have a paper white strip to compare the highest value areas against. Would having a lamp selected specifically for this purpose help? What about having a standard 18% gray background to place under the lamp and beside the print? Would any of this help to standardize the process?
 

Bruce Watson

Member
Joined
Mar 28, 2005
Messages
497
Location
Central NC
Format
4x5 Format
So if I understand what's being said here, judging the final tone in high value areas is difficult when viewed in the darkroom and while the the print is wet. Obviously there are skills to be learned through experience and one is to have a paper white strip to compare the highest value areas against. Would having a lamp selected specifically for this purpose help? What about having a standard 18% gray background to place under the lamp and beside the print? Would any of this help to standardize the process?

The only thing that helped me was to finally come to the understanding that it's nearly impossible to evaluate highlights on a wet print. Once you learn that, you learn to keep good notes and dry the print before trying to evaluate the highlights.

A lot of people really object to this. It does disrupt the "natural" feedback of darkroom work. It becomes more of a methodical working process and less of an intuitive do-what-feels-right exercise. But it's the only way I know to make the print do what I want it to do and look right on the wall. And for me that takes precedence over everything else.
 

Bob Carnie

Subscriber
Joined
Apr 18, 2004
Messages
7,735
Location
toronto
Format
Med. Format RF
A method I use is to flip the print over while wet and see the difference to the paper white to tones within the highlights.
A well exposed and processed negative that includes a lot of white tones should not be far off when the rest of the image looks good.
There may be some burning in to do but not as much as one would think.
A good method that I use and I know Les does as well is to not only burn in the whites with normal grade but as well burn in with grade 5.
What this does is set the dark tones within the highlight regions to create separation.
Just burning in with a lower filter will basically IMO muddy the highlights.

Also if a sky is white with no major drama in the original scene , it is best to let the image land as it should , rather than trying to hammer in sky detail that may not be there.

Also with this type of clear sky, I will always look at the border where the easel overlays the image and if I can see a faint line that indicates the border then I know there is tone when it drys down

I think a lot of printers try to over work images and the result is the viewer sees the work which IMO not a good print.
 
Joined
Mar 17, 2009
Messages
420
Format
Medium Format
When still in the darkroom, you can judge white tones against the border or back of the paper, since those areas will always be as white as possible since they've not been exposed at all. The best thing to do is to take it out in the light and look at it. If you're printing on fiber, you can dry your prints quickly in a microwave.
 
Joined
Jan 21, 2003
Messages
15,708
Location
Switzerland
Format
Multi Format
Most excellent advice. Thanks, Bob! The whole 'relative to paper white' thing applies to papers with a cream base too, as you have the easel overlap to review and compare to.

The thing I find the most challenging is how much density in the highlights I need so that they are still present after I tone them. With pot ferri and sulfide toner, the highlight tone gets reduced some, and if I give a second bath in selenium, that tends to obliterate some of the highlight tone as well, effectively increasing contrast. To get all of that just right is challenging to the Nth degree. At least for me. But I think it's about developing a sense for what the end result is going to be, and for me it has helped to use just two types of paper (mainly) for printing - Ilford MG and MGWT. This way it's easier to learn exactly how much the print will dry down, and how much it will bleach out during toning.

- Thomas

A method I use is to flip the print over while wet and see the difference to the paper white to tones within the highlights.
A well exposed and processed negative that includes a lot of white tones should not be far off when the rest of the image looks good.
There may be some burning in to do but not as much as one would think.
A good method that I use and I know Les does as well is to not only burn in the whites with normal grade but as well burn in with grade 5.
What this does is set the dark tones within the highlight regions to create separation.
Just burning in with a lower filter will basically IMO muddy the highlights.

Also if a sky is white with no major drama in the original scene , it is best to let the image land as it should , rather than trying to hammer in sky detail that may not be there.

Also with this type of clear sky, I will always look at the border where the easel overlays the image and if I can see a faint line that indicates the border then I know there is tone when it drys down

I think a lot of printers try to over work images and the result is the viewer sees the work which IMO not a good print.
 

rmolson

Member
Joined
Feb 23, 2006
Messages
327
Location
Mansfield Oh
Format
Medium Format
Judging values

Years ago I had to judge color shifts in prints, One of the tricks was to not stare too long. As the brain starts to correct the shift to what it perceives as normal. I would glance at the print and look away and go by my first impression, which was often more accurate than a detailed study. Tends to work under my inspection light in the darkroom too Never could judge a print in the tray under a safelight.
 

rternbach

Member
Joined
Dec 30, 2006
Messages
276
Location
Western Mass
Format
Med. Format RF
All of this is very informative and I thank you all for discussing your experiences in this area. One more naive question I have concerns the possible use of several test strips through clouds and problem highlights. Is it useful to do these small strips, pull them out of the developer at different times, quick dry using a microwave or hair dryer and view under a viewing light or in daylight? Would this then guide you correctly for the full-size print?

Best,

Rudy
 
Last edited by a moderator:

Bob Carnie

Subscriber
Joined
Apr 18, 2004
Messages
7,735
Location
toronto
Format
Med. Format RF
IMO when silver printing it is best to process for the full time. pulling the tests early won't be much help. Maybe to salvage a print but I do not think this is what we are talking about here.

One thing I did not mention in my last post was I always dodge images, in fact I was taught by a pretty good printer that dodging during exposure was the most important factor .
What good dodging allows you to do is let the mid to upper highlights come in much more than some printers who
stop about 1/2 way and try to burn in the mid highlights to upper highlights.
This requires a swift and precise dodge pattern with counting the overall time in the head.
After a few thousand prints this method of massive dodge becomes second nature.

There fore I do my test to see good mid and highlight tone with very little need for burning , During this main exposure , I will isolate the shadow areas and make sure I dodge well and good.
and I use a modified split method of exposure with filters to use the Grade 5 filter to make the good shadow detail and black detail.
Starting with a lower grade filter for the first exposure allows more highlight tone to show its head.

As Thomas points out keeping the range of options ie paper, dev and time small , in the beginning stages will help you find your printing style.
Also a very little known fact, at least to me is that Lith Printers make better traditional silver printers.
Why
Because when one is forced to watch an image emerge time , time , and again, one begins to see the way this whole wonderful process works, Lith Printers judge in safe light and get a keener sense of the whole process.
When I started Lith Printing , I realized this simple fact, and now no matter what process I am very , very keen on how the print looks in the developer, with practice and a few hundred prints under your belt, you may not need room lights to make prints as everything is under your nose, you just have to look.
All dodging burning is definately apparent, and after time density and contrast can be judged.

who needs those stinkin microwaves and room lights, just make three variations and after time working in the darkroom becomes super cool


hope this make sense.


All of this is very informative and I thank you all for discussing your experiences in this area. One more naive question I have concerns the possible use of several test strips through clouds and problem highlights. Is it useful to do these small strips, pull them out of the developer at different times, quick dry using a microwave or hair dryer and view under a viewing light or in daylight?

Best,

Rudy
 

George Collier

Subscriber
Joined
Feb 23, 2005
Messages
1,363
Location
Richmond, VA
Format
Multi Format
In addition to Bob's good suggestions, you might also try a low wattage inspection light over the tray, ceiling height, wattage low enough to compensate for dry-down (trial and error for this). It didn't take me long, and my highlight evaluation in the darkroom is very good. Another thing, though - never evaluate a print in the tray - set up a piece of glass or plexi, on the other side of the sink, angled so that when you stand back to 5 - 6 feet or so (1 - 2 meters), your eyes are looking down to the glass at about 90 degrees. Then place the print on the angled surface, let it drain some and look. Doing this and finding the right wattage for the bulb works really well for me and others (there was a thread within the last year on print viewing wherein this was discussed).
One other thing - sheild your eyes from direct light from this bulb, and have no other lights on in the darkroom (except the safelights:wink:)
 

Nikanon

Member
Joined
Jul 11, 2009
Messages
433
Location
Chugwater, Wyoming
Format
35mm RF
It's like selenium toning while watching, you'll never know the degree of your toning in comparisson to untoned of you flat out watch it. Figure out what's right in the test strip ( make sure your negative has density in the areas your trying to obtain it, and maintain all your variables during actual printing, and don't determine anything is wrong until the print is fully processed, unmanagable
blown out whites are
mainly due to exposure, if you think during exposure the high values exceed recordable range of the film reduce your development
 

Martin Aislabie

Subscriber
Joined
Nov 17, 2007
Messages
1,413
Location
Stratford-up
Format
4x5 Format
I use the Les McLean “Dry Down” method of assessing wet prints and then knock a bit off for dry down

If you go to Les McLeans’ Web Site he has an article on it.

However, when assessing the highlight density of a wet print, I find it is very important that it is laid onto a neutral tone surface, as the wet paper is translucent, so by placing it on a surface this backlight it eliminated.

I agree with Bill Spears, the longer you stare the worse it gets but find having some reference prints around to look as comparators helps.

Having said that, an awful lot of my prints end up in the recycle bin the next day

Martin
 

Anon Ymous

Member
Joined
Feb 7, 2008
Messages
3,661
Location
Greece
Format
35mm
...If you go to Les McLeans’ Web Site he has an article on it...

He has posted his method right (there was a url link here which no longer exists) in APUG. The articles section has quite a lot of information that many members don't even know about.
 

brian steinberger

Subscriber
Joined
Jan 5, 2007
Messages
3,007
Location
Pennsylvania
Format
Med. Format RF
I used to have problems with this as well. I tried the drydown percentage thing as well as a dimmer viewing light. Then I got an old microwave from someone for free. Drying test strips has greatly increased my accuaracy with highlight detail. The other nice thing is once dry, I can take the strip out of the darkroom into daylight, living room light, any light I'm going to hang or view the print in and judge highlight detail. This to me has been one of the greatest advances in my printing, though it seems to simple. I can't stress the importance of viewing a dry test strip, atleast from my experience.
 

RalphLambrecht

Subscriber
Joined
Sep 19, 2003
Messages
14,643
Location
K,Germany
Format
Medium Format
One of the hardest things in printing IMO is to produce subtle high values without them blowing under lighting or looking leaden... while getting all your other values where you want them. I often find I have to go through the hassel of printing a number of shades, quick washing and then drying to allow me to observe the subtle variations that seem to have a huge effect on the balance of the final print.

When I print a number of slight variations I often find myself becoming blind to the changes in highlihgt density when observing the wet images in the tray. The ability to distinguish the variations in highlght density comes back when I take time away from the prints and the lights and see them afresh. Does anyone else find they become snow blind when working on prints with lots of high key tones, or bright subtle highlights?

I often find myself printing lighter and lighter only to find that the later, lighter prints, ended up too light. I invariably find the earlier (more dense) prints (printed according to values ascertained from dried test prints) were spot on and I keep getting led astray by what my eyes tell me when the prints are wet. Note that this is the opposite of drydown i.e. my eyes somehow imagine/see more density than is really there with the wet prints.

Tom

I think every printer battles this or similar effects. Here is what I do to print with more confidence for the right highlights:

1. Exposing for the highlights is the best method IMHO.
2. Never evaluate a wet print in the fixer or the wash.
3. I hand squeegee the print off and hang it at a dedicated evaluation board.
4. The board is illuminated with a 100W bulb at 6 feet (EV7).
5. I use test strips of the same area which have a 1/4" white gap between them. This is how they come out of my test-strip printer.
6. The white gap is the white reference for me. All highlights are evaluated against it.
7. I print until my brightest highlights are just above Dmin.
8. The final conformation is done with a dried test strip (microwave oven), which typically causes me to reduce the exposure by 1/12 stop.
9. Now let's take care of the shadows with contrast.
 

BetterSense

Member
Joined
Aug 16, 2008
Messages
3,151
Location
North Caroli
Format
35mm
Tom

I think every printer battles this or similar effects. Here is what I do to print with more confidence for the right highlights:

1. Exposing for the highlights is the best method IMHO.
2. Never evaluate a wet print in the fixer or the wash.
3. I hand squeegee the print off and hang it at a dedicated evaluation board.
4. The board is illuminated with a 100W bulb at 6 feet (EV7).
5. I use test strips of the same area which have a 1/4" white gap between them. This is how they come out of my test-strip printer.
6. The white gap is the white reference for me. All highlights are evaluated against it.
7. I print until my brightest highlights are just above Dmin.
8. The final conformation is done with a dried test strip (microwave oven), which typically causes me to reduce the exposure by 1/12 stop.
9. Now let's take care of the shadows with contrast.

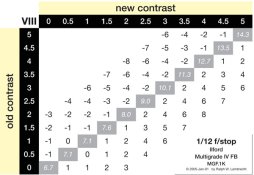
Did you really mean 1/12 stop? That's such a tiny difference.

Also, if you use gel filters to adjust contrast, your white point will change along with the shadow density. Do you use a split-grade technique?
 

RalphLambrecht

Subscriber
Joined
Sep 19, 2003
Messages
14,643
Location
K,Germany
Format
Medium Format
Did you really mean 1/12 stop? That's such a tiny difference.

Also, if you use gel filters to adjust contrast, your white point will change along with the shadow density. Do you use a split-grade technique?

The eye's sensitivity to tonal changes is impressive! Viewed next to each other, differences of 1/24 stop can easily be seen in Zone II or VIII at normal grades (goes down to 1/96 stop in Zone V), but I limit my printing efforts to 1/12 stop to keep it practical.

I mainly use a dichroic color head and calibrated settings to compensate for the highlight point at Zone VIII shifting with contrast changes.
 

Attachments

  • PaperContrastComp2.jpg
    PaperContrastComp2.jpg
    36.9 KB · Views: 87

rternbach

Member
Joined
Dec 30, 2006
Messages
276
Location
Western Mass
Format
Med. Format RF
If I remeber my correctly, 1/12 stop may be more than 1 JND ("just noticeable difference") but this is not a constant and will change depending on where you are along the brightness curve.
 

RalphLambrecht

Subscriber
Joined
Sep 19, 2003
Messages
14,643
Location
K,Germany
Format
Medium Format
If I remeber my correctly, 1/12 stop may be more than 1 JND ("just noticeable difference") but this is not a constant and will change depending on where you are along the brightness curve.

Correct!
However, you can only control two points of the characteristics curve (the rest falls whereever the material and processing characteritics want it to), and one is well advised to control a highlight point with exposure and a shadow point with contrast. Even then, 1/12 stop is not a constant and changes with paper contrast, but it works well for grade 2. nevertheless, the harder the paper, the more sensitive the print is to exposure deviations.
 
Photrio.com contains affiliate links to products. We may receive a commission for purchases made through these links.
To read our full affiliate disclosure statement please click Here.

PHOTRIO PARTNERS EQUALLY FUNDING OUR COMMUNITY:


Ilford ADOX Freestyle Photographic Stearman Press Weldon Color Lab Blue Moon Camera & Machine
Top Bottom