Goerz Dagor: Broken iris.

A window to art

D
A window to art

  • 0
  • 0
  • 25
Bushland Stairway

Bushland Stairway

  • 4
  • 1
  • 72
Rouse st

A
Rouse st

  • 6
  • 3
  • 110
Do-Over Decor

A
Do-Over Decor

  • 1
  • 1
  • 117

Recent Classifieds

Forum statistics

Threads
199,241
Messages
2,788,408
Members
99,840
Latest member
roshanm
Recent bookmarks
0

paul_c5x4

Member
Joined
Apr 22, 2009
Messages
1,942
Location
Ye Olde England
Format
Large Format
Setting up a camera and twisting the aperture, I noticed things were not as smooth as they should be - It felt like something was binding inside my 360mm Goerz Dagor (dating from around 1908). Popped the cells out and found one of the pins missing from an iris blade and it is missing another completely. Making and fitting a new pin is going to be challenging as it is tiny (1.5mm Dia, 0.8mm long). Should be able to find some brass rod, so it shouldn't be too much of a problem...

The missing blade could well prove to be another matter - Cutting 0.008" sheet is going to be tricky, and as for measuring it to determine inside & outside radii and pin locations, I may well struggle. Don't suppose anyone has a dimensioned drawing available ?


Before anyone suggests Flutot's or SK Grimes - Neither are an option due to shipping costs and money.
 
Joined
Oct 29, 2006
Messages
4,829
Location
İstanbul
Format
35mm
Contact with Carl Zeiss Archives , they sent me few Dagor diagrams , 3 or so and I posted to the articles , they were the only dagor diagrams in entire zeiss archive. If they dont reply in two days , write again and ask them whats going on, thats the way to get technical know how from an german archive.

http://www.zeiss.com/corporate/en_de/website/forms/inquiry.html

For product literature , 100000 of them are there but I could not locate in 1908 , any related document .

http://www.zeiss.com/corporate/en_de/history/archives.html#product-literature

There is a German search option in archives .

http://www.archive.zeiss.de/dok_start.fau?prj=zeiss&dm=akten

I found two papers related to Dagor.


VEB 1948-1964 Als Lesezeichen speichern
Signatur neu:
BACZ 7976
Herkunft:
Photoobjektive
Aktentitel:
669 Korrektions-Darstellungen von Photo-Objektiven eigener Zeissfertigung und fremder Firmen
enthält:
Fotokopien
Laufzeit:
1920 - 1950
Stichwörter:
Fotoobjektive, Darstellungen; Fotoobjektive, Zeissfertigung, Darstellung; Fotoobjektive, fremde Firmen, Darstellung
Geräte:
Tessar 4,5/40; Ernemann 2:10; Tessar 6,3/50; Triplet 3.2:178; Triplet 2,7/7,5; Triotar 3,0/2,7; Hypar 3/35, modifiziert; Tessar 2,7/8,2; Tessar 2,7/8; Teleobjektiv, Rudolph 8/50; Projektionsobjektiv, Müller/Wetzig, 3,6/32; Triotar 3,5/21; Triplet, Spiegelglas, 3,6/7,5; Projektionstriplet, 3,6/15; Tessar 3,57/15; Heliar 4,5/15; Biotar 1,8/8.5; Sucherobjektiv 4,5/7,5; Dogmar 3,5/100,7; Ernemann 2:100; Teleobjektiv 4,5/10; Teleobjektiv 5,3/10; Ernostar 2,7/10; Biotar 1,8/12; Hypergon 22:6; Dagor 1:6,8 / 100; Geodar 7,7/100; Fliegerobjektiv 4,5/21; Epikar 3,7/37; Skopar 4,5/13,5; Kodar 7,9/131; Kodak, Anastigmat 6,3/13; Projektionstriplet 4/38; Radionar 4,5/7.5; Voigtländer 4,5/10; Orikar 3,6/36; Ernoskop 3,2/33,5; Magnar 10:45; Doppelquastigmat 4,5/13,5; Ernostar 2/100; Biotessar 2,2/1,5; Biotessar 2,25/1,5; Tessar 2,7/2,5; Quarzanastigmat 6,3/386; Ernastigmat 6,3/135; Triplet 6,3/13,5; Tessar 4,5/15; Epiotar 3,5/26; Biotessar 2,8/1,7; Geodar 5/21; Biotar 1,4/8,5; Biotar 1,9/2,5; Biotar 1,5/2,5; Weitwinkeldagor 9/10; Trioplar 6,3/135; Biotessar 2,7/4; Kinoteletessar 4/15; Igetar 8,8/9,5; Orthometar 8/13,5; Suchertriplet 2,8/6; William Lee & Kapella 1,8/10; Gallus-Objektiv 8,5/24; Leica-Objektiv 3,5/5; Anastigmat 4,5/10; Triplet 4,5/5; Tessar, Teletessar 850; Anastigmat 2,5/100; Projektionsobjektiv 1,9/10; Mikroprojektionsobjektiv 3,3/5; Tessar, Steoplagmesstessar 8/21; Tessar 3,5/5; Voigtländer 3,5/10; Henon 2/4,5; Geodar 8/13,5; Triplet 4/7,5; Sonnar 4/7,5; Quarzanastigmat 4,5/12; Apochromatclaron 9/18; Sonnar 2,8/5; Sonnar 2/5; Spiegelglastriplet 7,7/10; Tessar 2,8/5; Leitz-Objektiv 2,5/100; Triplet 4/8,0; Sonderobjektiv, MG-Kamera 7,5/9; Messfliegerobjektiv 4,5/25; Pantoskop, Busch 30/206; Orthometar 4,5/21; Sonnar 2/8,5; Tessar 8/2,8; Gramatzki 1,4/10; Meyersatzplasmat 4,5/10; Ernostar 1,4/5; Biotar 1,4/5; Sonnar 1,4/13,5; Biotar 2/5; Biotar 2/4,5; Sonnar 1,4/2,5; Tessar, Teletessar 10/25; Sonnar 1,5/5; Biotar 2/4; Zeiss Ikon 2,8/10; Triplet 3,5/10; Tronnier 3,8/100; Sonnar 2,8/7,6; Minor 1,4/4; Tessar 5/50; Objektiv, Fernobjektiv 8/50; Sonnar 4/13,5; Weitwinkelobjektiv 6/9,5; Kapella 4,5/10; Weitwinkelobjektiv 5,5/10; Feuillet 4/28,3; Schneider 4,5/100; Triplet 3,8/7,5; Tristar 2,8/1,25; Suchertriplet 3,5/7,5; Triplet 4,8/12; Weitwinkelobjektiv 8/3,8; Sonnar 1,2/35; Sonnar, Telesonnar 2,8/1,8; Triotar 5,6/10,5; Epiotar 3,5/43; Biotar 4/10; Voigtländer 2,8/10; Tessar 4,5/50; Biotar 0,85/12; Sonnar 1,5/1,5; Sonnar 2/1; Apo-Planar 9/10,5; Liotar 2/10; Suchertriplet 2,8/7.5; Sonnar 2/8; Triplet 16/21; Sonnar 4/18; Sonnar 4/30; Alinar 1,9/9; Triplet 16/36; Biotessar 2,8/5; Biotar 4/20; Tessar 4,5/25; Tessar 16/21; Weitwinkelobjektiv 6,3/6; Biotessar 2,8/12,4
voriges Datensatz Anfang der Liste 2 von 2 : Forschungszentrum Als Lesezeichen speichern
Signatur neu:
WB 3085
Herkunft:
Prüfvorschriften; Prüfvorschriften W
Aktenplan (1975-1990):
5.2.1.46. Technische Prüfvorschriften
Aktentitel:
Prüfvorschriften für mechanische Komponenten (64) und optische Komponenten (72): Foto
enthält:
Qualitätsanforderungen von mechanischen, optischen Komponenten/Teilkomponenten; technische Parameter; Angabe der Prüfmittel und Prüfmethoden; Messbedingungen und -methoden; Funktionsprüfung des Gerätes und deren Zubehörteile; Sauberkeitsvorschriften; Einstell- und Messbereiche festlegen; Temperaturbedingungen; Auswertung von Messergebnissen; Betriebssicherheit, Schutzgüte; Beschreibung, Funktion und Einstellbedingungen der Bedienelemente; Verhalten des Gerätes
Laufzeit:
1953 - 1968
Stichwörter:
Qualitätssicherung (Foto); Prüfmittel (Foto); Blendendurchmesser; Auflösungsvermögen; Lichthof; Lichtpunkt; Brennweite; Bildgüte (Foto); Verspannung (Deformierung Lichthof); Kälteverhalten; Wärmeverhalten; Kontrastminderung; Springblende; Blendenschließzeit; Lichtdurchlässigkeit; Schlieren; Entfernungsteilung; Bildfeldwinkel; Dauerbelastung, Springblende; Transmissionsgrad; Wärmeverhalten; Kälteverhalten; Entfernungseinstellung; Blendeneinstellung; Druckblende; Dauerbelastung; Drehwinkel; Blendendurchmesser; Farbortlage; Tiefenschärfe
Geräte:
Biometar 2,8/120; Pancolar, 2/50; Biometar 2,8/80; R-Sonnar 1,5/50; Cardinar 2,8/85; Cardinar 4/240; Biometar 2,8/55; Biometar 2,8/77; Triplet 2,8/18 mit 8-Kantprisma; Flektar 3,5/75; UV Achromat 4,5/120; Novonar 3,5/50; Dagor 1:6,8 / 180; Tessar 4,5/40
Institutionen:
FKon1; ZPrüf (Zentrale Prüfabteilung); PhoPrüf; PhokonEnd; PhoKonTest; SKon; FELFo; QQ


English Translation of the second result.

Good luck

Quality requirements of mechanical, optical components / subcomponents; technical parameters; Specification of test equipment and test methods; Measurement conditions and methods; Functional testing of the device and its accessories; Cleanliness requirements; Set the adjusting and measuring ranges; Temperature conditions; Evaluation of measurement results; Reliability, quality protection; Description, function and setting conditions of the controls; Behavior of the device
Running time:
1953 - 1968
Tags:
Quality Assurance (photo); Test equipment (photo); Aperture diameter; Resolving power; Atrium; Light spot; Focal length; Image quality (photo); Strain (deformation atrium); Temperature behavior; Thermal behavior; Contrast reduction; Springblende; Aperture closing time; Light transmission; Striae; Distance sharing; Field angle; Continuous load, automatic diaphragm; Transmittance; Thermal behavior; Temperature behavior; Distance setting; Aperture setting; Pressure diaphragm; Continuous load; Angle of rotation; Aperture diameter; Farbortlage; Focus
Equipment:
Biometar 2.8 / 120; Pancolar, 2/50; Biometar 2.8 / 80; R-Sonnar 1.5 / 50; Cardinar 2.8 / 85; Cardinar 4/240; Biometar 2.8 / 55; Biometar 2.8 / 77; Triplet 2.8 / 18 with 8-prism; Flektar 3.5 / 75; UV achromat 4.5 / 120; Novonar 3.5 / 50; Dagor 1: 6.8 / 180; Tessar 4.5 / 40
Institutions:
FKon1; ZPrüf (Central Inspection Department); PhoPrüf; PhokonEnd; PhoKonTest; Skøn; FELFo; QQ
 

gone

Member
Joined
Jun 14, 2009
Messages
5,504
Location
gone
Format
Medium Format
Have you thought about trying it with the missing blade? I had a lens like that, and decided to shoot it anyway. Surprisingly, it worked fine.
 

shutterfinger

Member
Joined
Feb 25, 2013
Messages
5,020
Location
San Jose, Ca.
Format
4x5 Format
Here in the states I used some 1/16 brass rod available at hardware stores and hobby shops, chucked a piece in a Dremel, laid it against a smooth cut flat file, then turned the Dremel on to medium speed and turned the rod down to the diameter needed for the aperture pin then used a cutoff wheel in the Dremel to cut it to length. Make a few extras as those tiny pins have a tendency to jump out of the holding tool when attaching. I soldered the one I made in place.

You will have to have the aperture separated to install the new blade so why not just use an existing blade as a template?

1/16=.0625 inch *25.4=1.5875mm
6 inch stainless steel digital readout calipers are readily available on line from Amazon and Ebay at a low cost and are very handy to have in camera work.
 
OP
OP
paul_c5x4

paul_c5x4

Member
Joined
Apr 22, 2009
Messages
1,942
Location
Ye Olde England
Format
Large Format
Contact with Carl Zeiss Archives , they sent me few Dagor diagrams

I would have thought it unlikely Zeiss would have any engineering drawings with dimensions, but if I get stuck, I'll ask them.


Have you thought about trying it with the missing blade?

I had used the lens with one blade missing and didn't notice anything amiss. Now that a second blade has been removed, it kinda bugs me and I have a hankering to fix it properly.

6 inch stainless steel digital readout calipers are readily available on line from Amazon and Ebay at a low cost and are very handy to have in camera work.
Indeed, and when I need to measure better than +/- 0.02mm, I reach for the digital micrometer (good for +/- 0.002mm). A small lathe is also very useful when it comes to making bits - Already had a go at turning a new pin or three (lost a couple in the swarf), and once I've cleaned off the pip, it should be usable.
 

trythis

Member
Joined
Sep 26, 2013
Messages
1,208
Location
St Louis
Format
35mm
I have lots of shim stock in .002 through .009 if you need some in brass, steel and stainless. I can mail you a piece big enough to make a few. Getting it FLAT after cutting would seem like the hardest part.
 
Joined
Oct 29, 2006
Messages
4,829
Location
İstanbul
Format
35mm
I have lots of shim stock in .002 through .009 if you need some in brass, steel and stainless. I can mail you a piece big enough to make a few. Getting it FLAT after cutting would seem like the hardest part.

If I get it right, you would be needed to cut surfaces flat also parallel. I remember engrave with burin videos and sharpening your burin videos at youtube for preparation for Intaglio Printing.

Burin is sensitive tool and it must be sharp and surfaces must be equal and parallel.

There are very fine polishing stones and oil and rubbing the surfaces with very careful hand movements may be 3 -4 seconds were enough.

Metals are hard but very easy hand or machine finish. Even with latest technology and expertise , Patek Phillippe creates final finish with rubbing on grit and finger tip , eye check.
 
OP
OP
paul_c5x4

paul_c5x4

Member
Joined
Apr 22, 2009
Messages
1,942
Location
Ye Olde England
Format
Large Format
I had in mind melting some wax on to a block of aluminium and floating a piece of shim stock on before it cooled down - Got some hard wax from a lapidarist, but if that doesn't work, some shellac or balsam should do the job. Once mounted, I can hopefully cut the profile on a milling machine without too much difficulty.
 

E. von Hoegh

Member
Joined
Sep 14, 2011
Messages
6,197
Location
Adirondacks
Format
Multi Format
I made a set of aperture blades for an old Compound shutter, the originals were some sort of composite which disintegrated.
Having measured the radii, I turned a ring with the appropriate ID and OD, cut segments out of the ring, drilled the segments with holes of the appropriate size and spacing for the pins, and put steady pins in the holes. After rounding the ends and hardening, the segments were used as a filing jig by clamping in a vise. Shim stock was prepared by cutting roughly to shape and drilling holes for the pins, the steady pins of the jig fit through these holes. The pins were made on a lathe and riveted to the blades.

Someone over at LFF made a set with a laser cutter, it looked like a beautiful job.
You wanna do it, do it right. ;
 
OP
OP
paul_c5x4

paul_c5x4

Member
Joined
Apr 22, 2009
Messages
1,942
Location
Ye Olde England
Format
Large Format
Make a few extras as those tiny pins have a tendency to jump out of the holding tool when attaching.

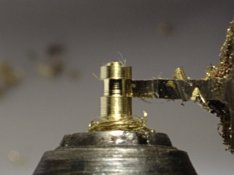
Lost the pins I made the other evening, fortunately the lathe is still set up. Three more turned this evening :smile:
 

Attachments

  • pin.jpg
    pin.jpg
    30.1 KB · Views: 133

Ian Grant

Subscriber
Joined
Aug 2, 2004
Messages
23,273
Location
West Midland
Format
Multi Format
C..P Goerz (in Germany(became part of Zeiss Ikon so Carl Zeiss Jena would have all the documentation that was passed to the, they made a few Dagors.

Goerz A.M. Opt the US side became independent before WWI. they were eventually bought by Schneider's US subsidiary so their rights to many of the designs went to Schneider.

Ian
 

AgX

Member
Joined
Apr 5, 2007
Messages
29,973
Location
Germany
Format
Multi Format
I made a set of aperture blades for an old Compound shutter, the originals were some sort of composite which disintegrated.
Having measured the radii, I turned a ring with the appropriate ID and OD, cut segments out of the ring, drilled the segments with holes of the appropriate size and spacing for the pins, and put steady pins in the holes. After rounding the ends and hardening, the segments were used as a filing jig by clamping in a vise. Shim stock was prepared by cutting roughly to shape and drilling holes for the pins, the steady pins of the jig fit through these holes. The pins were made on a lathe and riveted to the blades.

What shimming material did you use? I assume hardened steel.

(Shimming tape is also availabe in stainless steel and brass.)
 

trythis

Member
Joined
Sep 26, 2013
Messages
1,208
Location
St Louis
Format
35mm
I did find some .008 brass. In a few days I will sort out shipping.
 
OP
OP
paul_c5x4

paul_c5x4

Member
Joined
Apr 22, 2009
Messages
1,942
Location
Ye Olde England
Format
Large Format
I would probably try something like sandwiching the desired shim with coats of super glue and some other shim stock,

Had one of those "why didn't I think of that sooner " moments.... Got a box of dry mount tissue - That should work to hold down some shim stock whilst it is being machined :smile:
 
OP
OP
paul_c5x4

paul_c5x4

Member
Joined
Apr 22, 2009
Messages
1,942
Location
Ye Olde England
Format
Large Format
Rats...

Settled down to solder a replacement pin to the old blade last night. Gently scraped some of the black stuff away and found more black stuff underneath. It would appear that the blades are made from a phenolic laminate.... Also noticed a couple of the other blades have cracks around the pivot points, so it looks like I'll be making a few more :sad:
 
OP
OP
paul_c5x4

paul_c5x4

Member
Joined
Apr 22, 2009
Messages
1,942
Location
Ye Olde England
Format
Large Format
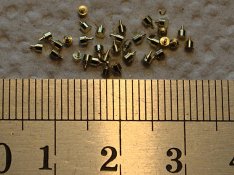
Whilst waiting for some shim stock to arrive (thanks trythis, much appreciated), made a few pins - 1.5mm diameter, 1.25mm long, with a 0.20mm shoulder. Lost a few in the bottom of the swarf tray, and a few more pinged off in to the dark recesses of the workshop.

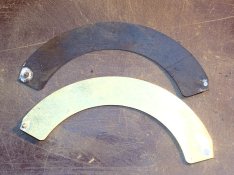
Ended up using double sided sticky tape to hold the brass to the table while cutting the blades. Cutting forces are minimal with such thin material. After soldering the pins in place and filing down the pips, dropped a blade in to a ammonia copper carbonate solution. This was prepared by dissolving a spoonful copper sulphate in ~100ml water then adding sodium carbonate a little bit at a time until it stopped foaming. The precipitate was then filtered and washed a few times by pouring hot water through the deposits left in the filter paper. The precipitate was then dissolved in ~100ml of household ammonia (nominally, a 5% solution) and a blade submerged for 20 minutes or so. The attached image shows the result - Should be more than adequate for an aperture blade.

For reference, should anyone come looking for information, I've also attached the CAD file. This is for a C.P. Goerz of Berlin 360mm Dopp-Anastigmat Series III Dagor - Other variants of this lens may use the same shape and size of blades, but no guarantee.
 

Attachments

  • pins.jpg
    pins.jpg
    79.3 KB · Views: 120
  • blades.jpg
    blades.jpg
    63.3 KB · Views: 142
  • Dagor_dxf.txt
    13.3 KB · Views: 97

trythis

Member
Joined
Sep 26, 2013
Messages
1,208
Location
St Louis
Format
35mm
How did you get the curl from the shim stock? Or is flatness not as critical? It's hard to tell how small they are.


Typos made on a tiny phone...
 
OP
OP
paul_c5x4

paul_c5x4

Member
Joined
Apr 22, 2009
Messages
1,942
Location
Ye Olde England
Format
Large Format
How did you get the curl from the shim stock?

There wasn't much of a curve to the sheet you sent. At just over 2" long, any curl left after being clamped down & sanded is barely noticeable - Once assembled, the replacement blades appear flat enough. If anything, any remaining curl will help to keep the pins located in their appropriate holes/slots.
 
Photrio.com contains affiliate links to products. We may receive a commission for purchases made through these links.
To read our full affiliate disclosure statement please click Here.

PHOTRIO PARTNERS EQUALLY FUNDING OUR COMMUNITY:


Ilford ADOX Freestyle Photographic Stearman Press Weldon Color Lab Blue Moon Camera & Machine
Top Bottom