Fujicolor CrystalArchive paper - Orange Mask

Rouse st

A
Rouse st

  • 4
  • 3
  • 43
Do-Over Decor

A
Do-Over Decor

  • 1
  • 1
  • 82
Oak

A
Oak

  • 1
  • 0
  • 68
High st

A
High st

  • 10
  • 0
  • 98

Recent Classifieds

Forum statistics

Threads
199,231
Messages
2,788,236
Members
99,837
Latest member
Agelaius
Recent bookmarks
0

hencz

Member
Joined
Jun 28, 2012
Messages
23
Format
Multi Format
Hi,

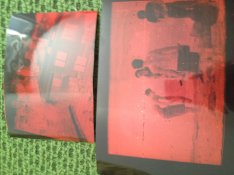
I'm using Fujicolor CrystalArchive paper with Rollei Digibase RA-4 Monokit developer. I use an old russian enlarger at f/16 that has no filters (apparently it's been used for b&w). All of my prints have an orange mask on them, completely monochrome. I tried exposing it longer/shorter, keeping it in the developer longer, still they have some kind of orange fade (only darker or lighter).
IMG_0311.jpg
 

markbarendt

Member
Joined
May 18, 2008
Messages
9,422
Location
Beaverton, OR
Format
Multi Format
It is always a :eek: moment when I see the print after developing when I forget to drop the filters back in place on my enlarger.

Color paper requires filtration.
 

markbarendt

Member
Joined
May 18, 2008
Messages
9,422
Location
Beaverton, OR
Format
Multi Format
BTW welcome to APUG.
 
OP
OP

hencz

Member
Joined
Jun 28, 2012
Messages
23
Format
Multi Format
Thanks, is there a way to attach filters to my enlarger? I have 30mm thread lenses.
 

markbarendt

Member
Joined
May 18, 2008
Messages
9,422
Location
Beaverton, OR
Format
Multi Format
Yes the red filter is for B&W so that the paper doesn't expose until its out of the way. I don't trust that process.

I have an old enlarger for my 4x5 stuff and just hold the filters/gels in the light path.

The bigger challenge is finding the right stack of filters/gels to use to get the right correction.
 

polyglot

Member
Joined
Jun 12, 2009
Messages
3,467
Location
South Australia
Format
Medium Format
If you want to print colour, you need a colour enlarger. It has cyan, magenta and yellow filters that slide in and out of the light path between bulb and diffusion box when you turn knobs on the head, thereby changing the colour. You need the ability to nearly-infinitely vary the filter colour in order to get the colour balance of the print correct.

Colour enlargers are as common as B&W enlargers in my experience and you can generally pick one up (in a Western country like US/EU/AU) for $0-$150 depending on size, condition and which lens might be included. You can probably find someone throwing one out if you look in local classifieds.
 

hrst

Member
Joined
May 10, 2007
Messages
1,293
Location
Finland
Format
Multi Format
There ARE color filter kits that can be used with a B&W enlarger (these are different from "viewing" filters), but many people find it's PITA to use them. They will contain a set of C, M and Y filters with different densities and you create a "pack" of them. For example, if you need 45M 50Y, which is a typical starting filtration, you use 40M+5M+40Y+10Y pack. This is just an example.

Probably easier to find a used color enlarger. In color printing, you need to adjust the filtration and it's easiest done by just turning a knob...
 
OP
OP

hencz

Member
Joined
Jun 28, 2012
Messages
23
Format
Multi Format
I'm thinking of buying either a Krokus 44 MAT Color or a Meopta Axomat 4 both under €15. Neither of them seem to have knobs for filter adjustment.. Anyone has any experience with either of them?
 
Last edited by a moderator:

RPC

Member
Joined
Sep 7, 2006
Messages
1,630
Format
Multi Format
Another alternative using the enlarger you have is tri-color printing. With this you make successive exposures through a red, green and blue filter under the lens to accomplish color balancing. This way you do not print through a stack of filters and quality is better. You simply change the exposure time through each filter. Wratten #99, 98 and 29 will work well. One must avoid vibration of the enlarger head when changing filters to maintain sharpness, however. But a colorhead is highly recommended
 

polyglot

Member
Joined
Jun 12, 2009
Messages
3,467
Location
South Australia
Format
Medium Format
An "Axomat 4" is not a colour enlarger, but an "Axomat 4 Colour" looks like it has a different (more horizontal than vertical) head on it. A google image search shows they seem to have wheels on the front; make sure those are present when you buy, and preferably test the enlarger by turning it on and watching the colour change when you adjust the wheels.

I would also suggest you buy an enlarger that can do medium format, preferably 6x7. They're just as common and cheap, often more sturdy (prints are not softened as easily by slight vibrations in your house), and you can step up to a larger format without replacing the enlarger.

Clean the colour filters gently with lint-free wet-wipes when you get it; they get quite dusty which can cause problems. They're very thin glass though; do not break them or scrub the dichroic coatings off!
 
OP
OP

hencz

Member
Joined
Jun 28, 2012
Messages
23
Format
Multi Format
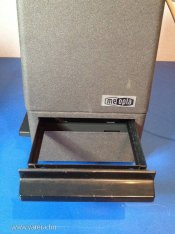
The Axomat 4 has a tray for filters so I guess I can put filters in it and use it as a color enlarger.
49f5_4_big.jpg
 

polyglot

Member
Joined
Jun 12, 2009
Messages
3,467
Location
South Australia
Format
Medium Format
I'm pretty sure you will find it harder to get a set of colour-printing filters than a colour enlarger. And you will probably pay more for them than a colour enlarger. And while they might work, they don't give you adjustments as fine as the knobs on colour enlarger (2 points matters!), and they're way more hassle than turning a knob.

The final insult is that gel filters (that go in the drawer) will fade over time and with use because they are merely dyes in a resin. In comparison, dichroic filters in a colour enlarger will never fade because they use metallic coatings on glass to achieve the filtering effect. A dichroic filter's effect is based on destructive interference of internal reflections in the coating layer - just like an anti-reflective coating, but of a thickness chosen to give strong attenuation of transmitted light at particular wavelengths.

Buy a real colour enlarger and don't make life unnecessarily difficult for yourself. It won't cost any more and it will save you grief and time.
 
Last edited by a moderator:
OP
OP

hencz

Member
Joined
Jun 28, 2012
Messages
23
Format
Multi Format
Ok, I've bought a Super Chromega D color enlarger. I tried compensating the films orange mask with a bit of cyan (so the projected image was had white highlights - shadows actually since it's a negative) but the print is still orange. I'm starting to think it's something with the paper/developer or the method I used for developing, 45s in developer 45s in bleachfix, temperature doesn't seem to affect the print I get the same result with preheated chemicals and room temperature.
 

Prof_Pixel

Member
Joined
Feb 17, 2012
Messages
1,917
Location
Penfield, NY
Format
35mm
It may be counter-intuitive, but when printing color negatives, you need to add the SAME color as the color is off. i.e. if the print is Red, add Red filtration.
 

MattKing

Moderator
Moderator
Joined
Apr 24, 2005
Messages
53,267
Location
Delta, BC Canada
Format
Medium Format
Ok, I've bought a Super Chromega D color enlarger. I tried compensating the films orange mask with a bit of cyan (so the projected image was had white highlights - shadows actually since it's a negative) but the print is still orange. I'm starting to think it's something with the paper/developer or the method I used for developing, 45s in developer 45s in bleachfix, temperature doesn't seem to affect the print I get the same result with preheated chemicals and room temperature.

Ignore the mask - the paper is designed with it in mind (or more accurately, the mask is designed with the paper in mind).

Your paper will most likely have a suggested starting filtration - that is where you should start.
 

perkeleellinen

Subscriber
Joined
Apr 14, 2008
Messages
2,907
Location
Warwickshire
Format
35mm
This is copied from another thread, I printed this out when I started printing in colour. Might be of help:


If your cast is red: You need to add cyan to the print. Therefore, you need to subtract cyan from the filter pack.
Since you are using the two warm filters only, put "subtract cyan" into "warm" terms: "add red".
Equal amounts of magenta and yellow equal red. Thus, when you have a red cast,
add equal amounts magenta and yellow filtration to the filter pack.

If your cast is magenta: You need to add green to the print.
Therefore you need to subtract green from the filter pack.
This is the same thing as adding the compliment of green to your filter pack.
Thus, when you have a magenta cast, add magenta filtration.

If your cast is yellow: You need to add blue to the print. Therefore you need to subtract blue from the filter pack.
This is the same thing as adding the compliment of blue to your filter pack.
Thus, when you have a yellow cast, add yellow filtration.

If your cast is green: You need to add magenta to the print. Therefore you need to subtract magenta from the filter pack.
Thus, when you have a green cast, subtract magenta filtration.

If your cast is blue: You need to add yellow to the print. Therefore you need to subtract yellow from the filter pack.
Thus, when you have a blue cast, subtract yellow filtration.

If your cast is cyan: You need to add red to the print. Therefore, you need to subtract red from the filter pack.
Equal amounts of red and yellow equal red. Subtract equal amounts magenta and yellow filtration to subtract red to the filter pack,
and thus add red to the print.

You should be able to at least on basic trend in all of this that you can use as a shortcut: If the print has a warm cast, you must add filtration.
If the print has a cool cast, you must subtract filtration.
Thus, when using just magenta and yellow filters (both of which are warm filters),
you always add filtration to cool a print and subtract filtration to warm it.
 
OP
OP

hencz

Member
Joined
Jun 28, 2012
Messages
23
Format
Multi Format
ok, I'm almost there with the colors, but now, with the filters turned up the image is much less contrasty. It's very dim.
 

polyglot

Member
Joined
Jun 12, 2009
Messages
3,467
Location
South Australia
Format
Medium Format
Changing filter settings means you need to change the exposure also. When I (totally not an expert at RA4) do this, I:
* get the exposure right within about half a stop
* adjust the filter pack to get colour exact
* adjust the exposure again to get the highlight/shadow detail I want

Because the filters work by attenuation, changing them will change the density as well as the colour, so you can't avoid that final step of tweaking exposure.
 

markbarendt

Member
Joined
May 18, 2008
Messages
9,422
Location
Beaverton, OR
Format
Multi Format
You are getting through the hard part.

Once you get a good print you will have a baseline, a workable starting point for that paper; life is easier after that.

With that baseline you can then use meters like Ilford's EM10 to find exposure or like a Beseler PM2L (or similar) to find both exposure and color pack.
 
Photrio.com contains affiliate links to products. We may receive a commission for purchases made through these links.
To read our full affiliate disclosure statement please click Here.

PHOTRIO PARTNERS EQUALLY FUNDING OUR COMMUNITY:


Ilford ADOX Freestyle Photographic Stearman Press Weldon Color Lab Blue Moon Camera & Machine
Top Bottom