Fuji GS645 S pro rangefinder patch Vs GW690iii

Rebel

A
Rebel

  • 0
  • 0
  • 13
Watch That First Step

A
Watch That First Step

  • 0
  • 0
  • 17
Barn Curves

A
Barn Curves

  • 0
  • 0
  • 17
Columbus Architectural Detail

A
Columbus Architectural Detail

  • 0
  • 0
  • 14
img421.jpg

H
img421.jpg

  • Tel
  • Apr 26, 2025
  • 1
  • 1
  • 30

Forum statistics

Threads
197,483
Messages
2,759,783
Members
99,514
Latest member
cukon
Recent bookmarks
0
OP
OP

dean-g

Member
Joined
Feb 7, 2021
Messages
19
Location
Hong Kong
Format
Multi Format
I don't see any sign of any edge printing on that negative, which says to me that the image is too close to the end of the film.
Which usually means that the film has been wound too far before the back is closed prior to the first frame.
Unless the problem is with the frame spacing itself.
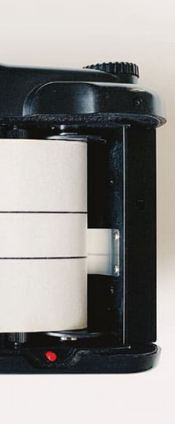
Can we see an image of the first few frames of the roll, which shows the edge printing and the spacing between frames?

Actually, these might be better to check. I used an Essential Film Holder mask to shoot some of this roll with the entire border in tact.
Fujifilm GA645i (R002C) - Portra 400 - Img01 - Hong Kong.jpg DSC_8607.jpg DSC_8606.jpg DSC_8605.jpg
Cheers.
 

MattKing

Moderator
Moderator
Joined
Apr 24, 2005
Messages
51,945
Location
Delta, BC Canada
Format
Medium Format
To show the space between frames I'll need to take an image of the actual entire strip.
That is exactly what we need.
The scans you posted subsequently show more of the Kodak edge printing - which is part of what we need to see, but to get a sense of whether there are spacing problems, we need to see the spacing.
If the first frame has 41 centred on it, the 15th frame should have 55 centred on it.
 
OP
OP

dean-g

Member
Joined
Feb 7, 2021
Messages
19
Location
Hong Kong
Format
Multi Format
That is exactly what we need.
The scans you posted subsequently show more of the Kodak edge printing - which is part of what we need to see, but to get a sense of whether there are spacing problems, we need to see the spacing.
If the first frame has 41 centred on it, the 15th frame should have 55 centred on it.

Thanks Matt.

I'll try and shoot an entire strip later on when I get home but I've already contacted the Japanese eBay seller and he's agreed to a full refund inc. shipping I I want. I think I'll most likely return it and buy another. They're always such cool people to deal with.

Cheers.
 

macfred

Subscriber
Joined
Nov 6, 2014
Messages
3,840
Location
Germany
Format
Multi Format
Only to make a few things sure ... I did this wrong myself a few times.


After loading your film It's important to push back the button on the bottom or your film will not wind properly.
Bildschirmfoto 2021-09-13 um 11.57.06.png

Tab of the film goes into the take-up spool
Bildschirmfoto 2021-09-13 um 12.27.25.png


Use the dial on the top of the camera to wind film furtheron to the start arrow - if the arrow should be disaligned you probably loose a part of the last frame when the motor drive winds on the rest of the roll to the take-up spool.
Bildschirmfoto 2021-09-13 um 11.57.28.png


It's also important to keep the film tensioned with your left thumb when you wind the film to the arrow with the top dial.
 

Attachments

  • Bildschirmfoto 2021-09-13 um 12.27.25.png
    Bildschirmfoto 2021-09-13 um 12.27.25.png
    127.3 KB · Views: 57
OP
OP

dean-g

Member
Joined
Feb 7, 2021
Messages
19
Location
Hong Kong
Format
Multi Format
Only to make a few things sure ... I did this wrong myself a few times.


After loading your film It's important to push back the button on the bottom or your film will not wind properly.
View attachment 285276
Tab of the film goes into the take-up spool
View attachment 285281

Use the dial on the top of the camera to wind film furtheron to the start arrow - if the arrow should be disaligned you probably loose a part of the last frame when the motor drive winds on the rest of the roll to the take-up spool.
View attachment 285277

It's also important to keep the film tensioned with your left thumb when you wind the film to the arrow with the top dial.

Hi.

Thank you for all the detailed information… appreciate it.

I did everything you outlined there. I lined up the start with the red dot on the left hand side as described in the manual. It’s a bit further (~1cm) than your image, but the manual also says it’s not imperative to get it exact only not to go too far to the right. In any case, the start arrow was in the right place when I loaded the film for sure.

Maybe where I’m going wrong is applying tension. I didn’t really apply much at all.

I just wasted a roll then and applied more tension and fired off a roll and this was the first time that the end seal was very easy to pull out. Maybe the tension was the issue?

I’ll shoot a proper roll and get it developed and see what happens.

Thank you again … and thank you to everyone here for their advice and help :smile: I hope I’m not wasting people’s time.

Cheers.
 

MattKing

Moderator
Moderator
Joined
Apr 24, 2005
Messages
51,945
Location
Delta, BC Canada
Format
Medium Format
I just wasted a roll then and applied more tension and fired off a roll and this was the first time that the end seal was very easy to pull out. Maybe the tension was the issue?
I doubt that the camera is the reason for the behavior of the end seal. That seams to happen from time to time - most likely it is related to how long the film has been stored and under what conditions. The seal doesn't really stick, it is just hard sometimes to peal off.
 
OP
OP

dean-g

Member
Joined
Feb 7, 2021
Messages
19
Location
Hong Kong
Format
Multi Format
I doubt that the camera is the reason for the behavior of the end seal. That seams to happen from time to time - most likely it is related to how long the film has been stored and under what conditions. The seal doesn't really stick, it is just hard sometimes to peal off.

Hi Matt.

The film was all new expiring late next year. Stored in the fridge and taken out the night before shooting the next day as I usually do.

There’s something seriously wrong with the way this camera loads/unloads the film. I shot another test roll at work yesterday and had them developed. I did everything correctly including applying some tension and lining up the start a little closer this time.

This time, not only was there an issue with the last shot again, but there were also creases/folds in parts of the film. Something happened when it wound up or rewound.

Anyway, it’s going back today. I’m looking for a new one to to buy as I really enjoyed using it. Just had some bad luck with this one :smile:

Cheers.


IMG_7689.jpeg IMG_7693.jpeg IMG_7694.jpeg IMG_7695.jpeg IMG_7697.jpeg IMG_7699.jpeg IMG_7700.jpeg
 
OP
OP

dean-g

Member
Joined
Feb 7, 2021
Messages
19
Location
Hong Kong
Format
Multi Format
Good luck and have fun !! :D
Thanks.

That trick with the MF button works really well and is pretty quick when you need it. I don’t know why though, but I shoot this thing on P mode most of the time and almost always everything comes out perfect. I rarely even use Aperture priority with it. It really is a P&S on steroids!

A great walk around street camera.

Cheers.
 
Photrio.com contains affiliate links to products. We may receive a commission for purchases made through these links.
To read our full affiliate disclosure statement please click Here.

PHOTRIO PARTNERS EQUALLY FUNDING OUR COMMUNITY:


Ilford ADOX Freestyle Photographic Stearman Press Weldon Color Lab Blue Moon Camera & Machine
Top Bottom