Hi all,
I made this a while ago, but I finally had the light-box set up the other day so I thought I'd take some photos to share, of how I went about front-mounting my Apo-Ronar to a shutter and lensboard. I thought some around here might find it interesting to try for themselves.
Firstly, SKGrimes of course do front-mounting, but from what I understand all they do is machine an adapter that screws into your shutter, and your lens screws into that.
Not a bad approach for smaller lenses, but a) it's expensive, b) especially so considering the postage from Aus to USA for me, c) most importantly, I would be really nervous about hanging 1kg worth of lens onto a screw-mount-adapter into a shutter, that's a whole lot of torque around the various interfaces and I'd be afraid it would just snap off one day.
So this is my method which I used on my 465mm f/9 Apo Ronar. Cheap (<$10 besides cost of lens/shutter/lensboard), and easy, but it requires a few things. Most importantly is the original flange-ring (or get one made), a lensboard (Toyo #1 for me), and a shutter (a Polaroid MP4 for me) you want to use. Next are some little standoffs that I normally use for PCBs, these were M4x25mm.
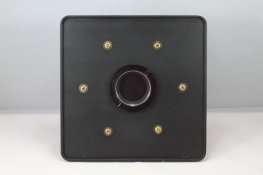
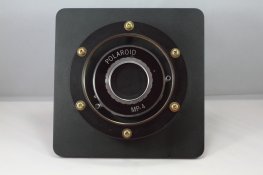
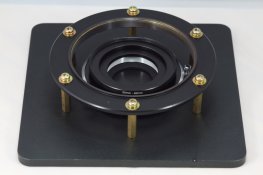
Mark out the lensboard with the position of the 6x screw holes on the flange. Drill out and screw the standoffs on:

(the photo shows the shutter already mounted, but I'd leave this until after you've finished drilling etc. I've put a screwdriver through a shutter before and it ain't pretty).
These screws are brass because I didn't have any black ones floating around, but black is probably better inside for less potential reflections.
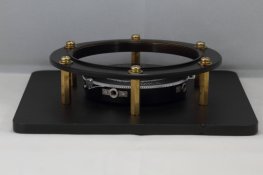
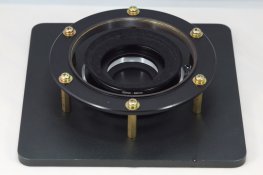
Then screw the flange onto the other end of the standoffs:


Then, to keep everything light-tight between the lens and shutter, I put in some regular $2-from-ebay-China step-up rings, 40-52mm and 52-62mm. 62mm is wider than the rear-element so it won't touch the glass, only its retaining ring.They aren't held in by anything other than sandwiching from the lens screwing in, but I suppose you could glue them onto the shutter if you don't mind it being permanent:

Also very important, to further protect the lens and stop the step-rings scratching it, plus to make sure it's perfectly light-tight, I put a piece of round felt between the step-up rings and the lens before screwing it in. Coincidentally, such a piece exactly the right size came to me mounted on the Polaroid MP4 shutter-lensboard I used, or you can cut your own:

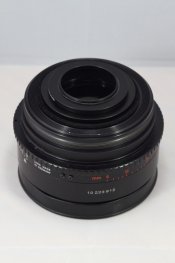
Then, just screw in the lens. Be careful not to let the felt get moved out of place, or just glue it to the step-rings (which I haven't). I found it's easier to do this with the lens on the bottom and lensboard above:

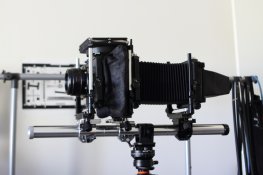
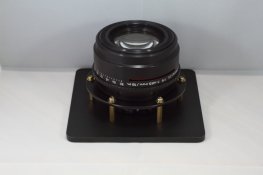
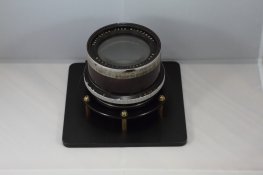
And done:

As a bonus, I have a 600mm f/9 Apo-Tessar which uses the same size mounting ring as the Apo-Ronar. So now I can easily change lenses by unscrewing, and leaving the lensboard on the camera:

As for coverage, I haven't really calculated it. It's got more than enough for 4x5, which is what my Toyo is. This will suffer the same less-coverage problem as all other front-mountings (as illustrated by Grimes in the link above). However, for this particular combination it's probably going to have more coverage than if I'd used a simple screw-screw adapter, as that would have to be really hefty/thick to take the weight, so I reckon this approach gets the lens closer to the shutter than otherwise possible (ergo, wider coverage). I could have possibly used 20mm or 22mm-long standoffs to get even closer for more coverage, but I didn't have any handy and it would make it harder to change shutter speeds on the lens.
Next up I plan to do the same thing on a Cambo board for my 8x10, I'm waiting for my #3-sized shutter now (I'm hoping that will fit in between the standoffs, or I'll have to do something else fancier).
I made this a while ago, but I finally had the light-box set up the other day so I thought I'd take some photos to share, of how I went about front-mounting my Apo-Ronar to a shutter and lensboard. I thought some around here might find it interesting to try for themselves.
Firstly, SKGrimes of course do front-mounting, but from what I understand all they do is machine an adapter that screws into your shutter, and your lens screws into that.
Not a bad approach for smaller lenses, but a) it's expensive, b) especially so considering the postage from Aus to USA for me, c) most importantly, I would be really nervous about hanging 1kg worth of lens onto a screw-mount-adapter into a shutter, that's a whole lot of torque around the various interfaces and I'd be afraid it would just snap off one day.
So this is my method which I used on my 465mm f/9 Apo Ronar. Cheap (<$10 besides cost of lens/shutter/lensboard), and easy, but it requires a few things. Most importantly is the original flange-ring (or get one made), a lensboard (Toyo #1 for me), and a shutter (a Polaroid MP4 for me) you want to use. Next are some little standoffs that I normally use for PCBs, these were M4x25mm.
Mark out the lensboard with the position of the 6x screw holes on the flange. Drill out and screw the standoffs on:
(the photo shows the shutter already mounted, but I'd leave this until after you've finished drilling etc. I've put a screwdriver through a shutter before and it ain't pretty).
These screws are brass because I didn't have any black ones floating around, but black is probably better inside for less potential reflections.
Then screw the flange onto the other end of the standoffs:
Then, to keep everything light-tight between the lens and shutter, I put in some regular $2-from-ebay-China step-up rings, 40-52mm and 52-62mm. 62mm is wider than the rear-element so it won't touch the glass, only its retaining ring.They aren't held in by anything other than sandwiching from the lens screwing in, but I suppose you could glue them onto the shutter if you don't mind it being permanent:
Also very important, to further protect the lens and stop the step-rings scratching it, plus to make sure it's perfectly light-tight, I put a piece of round felt between the step-up rings and the lens before screwing it in. Coincidentally, such a piece exactly the right size came to me mounted on the Polaroid MP4 shutter-lensboard I used, or you can cut your own:
Then, just screw in the lens. Be careful not to let the felt get moved out of place, or just glue it to the step-rings (which I haven't). I found it's easier to do this with the lens on the bottom and lensboard above:
And done:
As a bonus, I have a 600mm f/9 Apo-Tessar which uses the same size mounting ring as the Apo-Ronar. So now I can easily change lenses by unscrewing, and leaving the lensboard on the camera:
As for coverage, I haven't really calculated it. It's got more than enough for 4x5, which is what my Toyo is. This will suffer the same less-coverage problem as all other front-mountings (as illustrated by Grimes in the link above). However, for this particular combination it's probably going to have more coverage than if I'd used a simple screw-screw adapter, as that would have to be really hefty/thick to take the weight, so I reckon this approach gets the lens closer to the shutter than otherwise possible (ergo, wider coverage). I could have possibly used 20mm or 22mm-long standoffs to get even closer for more coverage, but I didn't have any handy and it would make it harder to change shutter speeds on the lens.
Next up I plan to do the same thing on a Cambo board for my 8x10, I'm waiting for my #3-sized shutter now (I'm hoping that will fit in between the standoffs, or I'll have to do something else fancier).
Attachments
-
 IMG_2217brs.JPG704.8 KB · Views: 551
 -
 IMG_2218brs.JPG695.4 KB · Views: 225
 -
 IMG_2219brs.JPG563.2 KB · Views: 217
 -
 IMG_2220brs.JPG653.1 KB · Views: 211
 -
 IMG_2221brs.JPG660.7 KB · Views: 215
 -
 IMG_2222brs.JPG579.6 KB · Views: 213
 -
 IMG_2223brs.JPG607.6 KB · Views: 225
 -
 IMG_2224brs.JPG634.5 KB · Views: 211