I am back.
The video posted by mwdake is really useful: I saw it in italian a long time ago.
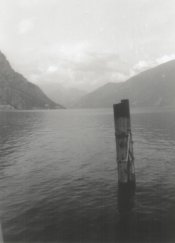
This evening I made another test with another frame from the film: the result is the following one (I’m sorry if that’s not scanned but just a photo...of the photo

).
As you can see, the results are a little bit better: seems I am on the right way. As previously said, the enlarger lens was really dirty and that, probably was the cause of the "foggy" effect. Right now, what don't convinced me was the fact that, to something near to the "correct exposure" I used the maximum aperture (f2.8) with more or less 30sec of exposition: this seems too much on paper but the result is not so bad.
My question is: how do you define your "starting values" for your first test strip? I mean...I have tried with f8 and up to 30sec of exposition with 5sec intervals and Magenta&Yellow filter on 0% but i barely saw the print on the paper hence I have changed the settings as written above.
I have to try again but what suggestion could you give to me? My main problem, besides the one presented before regarding the contrast, is that I haven't any easel and that leads to a difficult positioning of the paper: that's the main reason I used the red filter before exposing.
Thanks again for your help.
Andrea
hello andrea
do 2 test strips same print ...
the first one with a grade 3 1/2 filter the 2nd at 4
do a big swath of the mountain and houses.
focus on a scap piece of the paper you will print on lens wide open then 3 clicks to close the lens down..
10 seconds each exposure do about 5 x...
put them in fresh developer mixed/dilute like the package says. put your timer on for 3 full minutes ...
test strip in, face down, use tongs flip the paper, submerged it and
flip it, 5 times.
then face up so you can watch it, and rock the tray with the developer until
the 2 minutes is up.
rocking the tray is one of the most important things you need to do.
strip in the stop bath then in your fixer. repeat this routine for test strip #2, and for ALL your prints.
after your test strips are in the fixer for 1 min, put them in water to rinse them and
examine them
in room light.
pick the one where the whtie , just turned white is OK
do another test strip for the exact time you decide on, but a bigger strip to get an idea if it is right ..
then make your print.
flip it in the developer 5x and rock the tray just like you did before.
what might be going on is you aren't agitating the print and making sure it is devloping completely.
after you do this a few times you will get the hang of it. it won't be perfect
you will notice the face isn't light enough but you can fix that if you want to learn about
"dodging" ( giveing a part of your exposure less light )
if you want an experiment ... when you are making your print's exposure glide your hand over the print slowly
where you want it to be lighter .. that's dodging... you might notice when you do that, the face &c is perfect
BUT the edge of the print is too light ... then .. you burn the edge in ( turn on the enlarger and give teh edge a little
mor light, blocking everhting else.
you can use anything to burn and dodge ... hands, fingers, pencils, cardboard scraps, coathangers with tape on them
so they look like lollipops, .. pretty much anything and the more you do it, the batter you get ...
one thing you might notice is with RC paper usually the print starts to begin to appear on the paper at about 20seconds with FB paper about 45seconds.
have fun !
john


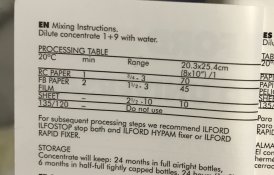
 on the bottle of my developer is written 1min with RC paper (see the photo below). What the...?!