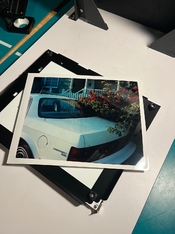
First time printing and my exposure times were quite short. 1.5 - 2 seconds. I’m wondering if that has to do with an overexposed negative? Also would like to dodge and burn so how do I go about lengthening exposure. I’m printing on an RCP20 would processing times play a part? Here is an example….the exposure time isn’t enough to bring out shadows. Any help would mean a lot.
-
Welcome to Photrio!Registration is fast and free. Join today to unlock search, see fewer ads, and access all forum features.Click here to sign up
You are using an out of date browser. It may not display this or other websites correctly.
You should upgrade or use an alternative browser.
You should upgrade or use an alternative browser.
First time printing (Beseler 23cii)
-
A
- Thread starter Rip77
- Start date


Recent Classifieds
-
For Sale Canonet QL17 Rangefinder
- Started by davela
-
For Sale 85mm F2 Olympus Zuiko for OM 35mm System - Bargain!
- Started by davela
-
Want to Buy Clean Zeiss Ikon ZM
- Started by NortheastPhotographic
-
Want to Buy WTB FM3a Black
- Started by samuelphoto
-
For Sale FS: Lomo LC-Wide, 35mm point and shoot w/ 17mm f/4.5
- Started by dirkfletcher
Forum statistics
Brad Deputy
Subscriber
I have the same problem with my enlarger (identical) with b&w printing. I ended up getting a large sheet of ND 0.6 (2-stops) gel and cut it to squares for inserting into the filter drawer just below the light. I use 1-3 of these sheets depending on the exposure of a given negative. This gives me 10-40 seconds time.
I realize you're doing color so you probably have a different color head and light source. If you have a way to insert gel filters, it may do the trick. Good luck!
I realize you're doing color so you probably have a different color head and light source. If you have a way to insert gel filters, it may do the trick. Good luck!
I have the same problem with my enlarger (identical) with b&w printing. I ended up getting a large sheet of ND 0.6 (2-stops) gel and cut it to squares for inserting into the filter drawer just below the light. I use 1-3 of these sheets depending on the exposure of a given negative. This gives me 10-40 seconds time.
I realize you're doing color so you probably have a different color head and light source. If you have a way to insert gel filters, it may do the trick. Good luck!
I think I’ll try the ND route perhaps putting one right on the lens can work from what I read. Thanks for the reply!
Ic,
Thanks! it’s an Schneider 90mm.
With colour, you're better sticking to a set exposure time, and adjust using the f/stop. Variations in time can have variations in colour balance, and then you're chasing too many rabbits.
Dodge/burn is not as convenient, and that's why many pro colour printers ended up resorting to masks for colour contrast.
Do have a look at Chapter 8 of Ctein's excellent Post Exposure booke: https://ctein.com/PostExposure2ndIllustrated.pdf
Dodge/burn is not as convenient, and that's why many pro colour printers ended up resorting to masks for colour contrast.
Do have a look at Chapter 8 of Ctein's excellent Post Exposure booke: https://ctein.com/PostExposure2ndIllustrated.pdf
L Gebhardt
Member
You can also add cyan filtration. Each 30cc of cyan (and an equal amount of magenta and yellow) will double your time. Combined with stopping the lens down you should be able to get to 16 seconds.
A neutral density filter on the lens also works if you have one that you can make fit.
A neutral density filter on the lens also works if you have one that you can make fit.
I’m wondering if that has to do with an overexposed negative?
No, color paper is just fast.
Burning & dodging is possible, but you'll run into color balance problems pretty soon. Give it a try; within narrow margins it tends to work OK. Use an ND filter, stop the lens doen or dial in Cyan as Larry suggested.
Instead of burning I'd propose pre- or post flashing through a diffusor, which is generally easier, quite effective and very flexible in terms of color balance. It also doesn't require ND filters etc. The drawback is that you generally can't do it locally, but that doesn't matter since it'll "automatically" affect only the areas where it's needed.
You can also add cyan filtration. Each 30cc of cyan...
Don't forget the 30cc Y and 30cc M to keep the filter pack balanced.
Instead of burning I'd propose pre- or post flashing through a diffusor, which is generally easier, quite effective and very flexible in terms of color balance. It also doesn't require ND filters etc. The drawback is that you generally can't do it locally, but that doesn't matter since it'll "automatically" affect only the areas where it's needed.
this is something I am interested in for sure. I see a lot of people pre flash for that softer focus look. I really like that but am unsure of the process. I know using a second enlarger makes it easier but how would you go about doing it with one enlarger? thanks for the reply!
I'm not sure about a soft focus look; what flashing does is compress contrast, while leaving sharpness alone. Is that what you mean? Soft focus is also possible, but you'd have to consider old tricks like smearing vaseline onto the enlarger lens or nick one of the wife's nylons. 
Anyway, when preflashing, I just slide a diffusor (fancy name for a piece of milky plexiglass) under the lens and expose. Then expose again without the filter. That's all there is to it, really. You control the degree of compression by varying the flash exposure.
A second enlarger also works, and has some advantages - but also some drawbacks (takes up space, for instance). I just do it with one and a diffusor.
You can also change the color filtration for the flash exposure. That way you can do a kind of split toned effect with e.g. yellowish highlights and cooler shadows.
You can also change the color filtration for the flash exposure. That way you can do a kind of split toned effect with e.g. yellowish highlights and cooler shadows.
this is something I hope to achieve! Would you recommend any glass in particular? would a diffusion filter work? Idk if I wanna go that route just because I might use an and filter if I can’t get the desired look with gels on exposure time. Very helpful! Also how long are pre flash exposures? do you quickly flash the paper? seems like the paper is sensitive with color paper.
Would you recommend any glass in particular? would a diffusion filter work?
I use milky plexiglass from the hardware store. A diffusion filter will also work, yes.
Also how long are pre flash exposures?
It's difficult to say because the diffusion filter generally eats up a lot of light and that makes it difficult to compare the flash and main exposure. I'd say the flash exposure for a subtle effect is generally maybe 2 stops or a little more below the main exposure. But I find that my diffusing filter compensates for pretty much all of that, so both exposures end up quite close to each other.
Just give it a try; if the whites in your print are (too) grey, dial back the flash exposure. If the highlights are still blown out, dial in some more flash.
Note that I personally don't flash the entire sheet; I just place it on the easel and then do both exposures right there without ever moving the paper. Of course it's also possible to flash the entire sheet, possibly using a different light source.
Btw, this technique can be exploited to print color-toned B&W images as well; here's one I did from an Ilford Delta 100 negative (so a B&W image):

I've also got a color example on my blog, but it doesn't look very interesting as the effect looks quite natural and inconspicuous most of the time: https://tinker.koraks.nl/photography/creative-possibilities-in-ra4-printing/#flashing
Koraks,
thanks for the help! Very much appreciate you taking the time. Excited to try some of these techniques this weekend. I really like that color image very much captured the scene even if the pre flash wasn’t as prominent!
thanks for the help! Very much appreciate you taking the time. Excited to try some of these techniques this weekend. I really like that color image very much captured the scene even if the pre flash wasn’t as prominent!
I would seriously recommend adding all three: cyan, magenta and yellow in equal amounts. Get to a "normal" comfortable ordinary exposure before adding any other variables.
| Photrio.com contains affiliate links to products. We may receive a commission for purchases made through these links. To read our full affiliate disclosure statement please click Here. |
PHOTRIO PARTNERS EQUALLY FUNDING OUR COMMUNITY:  |