• Welcome to Photrio!
    Registration is fast and free. Join today to unlock search, see fewer ads, and access all forum features.
    Click here to sign up

First time doing RA-4, thought I'd share my experience

Fire escape.

H
Fire escape.

  • 2
  • 1
  • 4
22886.jpg

A
22886.jpg

  • 2
  • 0
  • 17

Recent Classifieds

Forum statistics

Threads
204,343
Messages
2,867,387
Members
102,231
Latest member
kimlee2027
Recent bookmarks
0

filip0502

Member
Joined
Feb 14, 2026
Messages
34
Location
Croatia
Format
35mm
I just wanted to share my experience. Maybe someone finds it useful.

I used a Meopta Opemus 5 with a color head. I don't have any drums, and I couldn't find any for cheap, so I used a 5-reel Paterson tank with a 3D printed paper holder.
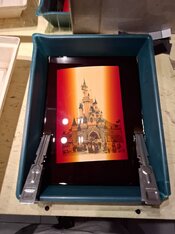
The RA-4 chemical kit was from Adox, and I heated the chemistry with a Cinestill unit. I put a film tank over it, and that thankfully blocked all the light from the screen.
The paper I used was the Kodak Royal Digital paper that I mentioned in another post. I cut the roll using a paper cutter. I put down some tape as a guide, but all the papers came out crooked, so I'm gonna need to make some sort of holder for the roll. The paper was old stock, so it was unopened, but it had a manufacturing date from 2019. I heard that old RA-4 paper loses it's whitness with age. and was the case here but it's not that noticable. It looks sort of yellow when you put it against some printer paper, but when you look at it on its own, it's not that apparent.
20260506_204934.jpg

Since the tiles in the darkroom are glossy, the light from the enlarger was bouncing around, and it hit the paper. My photos were very yellow at first, so I increased the yellow setting on the enlarger, which didn't help much. Then I realised that it could be the stray light, and that fixed it.
20260506_223212.jpg


My biggest worry with the Paterson tank was that I would get uneven development because the chemistry would gather at the bottom as I was pouring it in. Luckily, I didn't find that to be the case.
Still, I imagine it's much easier with a real drum that pours the chemistry only when it's horizontal.
I cut the paper to 15x10 cm, but in hindsight, that was probably a bad idea because it was hard to see how the photo was positioned and if it was in focus. I didn't realize how dim color enlargers are compared to a regular bw enlarger (at least this one is).
20260506_223235.jpg

20260507_140516.jpg

If anyone has some tips or thoughts, I'd love to hear them!
 
Progress! You're walking; from here, it's just a matter of ironing out the bugs one by one and optimizing the process where you see fit.

I (and many others, I'm sure) recognize the issue of the crooked cuts on the paper. It helps to have a guide parallel with the length of the paper roll to help ensure that the cut is always exactly perpendicular to the length of the paper. A dispenser/holder for the roll definitely makes things easier. Something with a bearing so that it rotates easily is ideal, but a simple spindle on which the paper core of the roll rests also works.

I'm not familiar with the Opemus 5, but many enlargers have a switch to engage/disengage the filters. Without the filters, the projection light is a little brighter, making it a lot easier to compose and focus the image. Of course do this with the lens opened up and only stop down for the exposure.

I find that with small prints on modern paper, the exposure times get really short so you either have to stop down (but at some point you lose sharpness due to diffraction) or use an enlarger timer that controls down to fractions of seconds.

If your work space permits it, you could use trays to develop your prints. Room temperature will work OK with a longer development time; try e.g. 2 minutes instead of 45 seconds. You may find that the tray method is ultimately quicker & easier than using a drum, although of course you need to keep the lights off until the paper is in the stop bath or blix.

I'd recommend using an acetic acid stop bath between developer and blix. This helps the blix to maintain its slightly acidic pH.

The major 'trick' to printing color is getting the filtration right. Be sure to have a place where you can judge the exposure and filtration of the prints, preferably under daylight conditions. It's frustrating to print a batch with everything looking great, only to find the next day all the prints look too blue under daylight because you balanced them all under warm artificial light.
 
I didn't see any switch but I'll take a look around.

Regarding the exposure, I did 20 seconds at f/8.

I'll definitely try developing in trays. I'm quite used to working with them so it will probably be easier.

As for the stop bath. I used water mixed with some white vinegar. It's what I usually use with b/w film and paper.

Thanks for the advice!
 
Progress! You're walking; from here, it's just a matter of ironing out the bugs one by one and optimizing the process where you see fit.

I (and many others, I'm sure) recognize the issue of the crooked cuts on the paper. It helps to have a guide parallel with the length of the paper roll to help ensure that the cut is always exactly perpendicular to the length of the paper. A dispenser/holder for the roll definitely makes things easier. Something with a bearing so that it rotates easily is ideal, but a simple spindle on which the paper core of the roll rests also works.

I'm not familiar with the Opemus 5, but many enlargers have a switch to engage/disengage the filters. Without the filters, the projection light is a little brighter, making it a lot easier to compose and focus the image. Of course do this with the lens opened up and only stop down for the exposure.

I find that with small prints on modern paper, the exposure times get really short so you either have to stop down (but at some point you lose sharpness due to diffraction) or use an enlarger timer that controls down to fractions of seconds.

If your work space permits it, you could use trays to develop your prints. Room temperature will work OK with a longer development time; try e.g. 2 minutes instead of 45 seconds. You may find that the tray method is ultimately quicker & easier than using a drum, although of course you need to keep the lights off until the paper is in the stop bath or blix.

I'd recommend using an acetic acid stop bath between developer and blix. This helps the blix to maintain its slightly acidic pH.

The major 'trick' to printing color is getting the filtration right. Be sure to have a place where you can judge the exposure and filtration of the prints, preferably under daylight conditions. It's frustrating to print a batch with everything looking great, only to find the next day all the prints look too blue under daylight because you balanced them all under warm artificial light.

Ok I tried tray processing. It so much better. I did 2 minutes for the developer and blix at room temp and it turned out great.

There are 2 things I'm worried about.
1. I have trouble grabing the paper in the dark. I can grab it with one tong (with some effort), but I have trouble grabing it with the second one. It's not a big deal with small papers but you need two tongs for big papers. Is it possible to use gloves?
2. Since the paper is curved it's sticking out of the chemistry. I noticed that one corner on one of the photos was a little underdeveloped (the paper was face down so the longer edges were out of the chemistry). I started nudging the trays back and forth so that the chemistry covers the whole paper and it seemed to work.
 

Attachments

  • 20260508_174111.jpg
    20260508_174111.jpg
    282.7 KB · Views: 35
  • 20260508_224209.jpg
    20260508_224209.jpg
    353.5 KB · Views: 37
Looks great. I try to shoot 1 type of film, usually Kodak Portra 160, once you find the correct filter "pack" (required yellow and magenta filtration) it usually won't change much if your negatives are processed properly.
Sticking with one film type in the beginning will save you some headache.

Absolutely agree with using trays, so much easier than tubes (these things used to be very inexpensive not today). RA-4 process is more flexible than the old processes.
I use an old Kodak Rapid Color processor that was sold in the 1960s, which allowed (at 38°C) processing a color print in only 7 1/2 minutes! Now with RA4 only a couple minutes
 
1: yes you can use gloves, no problem.
2: agitate constantly, and/orpricess the print face down. Also, if you cut paper from rolls, it flattens out over time, reducing extent of the problem.
 
The main problem for me with open trays in closed rooms is the blix. You may already noticed that its smell is not something pleasant during long sessions, and the warmer the solution gets the worse.

Tbh, I didn't notice the smell. I mean I did smell the chemicals but it didn't really reach my nose when I stood over the trays. Although I did use just 500ml of chemistry per tray.
 
1: yes you can use gloves, no problem.
2: agitate constantly, and/orpricess the print face down. Also, if you cut paper from rolls, it flattens out over time, reducing extent of the problem.
Do you wash the gloves in between prints or do you just put on another pair.

I did put the prints face down put the edges rose up from the chemistry. That's where I noticed a slight gradient in the desnity.
 
Wash them! No need whatsoever to be so wasteful! When I use gloves, I use the nitrile kind, not latex. Nitrile lasts longer and is easier to put on and take off. They last a couple of sessions; at some point they puncture. Just wash/rinse your gloved hands, then dry with a towel.

The curved paper can be an issue esp. towards the end of the roll. If you wear gloves you can just push the prints down regularly; this avoids issues with uneven development.
 
You have come far from you initial activities in a short time.
 
Ok I tried tray processing. It so much better. I did 2 minutes for the developer and blix at room temp and it turned out great.

There are 2 things I'm worried about.
1. I have trouble grabing the paper in the dark. I can grab it with one tong (with some effort), but I have trouble grabing it with the second one. It's not a big deal with small papers but you need two tongs for big papers. Is it possible to use gloves?
2. Since the paper is curved it's sticking out of the chemistry. I noticed that one corner on one of the photos was a little underdeveloped (the paper was face down so the longer edges were out of the chemistry). I started nudging the trays back and forth so that the chemistry covers the whole paper and it seemed to work.

Hallo !

My experiences with RA-4 printing are very very good. Easy to handle. I use now a drum. Startet with a 4x5"development tank of Zebra (Slovenia) and later with a 8x10 inch silver-tank (from the same firm) prepaired for RA-4 development.

I learnd very much from the 3 parts Youtube of The Naked Photographer. The most important thing was that I can use 2 minutes with all the chemicals when their temperatures are 22 C or lower !


RA-4 Printing, pt 1: Tools and Materials

 
Photrio.com contains affiliate links to products. We may receive a commission for purchases made through these links.
To read our full affiliate disclosure statement please click Here.

PHOTRIO PARTNERS EQUALLY FUNDING OUR COMMUNITY:


Ilford ADOX Freestyle Photographic Stearman Press Weldon Color Lab Blue Moon Camera & Machine
Top Bottom