
I just got a Beseler Dichro Colorhead for my C23 enlarger and made a print from Fuji Reala to Fuji paper. It looks very nice (took 5 tries). The shot is of a model in studio lighting. The background has the slightest tinge although the overall color balance is fine. I think the issue arises from the fact that lighting of the background at the time of the shot was not carefully done. Is there any suggestions for changing the filter pack to render the background white? My best print came from Y45 M55. Apologies in advance, I don't have a way to scan the print (and also, it's still wet). Thanks!


- Home
- Forums
- Analog Workflow Forums (100% Analog/Traditional)
- Darkroom
- Color: Film, Paper, and Chemistry
You are using an out of date browser. It may not display this or other websites correctly.
You should upgrade or use an alternative browser.
You should upgrade or use an alternative browser.
First Color Print using RA-4
-
A
- Thread starter tnabbott
- Start date


Recent Classifieds
-
Want to Buy 135mm 5.6 enlarging lens
- Started by ediz7531
-
For Sale New 55 instant film (replacement for polaroid type 55)
- Started by Early Riser
-
Free 16x20 and 20x24 expired Ilford multigrade paper, Portland Oregon pick up
- Started by Early Riser
-
For Sale Helipan 112mm Circular Polarizer
- Started by Early Riser
-
Sold For Sale: 10 rolls of 120 film *SOLD*
- Started by Brad Bireley
Forum statistics
hoffy
Member
I just got a Beseler Dichro Colorhead for my C23 enlarger and made a print from Fuji Reala to Fuji paper. It looks very nice (took 5 tries). The shot is of a model in studio lighting. The background has the slightest tinge although the overall color balance is fine. I think the issue arises from the fact that lighting of the background at the time of the shot was not carefully done. Is there any suggestions for changing the filter pack to render the background white? My best print came from Y45 M55. Apologies in advance, I don't have a way to scan the print (and also, it's still wet). Thanks!
You say a slightest tinge.....of what colour!?
Using the same colour filtration, do a test strip with additional: + 1/6 stop, + 1/3 stop, +2/3 stop and + 1 stop.
You may see a change in the colour of the foreground model.
You may see a change in the colour of the foreground model.
markbarendt
Member
A color print viewing filter kit will help.
http://www.ebay.com/sch/i.html?LH_FS=1&_nkw=kodak+color+print+viewing+filter+kit&_sop=16
Matt's idea of printing different exposures can help find color casts.
Reducing enlarger exposure may help, RA4 paper remains white (the color of the paper) in areas where it gets very little light.
http://www.ebay.com/sch/i.html?LH_FS=1&_nkw=kodak+color+print+viewing+filter+kit&_sop=16
Matt's idea of printing different exposures can help find color casts.
Reducing enlarger exposure may help, RA4 paper remains white (the color of the paper) in areas where it gets very little light.
polyglot
Member
The print adjustments have their greatest effect in the shadows (where there is a lot of light hitting the paper) and their least effect in the highlights (where there is little). Therefore when printing, you really only have shadow-colour adjustment. If a highlight is the wrong colour, e.g. due to mixed lighting when the scene was shot, there really isn't much you can do about it.
One thing you can try though is to print different parts of the print with different filter settings, e.g. you can do a base print with one filter setting and burn with a different hue. That can allow some minor local corrections, but it's hard not to get bad seams in the final print if you need strong colour shifts with sharp edges.
One thing you can try though is to print different parts of the print with different filter settings, e.g. you can do a base print with one filter setting and burn with a different hue. That can allow some minor local corrections, but it's hard not to get bad seams in the final print if you need strong colour shifts with sharp edges.
JOR
Member
- Joined
- Aug 18, 2013
- Messages
- 43
- Format
- Med. Format RF
Crossed curves
Polyglot is right - the problem of crossed curves (indicated by the impossibility of correcting the highlights without spoiling the mid-tones and shadows) suggests mixed lighting, poor processing of the negative or incorrect paper processing. Stale or poorly-stored film might also be the cause.
The same problems occur in B&W but the eye is very sensitive to small errors in colour rendition, so the processing of the three main dye layers has to be spot-on, otherwise the errors will become noticeable.
There is one extra possible fault. I was tempted by the low price of a Chinese-made kit of studio electronic flash. But the colour emitted varies according to the brightness setting and between heads. One is distinctly pinker than the other.
Last edited by a moderator:
markbarendt
Member
I don't agree Polyglot.
Color corrections at the enlarger effects the print globally except where, for example, burn or dodge at different correction settings are used.
IMO the effects of adjustments are most effective across the printed mid tones, as we approach paper white and paper black the effect diminishes.
What I have found, like you, is that in mixed light I only get to set one spot/subject "correctly". I've also found that typically when I get that one subject right the color casts around it look normal/believable and I've come to view these natural color casts as a good and normal thing.
I think tnabbott is correcting to an unknown baseline here and may not even understand what that norm is yet. Which color-of-white should the target really be? Is it a warm or technically pure or a cold white that tnabbott wants?
All we know for sure is that the whites now are "pinker" than wanted.
Last edited by a moderator:
pentaxuser
Member
Once the print is dry, give us a scan as near to the print's colours as possible. Until we see it we can argue amongst ourselves but get you no nearer to a solution.
pentaxuser
pentaxuser
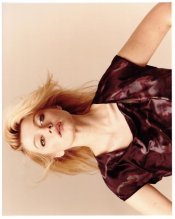
I should add that I have also scanned frames from this shoot and got approximately the same colors. I am not discounting the possibility that user error plays a large part in the results, but I am also leaning toward the conclusion that there was mixed lighting. I went to a workshop and the studio took care of the lighting and everyone there was using a digital camera. BTW, really great workshop, loads of fun!
Last edited by a moderator:
JOR
Member
- Joined
- Aug 18, 2013
- Messages
- 43
- Format
- Med. Format RF
That's a nice print from a beginner, even if it took five tries. But don't start grading it until it's dry. I take back my comment about crossed curves - I looked at your .JPG scan in Photoshop and it looks as though the background really was pink! Or at least skin-toned - there are light mid-tones in the skin which are very similar to the darker areas of the background, so that's how the film saw it! How did it look when you scanned the negative?
That's a nice print from a beginner, even if it took five tries. But don't start grading it until it's dry. I take back my comment about crossed curves - I looked at your .JPG scan in Photoshop and it looks as though the background really was pink! Or at least skin-toned - there are light mid-tones in the skin which are very similar to the darker areas of the background, so that's how the film saw it! How did it look when you scanned the negative?
Thanks. It looked about the same when I scanned the negative. I recall some frustration with these sets because I could not get the background white (I don't use masks).
My experience with RA-4 printing is, that you often do filtration too weak. It is sometimes better to make a test print using much bigger "fault" steps in filtration too see if you are going the right direction. Sometimes, you stick at a print, fiddeling +/-5 filtration here and there and every print looks unreal.
In that situation, it is sometimes better to try +/- 20 Y or +/-10 M just too see if you are at the right side of the color line.
In your print, I see some strong red/orange cast. Even the skin of the model may look nice, the dress and the background don't look correct(?).
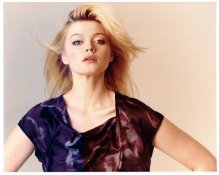
I did a very very extreme example, what happens if you remove the orange (too much). The skin is now too pink but look what happens with the rest. I removed about 50% of the yellow and 30% of the red. The question is: Was the color of the dress brownish-red? I guess no, because there is a really high amount of blue in this area.
You now see how much orange you really have in your print.
The optimum will bee somewhere between.
Joachim
In that situation, it is sometimes better to try +/- 20 Y or +/-10 M just too see if you are at the right side of the color line.
In your print, I see some strong red/orange cast. Even the skin of the model may look nice, the dress and the background don't look correct(?).
I did a very very extreme example, what happens if you remove the orange (too much). The skin is now too pink but look what happens with the rest. I removed about 50% of the yellow and 30% of the red. The question is: Was the color of the dress brownish-red? I guess no, because there is a really high amount of blue in this area.
You now see how much orange you really have in your print.
The optimum will bee somewhere between.
Joachim
Attachments
mudfly9
Member
I don't think this will help you with the particular issue you've got but I've always found that I can affect the colour of the highlights based on the filter settings used for a pre-flash. For example, if I want to warm up the highlights a little, a pre-flash with 0M 0Y 0C seems to do this nicely. Presumably this colour cast affects the rest of the image less because it only represents a small proportion of the total amount of light it sees, whereas for the highlights it's quite a lot.
You could try doing a pre-flash with a job lot of magenta dialled in (you'd have to experiment with the colour, obviously) but dodge the place where the model is going to be; tricky, but it might work!
You could try doing a pre-flash with a job lot of magenta dialled in (you'd have to experiment with the colour, obviously) but dodge the place where the model is going to be; tricky, but it might work!
markd514
Member
- Joined
- Jan 19, 2014
- Messages
- 101
- Format
- 35mm
My experience with RA-4 printing is, that you often do filtration too weak. It is sometimes better to make a test print using much bigger "fault" steps in filtration too see if you are going the right direction. Sometimes, you stick at a print, fiddeling +/-5 filtration here and there and every print looks unreal.
In that situation, it is sometimes better to try +/- 20 Y or +/-10 M just too see if you are at the right side of the color line.
In your print, I see some strong red/orange cast. Even the skin of the model may look nice, the dress and the background don't look correct(?).
I did a very very extreme example, what happens if you remove the orange (too much). The skin is now too pink but look what happens with the rest. I removed about 50% of the yellow and 30% of the red. The question is: Was the color of the dress brownish-red? I guess no, because there is a really high amount of blue in this area.
You now see how much orange you really have in your print.
The optimum will bee somewhere between.
Joachim
Can you please tell me what software you used to reduce the colors and render the new image? Thank you.
Sirius Glass
Subscriber
Can you please tell me what software you used to reduce the colors and render the new image? Thank you.
What software? RA-3 printing is analog, we do this by eye.
markd514
Member
- Joined
- Jan 19, 2014
- Messages
- 101
- Format
- 35mm
What software? RA-3 printing is analog, we do this by eye.
Yes, I know, BUT Jojo has a scanned photo. There was manipulation done to it to change the colors. Only a software program could have done that. It is not over the entire image. The colors are altered on the image.


Photo Engineer
Subscriber
I would add 10Y and 5M to the filter pack and see where you are. This might make the scene too blue, but then you know that the right pack is in the middle.
And remember that wet prints look different than dry prints.
PE
And remember that wet prints look different than dry prints.
PE
DREW WILEY
Member
- Joined
- Jul 14, 2011
- Messages
- 14,008
- Format
- 8x10 Format
This could just as easily be a minor chem or temp problem.
RedSun
Member
For beginner RA-4 printing, I would say color balancing is a daunting experience. The quality control of color paper, chemicals and processing is all critical. Also, since we do not print on a regular basis, we often have to learn and pick up again.
I believe labs use processor to scan the negative, find the auto color balancing, then set the color filtration and make the exposure. It is an automated process and the result is quite satisfactory.
The closest we can do in our darkroom is the color processor, such as Jobo ColorStar. But it also requires experience. But it is still easier to do than using purely human eyes.
Here I'm not to argue that color processor is better than 20 years in darkroom. But for beginners, that is definitely another way to do, or at least to try.
Roger Cole
Member
The OP is the same person who posted in the 2015 predictions thread that he gave up film because it was too hard to "source" (I think he means "buy") supplies and that film is dead. So advice is likely to be wasted.
DREW WILEY
Member
- Joined
- Jul 14, 2011
- Messages
- 14,008
- Format
- 8x10 Format
Thanks, Roger. But for general background opinions of wider interest, I'd still remark that pro labs do it different ways. Inexpensive machine prints might be automated, but custom optically enlarged prints be done in the same manner as we do. Batch control might be established with a color densitometer program, but otherwise it could be as simple as printing test strips. But "purely human eyes" are the most sophisticated instrument there is. The problem is, we don't know how to recognize what we actually see. I can perceive color with at least twice the accuracy of most people - even better than most densitometers - not because my eyes are better, but because I'm trained. I worked as a color consultant, and blended colors industrially for quite awhile. I've even gotten way better distinguishing color prints hues
over the years. And ultimately, it's your eyes which determine whether a print is on target or not. I've even worked with all kinds of very expensive spectrophotometers; and while such aids certainly make workflow more efficient, at the end of the day there is no substitute for
human vision.
over the years. And ultimately, it's your eyes which determine whether a print is on target or not. I've even worked with all kinds of very expensive spectrophotometers; and while such aids certainly make workflow more efficient, at the end of the day there is no substitute for
human vision.
Roger Cole
Member
Of course you are right. I just thought it ironic that he started this thread about his first RA4 print in August and by January had given up on film. We've become a society of, if not instant gratification, at least remarkable impatience. Personally I find most rewarding those things I've has to put time and effort into learning.
Sent from my iPhone using Tapatalk and 100% recycled electrons - because I care.
Sent from my iPhone using Tapatalk and 100% recycled electrons - because I care.
Roger Cole
Member
Note that I never tried an analyzer myself. People I knew who did seemed to find them just more confusing to beginners but sometimes time saving for the experienced. I'd think they're a very YMMV kind of thing.
Sent from my iPhone using Tapatalk and 100% recycled electrons - because I care.
Sent from my iPhone using Tapatalk and 100% recycled electrons - because I care.
| Photrio.com contains affiliate links to products. We may receive a commission for purchases made through these links. To read our full affiliate disclosure statement please click Here. |
PHOTRIO PARTNERS EQUALLY FUNDING OUR COMMUNITY:  |