• Welcome to Photrio!
    Registration is fast and free. Join today to unlock search, see fewer ads, and access all forum features.
    Click here to sign up

First color example.

Cemetery Chapel

H
Cemetery Chapel

  • 1
  • 0
  • 22
2 bath test

A
2 bath test

  • 3
  • 0
  • 48

Recent Classifieds

Forum statistics

Threads
202,769
Messages
2,845,321
Members
101,513
Latest member
adammoore2011
Recent bookmarks
0

Photo Engineer

Subscriber
Allowing Ads
Joined
Apr 19, 2005
Messages
29,017
Location
Rochester, NY
Format
Multi Format
I thought the enthusiasts here might want to hear! I'm excited.

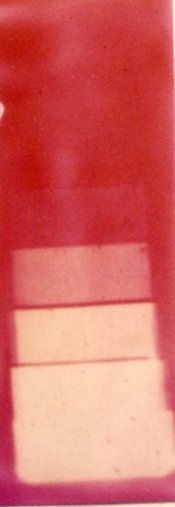
It is drying in the darkroom right now :whistling: . Scanning tomorrow.

I used Red 1 Azo dye in an AgCl coating and gave it a "normal" dye bleach process after a "normal" B&W process.

The Bleach was H2SO4 (~4%), Phenazine (~100 mg/l), NH4Br (~20 g/l), and Thiourea (~20 g/l).

I followed this by a wash and a blix and then a wash. I got a quite distinct positive magenta / red image. A lot of dye washed out even though I used an Aluminum mordant, and the coating blistered indicating poor hardening for this process.

But, it is my first color coating, not my last. :D

I have Metanil Yellow for the yellow layer, so if I can get a Cyan dye and a good red sensitizer for this emulsion....... Maybe. IDK. The only Cyan dye I can easily get is Chicago Blue, which is not the best "cyan" in the books but bleaches well.

PE
 
You know what? This is just way, way too cool. Sincere congratulations. I can't wait to see the scans. The individuals on this site and what they know - and what they can do with that knowledge - never ceases to amaze me.

Ken
 
That is great! Now if you can just keep the troll from asking about scavengers ... :whistling: jest sayin'
 
You know that you are trolling right there, don't you?
:blink:
 
You know that you are trolling right there, don't you?
:blink:

Yes, you. The one who keeps splitting hairs about a discussion long after the discussion is done. [Do you need an mirror to see who it is?] But you are providing a service of raising my post count, even though it is not on my agenda.
 
Grind up T...M and see it that works!
 
Too bad. I thought you knew this kind of stuff based on previous posts.

PE

Deranging again... but what previous posts may have given you that idea?
If you would point them out, i would be happy to explain them to you.
:wink:
 
No, just your broad ranging knowledge on photomaterials, color and photography gave me the idea that you may have some thoughts on this matter. That is all. I have no evidence either way except your posts.

PE
 
Congratulations! Keep up the good work, I would offer to help you, but I have no clue after basic chemistry.
 
I asked a Sirius question of you. Any suggestions?

PE

"Sirius" - that's a good one!

I have a sirius question:

When do the "dog days of summer" end?

Or, a less technical sirius question:

Will Sirius go broke like MX Radio, or can Howard Stern keep it solvent?

(Ha - I worked it back to chemistry, sort of...)
 
I need a solution to my problem of the dye being too soluble. I thought alum would work, but it did not. I guess I have to try calcium next.

PE
 
Don't laugh

Well, it looked better wet!

Here is the image that I got of the Stouffer step wedge. After scanning in the image I could clearly see both a negative yellow brown image and a positive dye image. I tried treating the brown area today and could do nothing to remove it.

The blemishes are due to the acid causing the gelatin to swell in a bubble and then burst. The spots appear to be due to dye washing out or being retained in some of the areas.

I can play with this in PS and get just about any enhancement to show more detail, better color, or even the dual neg-pos images, but this is the raw data.

As the title says, "don't laugh". Because then I would ask you to try it and see how you did on your first attempt! :wink:

PE
 

Attachments

  • Azo 1.jpg
    Azo 1.jpg
    38.6 KB · Views: 329
Well, it looked better wet!

Here is the image that I got of the Stouffer step wedge. After scanning in the image I could clearly see both a negative yellow brown image and a positive dye image. I tried treating the brown area today and could do nothing to remove it.

The blemishes are due to the acid causing the gelatin to swell in a bubble and then burst. The spots appear to be due to dye washing out or being retained in some of the areas.

I can play with this in PS and get just about any enhancement to show more detail, better color, or even the dual neg-pos images, but this is the raw data.

As the title says, "don't laugh". Because then I would ask you to try it and see how you did on your first attempt! :wink:

PE

Oops! Perhaps it isn't considered a successful photograph, but it is an interesting abstract/psychedelic piece of art in my eyes.

I guess that if some one like you (former photo engineer and worked with color) gets that results,; I can't imagine me, who hasn't got more than the most basic chemistry knowledge.

Just curious, Is the process some kind of dye transfer or dye bleach?

I wish you success in future color coatings.
 
Similar coating done at EK

Here is a similar coating to the one shown in my first example.

I coated this by machine and it was one of the first Dye Bleach coatings I ever did. The process was close to what I used above. However, this machine coating was the result of a lot of experimentation using hand coatings to get the balance of silver and dye correct, and experiments to bind the dye in place.

Even so, this early example shows flaws.

PE
 

Attachments

  • Azo machine coated.jpg
    Azo machine coated.jpg
    28.2 KB · Views: 299
This is a complete dye bleach process from start to finish, quite similar to that used by Ilfochrome.

PE
 
An AhHah moment - Second try.

I ran the first attempt posted here, on Strathmore paper, and thought that the paper fibers might be absorbing some chemicals and might also be reacting erratically. So, I repeated the experiment on Baryta paper. This scanned image still shows a bit of the negative image which is not apparent to the naked eye. Also, the hue shift across the paper is not very evident to the eye. It appears as more of a density change. So, the original looks better. Again, using PS tools I can make it look more like the eye sees it, but I think that the raw scan is the only fair way to post the example.

There is some mottle in the high density areas. IDK if that is in the silver or dye or bleach part of the overall sequence.

The original silver image is very sharp! The lack of sharpness in the final image indicates that there is too much silver, or too much phenazine or that the "system" needs a competer or a scavenger. Wandering phenazine in excess can drastically decrease sharpness.

You can see how sensitive any color system is!

Sequence at 20 deg C is as follows:

Develop 1' Dektol 1:3
Stop 30"
Fix in Kodak Hardening Fixer (alum).
Wash 10'
Dry to examine the results
........................< Dye step tb posted later
Dye Bleach 4'
Rinse 1'
RA4 blix 1'
Wash 4'
Dry
 

Attachments

  • Azo 2.jpg
    Azo 2.jpg
    21.1 KB · Views: 257
Again, weak on chemistry, but what about a Copper compound? Although those like to stick to just about anything and not let go easily, that would give you your cyan as well, but it might not be blue enough. CuAu? Nope, they are in the same period so they won't stick well, but they are in the same period so in theory there is a way to make Cu light sensitive. No, that's silly, but if it works put me in a footnote.
 
Photrio.com contains affiliate links to products. We may receive a commission for purchases made through these links.
To read our full affiliate disclosure statement please click Here.

PHOTRIO PARTNERS EQUALLY FUNDING OUR COMMUNITY:


Ilford ADOX Freestyle Photographic Stearman Press Weldon Color Lab Blue Moon Camera & Machine
Top Bottom