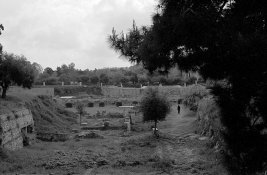
First attempts, 35mm NOT pleased with the results.

Frank Dean,  Blacksmith

A
Frank Dean, Blacksmith

  • 8
  • 5
  • 73
Woman wearing shades.

Woman wearing shades.

  • 1
  • 1
  • 80
Curved Wall

A
Curved Wall

  • 6
  • 0
  • 92
Crossing beams

A
Crossing beams

  • 10
  • 1
  • 115
Shadow 2

A
Shadow 2

  • 5
  • 1
  • 86

Recent Classifieds

Forum statistics

Threads
198,842
Messages
2,781,731
Members
99,725
Latest member
saint_otrott
Recent bookmarks
0

hoakin1981

Member
Joined
Feb 26, 2014
Messages
75
Location
Athens, Gree
Format
Multi Format
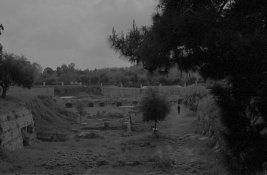
As said, first attempts both at developing and at scanning my first 2 rolls of TMAX 400 with HC-110. Can't say I like the result that much, I know there are better alternatives from the Epson V600 when it comes to 35mm but I believe it can do better than this. So, to see what I am talking about:

scan0005.jpg

scan0005-2.jpg

Any ideas how to improve detail and clarity?

Thanks!
 

Highlandpete

Member
Joined
Mar 26, 2014
Messages
13
Location
Highland, NY
Adjusting your image in Photo Shop

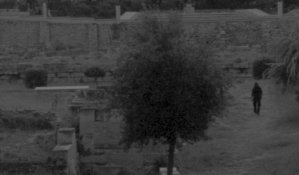
Hi hoakin1981, I'm not familiar with the scanner you have, but my first suggestion would be to adjust your levels in your photo editing program, then adjust your brightness and contrast, and lastly add about 50% shapening to your image. Another idea is to scan in color setting then convert to B&W in your photo editing program. I find I lose less detail if I scan in color and then convert to B&W afterwards. Here's your image with the levels adjusted, a little brightness and contrast adjustment and 50% sharpening.

scan0005.jpg
 
OP
OP

hoakin1981

Member
Joined
Feb 26, 2014
Messages
75
Location
Athens, Gree
Format
Multi Format
Hi hoakin1981, I'm not familiar with the scanner you have, but my first suggestion would be to adjust your levels in your photo editing program, then adjust your brightness and contrast, and lastly add about 50% shapening to your image. Another idea is to scan in color setting then convert to B&W in your photo editing program. I find I lose less detail if I scan in color and then convert to B&W afterwards. Here's your image with the levels adjusted, a little brightness and contrast adjustment and 50% sharpening.

View attachment 1057

Thanks for the suggestions! Indeed the shot does look better. However, want I mostly need to establish I whether my original capture and film processing were executed correctly. Meaning that the final film I have to work with indeed has all the necessary information required to make a suitable digital version to work with.

Apparently the problem lies in the scanner's inability to capture the fine details on the film. Perhaps I do need to spend some time testing the color scanning process as well, I have read elsewhere that it does help even though the specific articles were 10 years old and I trust scanning technology has evolved from back then.
 

dismalhiker

Member
Joined
Feb 14, 2014
Messages
34
Location
Little Rock,
Format
Multi Format
Hi hoakin1981... as noted over on APUG, probably the best way to evaluate your negatives is to examine them directly and, if you have the option, to print them the traditional (non-digital) way. With that out of the way... could you tell us what scanning software you are using? I have the Epson V700, which is probably quite similar and find the Epson software the comes with it nearly unusable. I have Lasersoft Silverfast, I don't use it and MUCH prefer Vuescan.

My workflow is to scan the negative 'raw' in Vuescan, which produces a linear TIF file with no adjustments by the software. Then I import the TIF file into Photoshop (using import as TIF, NOT using ACR) and invert it from neg to pos using ColorPerfect plugin. This gets me a decent file to work with and the rest can be done with PS curves and other adjustments.

However, if you want a quantum leap more and finer control of contrast, white/black levels, etc., the NIK Silver Effects Pro II plugin is worth a try. The fine control made possible by Nik Silver Effects Pro plugin is quite amazing.

Also, if you don't want to invest in ColorPerfect (colorneg/colorpos), you can still get excellent results with Vuescan doing the neg-pos conversion.

If you don't use Photoshop, then perhaps others will have alternative suggestions.
 
OP
OP

hoakin1981

Member
Joined
Feb 26, 2014
Messages
75
Location
Athens, Gree
Format
Multi Format
Hi hoakin1981... as noted over on APUG, probably the best way to evaluate your negatives is to examine them directly and, if you have the option, to print them the traditional (non-digital) way. With that out of the way... could you tell us what scanning software you are using? I have the Epson V700, which is probably quite similar and find the Epson software the comes with it nearly unusable. I have Lasersoft Silverfast, I don't use it and MUCH prefer Vuescan.

My workflow is to scan the negative 'raw' in Vuescan, which produces a linear TIF file with no adjustments by the software. Then I import the TIF file into Photoshop (using import as TIF, NOT using ACR) and invert it from neg to pos using ColorPerfect plugin. This gets me a decent file to work with and the rest can be done with PS curves and other adjustments.

However, if you want a quantum leap more and finer control of contrast, white/black levels, etc., the NIK Silver Effects Pro II plugin is worth a try. The fine control made possible by Nik Silver Effects Pro plugin is quite amazing.

Also, if you don't want to invest in ColorPerfect (colorneg/colorpos), you can still get excellent results with Vuescan doing the neg-pos conversion.

If you don't use Photoshop, then perhaps others will have alternative suggestions.
Hi! Thanks for the info. Indeed i trust an actual print from the negative would help but this is not possible at this time for various reasons. I too have vuescan available so i could try the "raw" option to start with, so basically you just scan the negative with all options turned off, absolutely no tampering whatsoever. And then invert to pos in PS and take it from there...

One last question, ever tried scanning it as a color image in 48bit data? Some say you get more "information" from the negative this way...
 

dismalhiker

Member
Joined
Feb 14, 2014
Messages
34
Location
Little Rock,
Format
Multi Format
Hi! Thanks for the info. Indeed i trust an actual print from the negative would help but this is not possible at this time for various reasons. I too have vuescan available so i could try the "raw" option to start with, so basically you just scan the negative with all options turned off, absolutely no tampering whatsoever. And then invert to pos in PS and take it from there...

One last question, ever tried scanning it as a color image in 48bit data? Some say you get more "information" from the negative this way...

If you wish to scan a "raw" file, Vuescan has an option to save as "raw", which I believe is a linear TIFF. If configured correctly, this saves it as a negative (no neg-to-pos conversion). Then you can use the ColorPerfect plugin in PS (C F Systems Innovations in Sight and Sound - Photoshop plug-ins page). ColorPerfect is not easy to learn but its a powerful tool once you get used to its quirky interface. If you Google ColorPerfect, there is quite a bit on the net about how to use it to convert b&w negatives (and color too). Maybe others use ColorPerfect and could chime in here.

An alternative is to use auto-levels (under the "Color" tab of Vuescan I think) and then tweak the appearance of the pic from there in Vuescan prior to scanning. I find that Vuescan can be quite good for the neg-pos conversion, with some adjustments. If you uncheck "all frames", you can make adjustments for each photo individually. Then, you don't need to do so much in PS.

Sorry, I don't know about the 48 bit option.
 

dismalhiker

Member
Joined
Feb 14, 2014
Messages
34
Location
Little Rock,
Format
Multi Format
Apparently the problem lies in the scanner's inability to capture the fine details on the film. .

Hi again... I just re-read your posting and it seems that you are most concerned with the lack of fine detail. I've had experience with multiple flatbed scanners as well as dedicated film scanners, most recently a Plustek OpticFilm 120 scanner for medium format film. Although the Plustek 120 produces obviously higher quality film scans than my Epson V700, the results (from 35mm) are still quite sharp with the Epson V700.

Looking at the two samples you posted, I can say that I've been getting much more detail from sharp negatives using the Epson flatbed. So, if fine detail is the question, perhaps it would be worth looking again at the original negatives (for sharpness) and, with regard to scanning, at the film holder and scanner focus.
 

Pioneer

Member
Joined
May 29, 2010
Messages
3,879
Location
Elko, Nevada
Format
Multi Format
You have probably done this but, if possible, I suggest that you try contact printing your negatives. Focus on getting a true black from the clear border surrounding the negative. Once you achieve that you can then use your loupe to study the contact prints themselves to determine whether you are exposing and developing your negative properly in the first place. I could certainly be wrong but my experience has been that the Epson scanner will make some adjustments just trying to get an image from your negative so you can never quite be sure that what you are seeing on your computer screen is an accurate representation of your exposure and developing processes. You can spend an awful lot of time fiddling with your scanner to no avail if your starting point wasn't good to start with.

As I mentioned, I'm sure you have tried this already but it is a good starting place if you haven't.
 
OP
OP

hoakin1981

Member
Joined
Feb 26, 2014
Messages
75
Location
Athens, Gree
Format
Multi Format
Thanks again for all the input so far.

@Pioneer, to be honest no I have not done a contact print because I simply do not have the necessary gear to do so. I was thinking about it but I have already spent a lot on developing gear & films & chemicals & a Mamiya 645 Pro :smile: & the V600 so I decided to just stop (apart from films and chemicals of course) and try to establish a good workflow with what I have now. In the future who knows...
@dismalhiker. Yes, my problem is not with the overall contrast or brightness or grey variations of the shot. The specific is not a good shot anyway, my problem is indeed the lack of fine detail & sharpness overall. What I see reminds me of a cheap 1st generation P&S digital camera and I was really expecting more from film...As for your advice to check the film holder and scan focus, sure! but do I go about doing that? I already have the betterscanning +ANR glass kit for the 120 format shots but such a kit is n/a for the 35mm. So, how do I adjust scan focus with the 35mm film?

@Alan Klein. Cannot remember for sure if the same was scanned using Vuescan or Epson Scan but what I do know is that all options were on OFF and I only increased the overall brightness a little since it was too dark to begin with. If I had to guess I would say it was done with Epson Scan. As for the dpi used believe it was on the range of 2400-ish, 16bit Grey and B&W negative.

Thanks.
 
Last edited by a moderator:

dismalhiker

Member
Joined
Feb 14, 2014
Messages
34
Location
Little Rock,
Format
Multi Format
Thanks again for all the input so far.
@dismalhiker. Yes, my problem is not with the overall contrast or brightness or grey variations of the shot. The specific is not a good shot anyway, my problem is indeed the lack of fine detail & sharpness overall. What I see reminds me of a cheap 1st generation P&S digital camera and I was really expecting more from film...As for your advice to check the film holder and scan focus, sure! but do I go about doing that? I already have the betterscanning +ANR glass kit for the 120 format shots but such a kit is n/a for the 35mm. So, how do I adjust scan focus with the 35mm film?

Hi hoakin1981... sounds like you are experienced with scanning, as you are already using the Betterscanning products. The Epson V700 holders have a crude height adjustment. In the absence of height adjustments on the holder, I guess the only way is to use a negative that you know is sharp and experiment with spacers. The film plane height seems critical and as little as 0.5 mm can make a big difference. Also, the Epson 35mm holders allow the film to remain curled (bowed) and don't flatten it (based on my experience with V700 holder).

Finally, according to THIS LINK the Epson V600 has an effective resolution of 1560ppi, which will limit its ability to scan negatives even under ideal conditions (according to that review).

Please let us know if you find effective solutions.
 
OP
OP

hoakin1981

Member
Joined
Feb 26, 2014
Messages
75
Location
Athens, Gree
Format
Multi Format
I am well aware my friend of this review of the V600, basically they claim that it is rubbish when it comes to 35mm scanning. On the other hand though I have learned over the years that reviews coming from "purist-seekers" must always be taken with a grain of salt. Ok I say but then I see shots taken from this fellow:

https://www.flickr.com/photos/altamiranopics/4674699217/in/set-72157626504159076

Pretty much all scanned with the V600 and a lot of it is 35mm. So you tell me, does it matter THAT much that the "effective" resolution of the V600 is 1560ppi? This is the IQ I would like to achieve. I don't want a miracle just the best that this machine can offer.
 

dismalhiker

Member
Joined
Feb 14, 2014
Messages
34
Location
Little Rock,
Format
Multi Format
I agree with you, I have the Epson V700 and many sharp 35mm scans from it. The photos in the flickr link are impressive, agree. I do not have a V600, so just thought I would mention that link.
 

Alan Klein

Member
Joined
Dec 12, 2010
Messages
1,067
Location
New Jersey .
Format
Multi Format
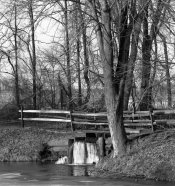
My BW scans with the V600 come out dark like yours. Some didn't have the detail I was expecting also but I just started shooting BW rather than color so I don't have enough experience to make firm conclusions. Here's one shot scanned flat that came out dark but was adjusted for the proper lighting using Levels mainly in LR. Also, scans always need a lot of sharpening. This is Tmax 100 developed in an outside lab with Xtol.
Reduced tree and hill003-4.jpg
 

artobest

Member
Joined
Oct 19, 2011
Messages
165
Location
South Wales
Format
Medium Format
I take that 'effective resolution' stuff on the filmscanner.info site with a dose of scepticism, given that they appear to test with the OEM film holders (and with no information about how/whether they have adjusted height correctly). As any owner knows, that is not how you extract the best from these scanners - and yet their numbers are routinely quoted as gospel around the net. In my opinion, 2300 dpi is almost certainly understating the real optical performance of the Epson V750 when used with a properly adjusted betterscanning holder.
 

hsandler

Subscriber
Joined
Oct 2, 2010
Messages
472
Location
Ottawa, Canada
Format
Multi Format
the scan does indeed look a little soft, but not wildly off, assuming they are unsharpened. Vuescan vs. epson scan won't make any difference. Prop up the neg holder in increments and rescan to find the best height. I use business cards as shims to do this. you may need to sharpen each scan to see the differences. I use unsharp mask with radius 1.1 amount 225 for an Epson v500 scanning at 2400 ppi. I do this in Photoshop, not the scanner software.

If you dont have glass for the 35mm holder, the negs may be bowing significantly in the middle. If you have emulsion side up, the bowing is usually downward, so keep that in mind if you find the optimal height using your med format holder and glass--you will need extra height for 35mm to get the centre at the same height.
 
Photrio.com contains affiliate links to products. We may receive a commission for purchases made through these links.
To read our full affiliate disclosure statement please click Here.

PHOTRIO PARTNERS EQUALLY FUNDING OUR COMMUNITY:


Ilford ADOX Freestyle Photographic Stearman Press Weldon Color Lab Blue Moon Camera & Machine
Top Bottom