First attempt at black and white reversal

Recent Classifieds

Forum statistics

Threads
198,729
Messages
2,780,068
Members
99,694
Latest member
RetroLab
Recent bookmarks
0

What About Bob

Subscriber
Joined
Aug 23, 2019
Messages
619
Location
Northampton, MA.
Format
Analog
I got the inspiration to try my hand at black and white reversal from @Ivo Stunga. Thanks!

Last night I developed black and white slides for the first time.

I mixed up PQ Universal concentrate and made two working developers: first developer at 1+5 with six grams of thiosulfate, pentahydrate, as the solvent and the second developer at 1+9. Some people were using 12 grams for the solvent and some were not using any at all. With that in mind and getting the idea that T-grained films needed some amount of solvent I decided to go in between at six grams.

I mixed up Sprint vanilla scented stop bath, sodium sulfite clearing bath with 50 grams of sulfite to a liter and Hypam fixer. I went with the potassium dichromate and sodium bisulfate bleach. 9.5 grams dichromate and 55 grams of bisulfate.

At first I did a bleach test with a tiny piece of old Tri-X film that failed big time. It was brought to my attention to just snip a piece off from the film that I was about to process. When I saw the results of the bleaching that was the green light to go.

The default first development time on Ilford's site is 12:00. I used 10:45 to compensate for the temperature of 69.8F/21C. Rest of the chemistry was around 70 to 70.5F/21.1 to 21.3C.

Bleaching was determined to be 3:00 followed by a couple of rinse cycles and then the clearing bath for 1:00. I used that twirly thingy on top of the AP Tank for agitation. Agitation was constant for the bleaching and clearing.

I wore gloves, mask and eye protection when mixing the dichromate and I worked slowly. Probably didn't need the mask after the powder was in solution but I kept it on anyway. I used trays to hold the container and graduate for the dichromate solution. Nearby I had a sprayer loaded with metabisulfite in case there were any drips in the tray. Nothing contacted the work surface. No spills at all. Anything that came into contact with the bleach was put into an Igloo type container: spoons, weighing cup, stirrer and a few other things in separate ziplok baggies in the Igloo container, separated from the other stuff.

I wanted to lessen the variables as much as possible for the time being and not use the permanganate version bleach until later because of some of the horror stories I have read regarding that type of bleach, even when diluted there were some users having problems with it. I will give the permanagante style bleach a chance.

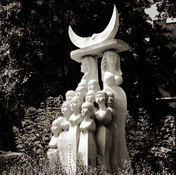
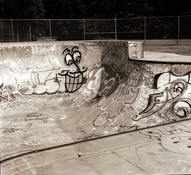
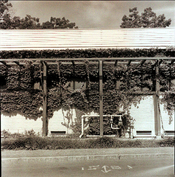
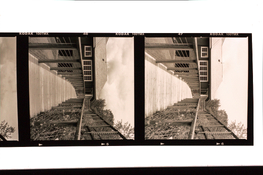
What was very exciting for me was the re-exposure step. I used a GE 60 watt, soft white, LED bulb at about a foot above the rim of the bowl. I kept the film on the reel and had it in a bright white bowl that measures 11 inches in diameter and about 5.75 inches depth, no water, and gave each side of the reel 1:00 of exposure while rotating the reel off-and-on. When the light was turned on I noticed images slowly appearing on the film! It was magical to witness mini images coming up on a milky light roll right before my very eyes! I did back the distance down by another foot or so when I noticed more of the images coming up. Kind of reminded me of overcooking, lol.

Second developer was for six minutes at 70.5F/21.3C, stop, rinse, fix, wash, photo-flo and hang to dry.

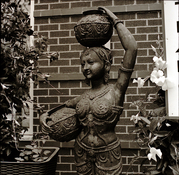
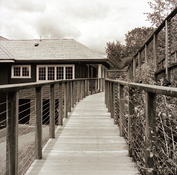
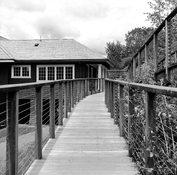
I really enjoyed this process and the experience. The brown tone is nice but I would like to try for a more neutral tone. I was informed that the brown tone is from the very fine grain nature of the film. I omitted the benzotriazole from the PQ recipe because I read that it shifts the tone on papers from warm to neutral, didn't mention anything about films and since I already had bromide and a solvent being used I thought it may end up being overkill. My main concern was that there could be a loss of shadow detail using that chemical along with the other restrainer. On my next batch mix of PQ I will add the benzotriazole and see if that makes any difference with the tone.

I am also thinking to maybe slightly increase the solvent from six grams to 6.5/7 and bring the first development time from 10:45 to 11:00 to even things out.

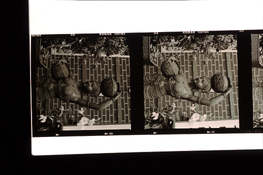
I used a Canon T5 to capture the frames and I had to do some fiddling with the brown tone because it was being recorded a little deeper than normal along with a pinkish overlay which doesn't show on the film when viewed in daylight. When the film is viewed in daylight the images are a very slight and nice looking tinted brown. The brown sort of reminds me of a pyrocat negative but in this case a pyrocat positive. The DSLR capture doesn't do the film justice. Looking through a magnifier on the light pad the clarity and sharpness of the images are amazing!

Please forgive the tininess of my little light pad table. I could almost fit three images per strip on it. Included are two test shots.
 

Attachments

  • Light pad example 1.jpg
    Light pad example 1.jpg
    1.4 MB · Views: 59
  • Indian statue.jpg
    Indian statue.jpg
    1.8 MB · Views: 60
  • Indian statue - desat.jpg
    Indian statue - desat.jpg
    1.1 MB · Views: 59
  • Light pad example 2.jpg
    Light pad example 2.jpg
    1.5 MB · Views: 54
  • Boat house.jpg
    Boat house.jpg
    1.8 MB · Views: 52
  • Boat house - desat.jpg
    Boat house - desat.jpg
    1.2 MB · Views: 60
OP
OP
What About Bob

What About Bob

Subscriber
Joined
Aug 23, 2019
Messages
619
Location
Northampton, MA.
Format
Analog
Bravo Bob! Reversal processing is very addictive and hence be warned. :smile:

Were the best results obtained at box speed?

Thanks, Raghu!

Box speed appears to be the sweet spot. The one stop under exposed frame has a slight punch to it and the one stop over exposed frame the highlights begin to wash out just a little but not too bad.
 

F4U

Member
Joined
Jan 15, 2025
Messages
471
Location
Florida
Format
8x10 Format
I have always had a question concerning the worth of B&W reversal, and suppose this thread is as good as any to ask my question without intending to sidetrack the thread. My question is, what good is it, when the film base is tinted to reduce light piping. That tinting (darkening) of the film base is still there whether it's a positive or not. So what practical purpose does it serve to reverse it, since it will always be quite a bit darker than a clear film base.
 

Ivo Stunga

Member
Joined
Apr 3, 2017
Messages
1,191
Location
Latvia
Format
35mm
Very nice @What About Bob!
Yesterday I finally put up the projection screen at my new place and re-watched my first E-6 slides, then first BW Reversal attempts by following Ilford recipe without any prior experience and chemistry knowledge. Hadn't projected for a year or so, and was blown away - again and long overdue.
My first attempts were an artistic failure (density, contrast and partial reversal issues). You, however, have a very balanced result right away - congrats and again: very nice!


what practical purpose does it serve to reverse it, since it will always be quite a bit darker than a clear film base.
If I got the question right: in 35mm projection setting the gray base means that the projected image is a tad darker. Eyes however quickly adjust and brain forgets that we're looking at a gray triacetate base.
It's only when a clear-base film is next in tray that we can see difference: a tad brighter, punchier slide.

In 135 the clear base material is PET except one film - Fomapan R100 (to my current knowledge). PET tolerates projection heat better thus it often just refuses to deform/bulge. This can create some focusing problems with curved field projection lenses that expect bulging to achieve edge-to-edge focus.

It might very well be worth to trade a tad darker projected image to the latitude and other characteristics/gains of any given film - like proper bulging/focusing alone.

When scanning, the difference is moot if your exposures/development is on point.
So don't shy away from gray-base films. It's a non-issue in my book.

Every film is a Slide Film when put through the reversal process successfully.
Even C-41 films if you're going for a strong low-key look - during processing the orange base looses its strong orange tone and adds to the density with shift to warm presentation.
 
Last edited:
OP
OP
What About Bob

What About Bob

Subscriber
Joined
Aug 23, 2019
Messages
619
Location
Northampton, MA.
Format
Analog
Thanks, @Ivo Stunga!

What kind of projector do you have? I have been looking around for even a mini viewer, something like a Panavue, but for 120. No luck. I always had a fondness for slides After doing this process for black and white I am in awe of the richness and character of the images. That re-exposure step was a delight to see!

What came to me not long ago is how would Catlabs X 320 perform with this process? I am trying to find the negatives from this film that I shot last year, figures I can't find it now, lol. The base of the Catlabs film, to my recollection, was really clear. I had difficulty with that film. Probably because I wasn't using their recommended list of developers. D-23 wasn't on it. I couldn't really get it to work the way I wanted. Didn't work well with BT2B. Punchy result. Latitude was very narrow. Midtones looked sparkling at least. I have no idea but something is telling me that PQ might actually fry this film. Won't know until it is tried. For the next film purchase I could get a few rolls and play around with it.
 

F4U

Member
Joined
Jan 15, 2025
Messages
471
Location
Florida
Format
8x10 Format
Very nice @What About Bob!
Yesterday I finally put up the projection screen at my new place and re-watched my first E-6 slides, then first BW Reversal attempts by following Ilford recipe without any prior experience and chemistry knowledge. Hadn't projected for a year or so, and was blown away - again and long overdue.
My first attempts were an artistic failure (density, contrast and partial reversal issues). You, however, have a very balanced result right away - congrats and again: very nice!


If I got the question right: in 35mm projection setting the gray base means that the projected image is a tad darker. Eyes however quickly adjust and brain forgets that we're looking at a gray triacetate base.
It's only when a clear-base film is next in tray that we can see difference: a tad brighter, punchier slide.

In 135 the clear base material is PET except one film - Fomapan R100 (to my current knowledge). PET tolerates projection heat better thus it often just refuses to deform/bulge. This can create some focusing problems with curved field projection lenses that expect bulging to achieve edge-to-edge focus.

It might very well be worth to trade a tad darker projected image to the latitude and other characteristics/gains of any given film - like proper bulging/focusing alone.

When scanning, the difference is moot if your exposures/development is on point.
So don't shy away from gray-base films. It's a non-issue in my book. Every film is a Slide Film when put through the reversal process successfully.

Thank you. I suppose that's an acceptable answer. If the process is capable of giving a similar tonal range to development as a negative, It sounds like a good possible way to enlarge the small reversed negatives onto 8x10 Xray film for cyanotype process. This is where I back out of this thread and return it to the OP's interests. I'll quietly keep an eye on it.
 

Ivo Stunga

Member
Joined
Apr 3, 2017
Messages
1,191
Location
Latvia
Format
35mm
What kind of projector do you have?
Soviet white noise generator: Peleng 500AF with 120W halogen bulb. The autofocus feature was converted to a very precise manual control via PlayStation 2 analog stick. Due to this conversion I currently keep it as my main machine.
I also have Leitz Pradovit that I gave to my friend for use. Considering he's not using it, I might actually revisit it to evaluate the autofocusing performance. Leitz is a much nicer, quieter machine that doesn't blast you with full strength light when tray runs out.

Lenses matter. Very much. The packaged lenses of both projectors just aren't good.

What came to me not long ago is how would Catlabs X 320 perform with this process
It's Aviphot, right? Aviphot 80 is lovely at ~30-64. Aviphot 200 is great at 80~125. If it's Aviphot 200, try it closer to EI100 and see how that goes. Contrast will become normal as you approach the film's actual performance for pictorial gamma.

Shooting it at 320 just pushes and crushes it as its latitude isn't that strong. That's the reason why majority of Rollei Infrared 400 and Retro 400S, and Superpan 200 (to a lesser degree) images online present crushed shadows and strong contrast when shot/developed for box speed.
 
Last edited:

Sirius Glass

Subscriber
Joined
Jan 18, 2007
Messages
50,352
Location
Southern California
Format
Multi Format
I am glad to see that the black & white reversal worked so well for you.
 
OP
OP
What About Bob

What About Bob

Subscriber
Joined
Aug 23, 2019
Messages
619
Location
Northampton, MA.
Format
Analog
@Sirius Glass: Next thing will be to work on bringing the tone down to be more neutral. I will be adding the benzotriazole this time around. I have 160ml used out of the 500ml concentrate so this gives a multiplier of 0.68 that will take the 25ml of the 1% solution of benzotriazole per 500ml down to 17ml for 340ml of leftover concentrate.

Oh yeah and these shots were taken with a Hassleblad 501C 😀 I can''t believe I posted all that and didn't include the data. This is a first for me.

Hasselblad 501C with 80mm lens
T-Max 100 at 100
Exposure: Indian statue: 125th at f/9 and Boat House: 125th at f/13
Developed in PQ Universal: 1st (1+5, 69.8F/21C) and 2nd (1+9, 70.5F/21.3C)
Dichromate bleach: 3:00 with twirling, sulfite clearing 1:00 with twirling, re-exposure: 1:00 per side with a 60 watt GE, soft white, LED bulb in between one and two feet, fix: 5:00 in Hypam, wash: 10:00, photo-flo: 1:30

@Ivo Stunga: I gave my first PlayStation, along with Hercules and Crash Bandicoot, away to a friend a long while ago.

The projectors at my old elementary school were noisy, so was the advancing of frames. The movie projectors were pretty much the same. In my head I can still hear the slapping of the film leader when the movie ended. The teacher would be by the projector's side to stop the machine or would have to make a dash for it from the other side of the classroom when it was too late, lol.

I was thinking about Catlabs seeing that it has a very clear base. Catlabs X 320 at 100/125 resulted in decent images. Anything below 200 forget it. BT2B didn't work well with this film. The highlights were on the cooked side which was a surprise. The film has a beefy character to it. If Catlabs X 320 were a printing paper it would closely resemble an Inktone Multipress paper for it's bravado.

I might give the Catlabs 80 a try, instead of the X 320.
 
OP
OP
What About Bob

What About Bob

Subscriber
Joined
Aug 23, 2019
Messages
619
Location
Northampton, MA.
Format
Analog
I am thinking that when I put in the benzotriazole this time around I think leaving it out in the first developer and instead using it in the second developer seems logical to me. The BZT in the PQ recipe is geared toward paper development. With film reversal I think that the BZT in the first developer wouldn't be necessary seeing that the bleach is going to strip away the negative image. It would be wasted and also it might cause a loss of speed, maybe even slightly extend the first development time. I only made one normal and one stop over images this time, didn't do a one stop under. Also wanted more frames for two extra subject sets

I just made the 1% solution of BZT with 1.00 a gram of sodium carbonate. According to my math: 3ml should be the minimum and maybe 5ml of the 1% solution should suffice. This will be my second crack with this process. This time to lessen the warm tone. I will post the results.
 
OP
OP
What About Bob

What About Bob

Subscriber
Joined
Aug 23, 2019
Messages
619
Location
Northampton, MA.
Format
Analog
The negatives are still wet, or should I say "positives". They look slightly less brown, I think. Second attempt and everything else appears to be nailed, except for the tone. It is a nice tone and could be a lovely tone for certain subjects.
 
OP
OP
What About Bob

What About Bob

Subscriber
Joined
Aug 23, 2019
Messages
619
Location
Northampton, MA.
Format
Analog
Nice! Dr5 website shows an example of TMax 100 reversed in their B&W neutral- DEV-1 process. It looks void of any brown tint. So there is definitely hope for getting neutral results.

Those examples look great! Thanks, Raghu

The positives have dried. I thought the tone looked lesser this time around but amount of tone actually looks the same as the first set. I was being conservative with the benzotriazole, maybe I didn't use enough?. I used 3ml of a 1% solution for the second developer. A poster here recommended adding at 5ml intervals at a time to get to where you want to go. I'm thinking a few things: 1 Increase the BTA, maybe to 10ml. 2. Maybe BTA needs to be added into the first developer as well as the second, this may affect speed and development time somewhat. Doesn't make sense to me to add it to the first developer seeing that the image is being bleached away. 3 Reduce the potassium bromide or take it out altogether, if this is what is giving the extra warmth. Reducing bromide might bring out the shadows a little or I might need to adjust E.I.

So these check out at the present time:
1. T-Max 100 at 100 being the norm
2. Six grams of thiosulfate for the solvent
3:. First developer: 10:45 development time
4: Bleaching: 3:00 bleaching time, I did go 5:00 this second time around and there was no difference between 5:00 and 3:00
5: Clearing: 1:00
6: Re-exposure: By a GE 60 watt, soft white, LED bulb in between one and two feet below from bulb with reel in a deep white bowl. 1:00 exposure to each side of reel. Film is kept on reel. Some people remove their films from the reel during this step. I have been leaving it on and it works fine. The really fun part is this step and seeing the mini images appearing right up on the roll.
7. Fixing: 5:00 with Hypam. Some don't use a fixer at this step but I do to err on the side making sure there is nothing left over.

Highlights look very clean. Exposures for box speed look spot-on. Very sharp detail. I just wish my Canon T5 would show more of what the slides have to offer.

This bleach has really good keeping qualities. Few old posts I have read didn't recommend holding on to it, storing it. It is still quick acting. I have been doing clip tests with the bleach by developing the clip to full black and then bleaching, before processing. About a good minute the film piece is bleached wih slight dip and dunk movement. I wait and extra 0:30 and then multiply by two to come to the 3:00 time. 5:00 might be the max time. Probably wouldn't go beyond that time. Once it is done it is done.

In the last image of the building with leaves I am noticing what looks to be an unevenness. Two things go through my mind about this: 1. Could this be due to uneven bleaching due to using the twirly stick or 2. Could my Canon T5 be suspect when capturing in the image? When I looked back at the image through my magnifier on the light pad and in daylight outside there is no uneveness at all. This leads me to believe that my Canon T5 could be on drugs.

Get this: When I switch the Cinestill light pad to the bluish light mode the images are neutral looking!! This is what I am trying to go for, lol.
 

Attachments

  • Hungry Ghost Choir.jpg
    Hungry Ghost Choir.jpg
    1.9 MB · Views: 18
  • Skateboard rink.jpg
    Skateboard rink.jpg
    1.9 MB · Views: 14
  • Building and leaves.jpg
    Building and leaves.jpg
    1.8 MB · Views: 19
Last edited:
Joined
Jul 28, 2016
Messages
2,724
Location
India
Format
Multi Format
I'm a bit skeptical of twirly stick agitation for bleaching, inversion is better to ensure evenness in my experience. But if it works for you, why not.

Dichromate bleach can indeed be reused multiple times and it would be wasteful to discard it after one or two rolls. You should be able to process at least 5 rolls per litre of bleach. Bleach turns very dark as it gets used and gets slower. So colour and speed are good indicators of the health of the bleach.
 

Europan

Member
Joined
May 21, 2009
Messages
633
Location
Äsch, Switzerland
Format
Multi Format
If you look at my avatar, you see objects that I used at my motion-picture film lab. Not on the picture are the tubs of 15 gallons capacity. I worked with rubber gloves in the open trays in the dark. Nothing replaces the agitation that’s possible when you have the room in the baths. Admittedly, 100-foot spirals for 35-mm. film were in use. But the same scheme recommends itself on a smaller scale.

Re. density and contrast: learn to process for a projection positive. Look what an image you can achieve with a powerful projector.
 
Joined
Jul 28, 2016
Messages
2,724
Location
India
Format
Multi Format
Ever since I heeded to the sage advice of @MattKing, I never had a leakage problem with Patterson tanks. So inversion agitation has always worked well for me in reversal processing of roll film. If you are concerned about spills while inverting your tank, why not use a large tray or a bucket to collect the spillage?
 

ChrisGalway

Subscriber
Joined
Feb 24, 2022
Messages
368
Location
Ireland
Format
Medium Format
Ever since I heeded to the sage advice of @MattKing, I never had a leakage problem with Patterson tanks. So inversion agitation has always worked well for me in reversal processing of roll film. If you are concerned about spills while inverting your tank, why not use a large tray or a bucket to collect the spillage?

Please let us know the link to MattKing's sage advice!
 
Joined
Jul 28, 2016
Messages
2,724
Location
India
Format
Multi Format
 

ChrisGalway

Subscriber
Joined
Feb 24, 2022
Messages
368
Location
Ireland
Format
Medium Format

Thanks. "Burping" it is then!
 
OP
OP
What About Bob

What About Bob

Subscriber
Joined
Aug 23, 2019
Messages
619
Location
Northampton, MA.
Format
Analog
@Europan: What type of glove material are you using when processing? Motion film brings back memories of elementary school.

@Raghu Kuvempunagar I have the AP brand tank. I saw a video a while back with John Finch demostrating that burping technique. In my case it wasn't always foolproofed. I could whip out an extra tray to put under the tank while agitating and then resting. I have a sprayer loaded up with metabisulfite to clean up any drips. I wear black nitrile gloves.

I'm becoming a little more confident with working with dichromate though at the same time I am still exercising caution. Maybe I am being overly cautious. This is really the first chemical that I have ever worked with where I am being exceedingly cautious. Confidence will build up more as I keep using the stuff and I defintiely will because I am really enjoying this process.

I will be working on attempt #3, the third roll, in a few days.

Side question: Is anyone making slides mounts for medium format film?
 
Joined
Jul 28, 2016
Messages
2,724
Location
India
Format
Multi Format
If inversion agitation is not desirable, then you can try this to ensure sufficient agitation during bleaching without worrying about spillage: place your developing tank in a large enough flat bottomed tray. Roll the tank from one end of the tray to the other continuously. Any spillage will be confined to the tray which can be safely handled.
 
Photrio.com contains affiliate links to products. We may receive a commission for purchases made through these links.
To read our full affiliate disclosure statement please click Here.

PHOTRIO PARTNERS EQUALLY FUNDING OUR COMMUNITY:


Ilford ADOX Freestyle Photographic Stearman Press Weldon Color Lab Blue Moon Camera & Machine
Top Bottom