Practice helps. You need to be able to read the light to tell when such a shot is possible. Notice that the example is pretty much back lit, which is common for such dramatic contrast. If you have important foreground detail, you will usually need carefully controlled fill light. Learning to use your light meter in back lit conditions is also essential. Learning the Zone system, how to previsualize the print, how to assign exposure zones to the subject, and how to develop for a usable result (adjusting for the exposure) are also handy. Since such exposures often require development adjustment away from what is the average on a roll, sheet film can be handy. It all comes in time, and with more than a little luck. Your luck is more or less proportional to the number of days you get out and do some serious shooting.
-
Welcome to Photrio!Registration is fast and free. Join today to unlock search, see fewer ads, and access all forum features.Click here to sign up
You are using an out of date browser. It may not display this or other websites correctly.
You should upgrade or use an alternative browser.
You should upgrade or use an alternative browser.
"Fine Art" style of exposure
-
A
- Thread starter Pandysloo
- Start date


Recent Classifieds
-
For Sale Rollei RPX 135-36
- Started by Roger Thoms
-
For Sale Black & White Paper Sale - Open box - UK only
- Started by Gary Holliday
-
Sold Efke PL 100 M
- Started by Roger Thoms
-
For Sale Omega C760 XL Medium Format Condenser Enlarger with Schneider Enlarger Lens - UK
- Started by Gary Holliday
-
For Sale Nikon FE2 / 50mm 1,4 AI-S
- Started by Jammoh
Forum statistics
OP
OP
- Joined
- Sep 15, 2012
- Messages
- 30
- Format
- Medium Format
Thanks for your advice, everyone. I realize it is something that will take years of careful attention and patience, and while my post came off a bit eager, I was simply trying to figure out the right direction to go in order to some day arrive there. The lack of shortcuts is one thing I love about film so much.
Everyone has been telling me to overexpose, but from what I can tell it looks washed out. For instance, in this photo I used an iPhone light meter app (I realize it's crude, but it's all I have at the moment) and set the EV compensation to 2 stops under. I then metered off the sky, which should have underexposed the image even more, if I'm not mistaken. Upon scanning it (unaltered), the image was still too bright for my tastes, and I had to drop the brightness maybe 1 stop-worth to get it looking like this: http://geometryofthought.tumblr.com/image/34321301137
My understanding up until this point was to underexpose the negative to get dramatic contrast, then print without altering it. It seems my concept of the photographic process was wrong. So the negative is for capturing the most tonal information, with adjustments to be made in the darkroom, correct? Rather than doing everything "in camera," so to speak...
The photographer is Hengki Koentjoro, who shoots with a Hasselblad. I have not tried to ask him; it's always the simplest and most direct solutions we seem to overlook, eh?
Oh, and don't underexpose unless you like grain and muddy shadows, or intend to print the shadows as solid black.
Everyone has been telling me to overexpose, but from what I can tell it looks washed out. For instance, in this photo I used an iPhone light meter app (I realize it's crude, but it's all I have at the moment) and set the EV compensation to 2 stops under. I then metered off the sky, which should have underexposed the image even more, if I'm not mistaken. Upon scanning it (unaltered), the image was still too bright for my tastes, and I had to drop the brightness maybe 1 stop-worth to get it looking like this: http://geometryofthought.tumblr.com/image/34321301137
My understanding up until this point was to underexpose the negative to get dramatic contrast, then print without altering it. It seems my concept of the photographic process was wrong. So the negative is for capturing the most tonal information, with adjustments to be made in the darkroom, correct? Rather than doing everything "in camera," so to speak...
Where did you find this example? Have you tried to ask the photographer?
Are you sure it's even a film image and not a digital one?
The photographer is Hengki Koentjoro, who shoots with a Hasselblad. I have not tried to ask him; it's always the simplest and most direct solutions we seem to overlook, eh?
- Joined
- Oct 9, 2010
- Messages
- 7,887
- Format
- 35mm RF
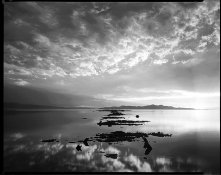
I'm completely new to B&W film. I would like to get into the "fine art" style; dramatic contrast: View attachment 61830
I realize lighting is the biggest factor, but I also am not trying for a technically perfect exposure, meaning I don't want as much tonal detail as possible because that leads to a flatter image (from what I can tell).
I have some Pan F+ and some Acros 100. Do I need to push it in order to get this look?
If you are completely new to B&W film and would like to get into the "fine art" style; dramatic contrast, may I suggest you spend a few years just working with B&W and you may realise that lighting is not the biggest factor.
- Joined
- Jun 21, 2003
- Messages
- 29,810
- Format
- Hybrid
anything made by a hassleblad looks like this
lxdude
Member
anything made by a hassleblad looks like this

anything made by a hassleblad looks like this
:munch:
~Stone
Mamiya: 7 II, RZ67 Pro II / Canon: 1V, AE-1, 5DmkII / Kodak: No 1 Pocket Autographic, No 1A Pocket Autographic | Sent w/ iPhone using Tapatalk
Thanks for your advice, everyone. I realize it is something that will take years of careful attention and patience, and while my post came off a bit eager, I was simply trying to figure out the right direction to go in order to some day arrive there. The lack of shortcuts is one thing I love about film so much.
Everyone has been telling me to overexpose, but from what I can tell it looks washed out. For instance, in this photo I used an iPhone light meter app (I realize it's crude, but it's all I have at the moment) and set the EV compensation to 2 stops under. I then metered off the sky, which should have underexposed the image even more, if I'm not mistaken. Upon scanning it (unaltered), the image was still too bright for my tastes, and I had to drop the brightness maybe 1 stop-worth to get it looking like this: http://geometryofthought.tumblr.com/image/34321301137
My understanding up until this point was to underexpose the negative to get dramatic contrast, then print without altering it. It seems my concept of the photographic process was wrong. So the negative is for capturing the most tonal information, with adjustments to be made in the darkroom, correct? Rather than doing everything "in camera," so to speak...
The photographer is Hengki Koentjoro, who shoots with a Hasselblad. I have not tried to ask him; it's always the simplest and most direct solutions we seem to overlook, eh?
A few things, one is you should meter for the subject, this being the mountain, secondly get a real light meter that has a spot meter for anything that's like a mountain as the iPhone won't capture this properly. Third is you probably chose the wrong time of day, even with color you should have chosen dawn before the sun came up and exposed for several minutes, fourth is that I don't think you had a haze filter on, and depending on the amount of moisture in the air you probably aren't seeing "over exposure" you're seeing water vapor in the air, a really good haze filter will HELP with this, not eliminate it, sometimes it's the right time of DAR or the right day that is clear and crisp and dry. Fifth is what the above poster said, before doing color start with B&W and spend a few YEARS learning and understanding light and your use if color filters etc. sixth is lean your color film you use, what film is this? For more "dramatic" looks, it's best to use the hardest film to expose of the lot which is transparency film, however that last but is personal preference, not to be held to by everyone.
Hope that helped somewhat.
~Stone
Mamiya: 7 II, RZ67 Pro II / Canon: 1V, AE-1, 5DmkII / Kodak: No 1 Pocket Autographic, No 1A Pocket Autographic | Sent w/ iPhone using Tapatalk
DAR=Day
~Stone
Mamiya: 7 II, RZ67 Pro II / Canon: 1V, AE-1, 5DmkII / Kodak: No 1 Pocket Autographic, No 1A Pocket Autographic | Sent w/ iPhone using Tapatalk
~Stone
Mamiya: 7 II, RZ67 Pro II / Canon: 1V, AE-1, 5DmkII / Kodak: No 1 Pocket Autographic, No 1A Pocket Autographic | Sent w/ iPhone using Tapatalk
- Joined
- Jun 21, 2003
- Messages
- 29,810
- Format
- Hybrid
:munch:
~Stone
Mamiya: 7 II, RZ67 Pro II / Canon: 1V, AE-1, 5DmkII / Kodak: No 1 Pocket Autographic, No 1A Pocket Autographic | Sent w/ iPhone using Tapatalk
exactly
exactly
It should be noted I own a Mamiya RZ67 and Mamiya 7 not a Hassleblad/Leica, is that why my shots end up like this instead?


Those are all about a minute exposure...
Sadly I can't recall what film, probably Tmax100 or tmax400 35mm in my M7 with pano adapter. It could be something else, I'm not home to look right now...
~Stone
Mamiya: 7 II, RZ67 Pro II / Canon: 1V, AE-1, 5DmkII / Kodak: No 1 Pocket Autographic, No 1A Pocket Autographic | Sent w/ iPhone using Tapatalk
It seems my concept of the photographic process was wrong.
No. Incomplete maybe, but not wrong.
Shooting slide film (or digital jpeg's like your iPhone provides) you generally get a direct correlation of exposure to output. You are creating an essentially finished, usable product, defined by the camera's exposure and a standardized process that follows. (Yes the result can be tweaked but for clarity I'll skip that here.)
Shooting to get a specific result is actually the preferred method, you are trying to do what Ansel Adams and many others have taught. But there's more than one way to skin a cat and Ansel had control of every step in his process.
Negatives are a different animal than slides and jpeg's, they are just an intermediate step that carries a lot more info than normally will get printed.
To get finished output from a negative you have to "take a picture" of the negative, and to get finished output print exposure needs to be adjusted and print exposure is the variable that defines how bright or dark the print becomes. (Enlargers are nothing more than specialized cameras designed to control exposure when taking pictures of negatives. If you sent your negative film to a lab they might even use another specialized type of camera called a scanner.)
Practical example.
The disposable cameras that you can get at the supermarket don't have the ability to change exposure settings. Instead they use negative films and a fixed exposure setting. Some frames may receive a lot of exposure, others much less; regardless, all of those shots can be printed to normal snapshot brightness or to the dramatic brightness level you prefer.
For negatives, there is no direct, absolute, or even normal connection between camera exposure and final output.
The person printing makes that choice, or in a lab that choice might be made by some software.
This second exposure choice allows us lots of flexibility but it also mandates that we make a choice, choosing once at the camera isn't enough.
For your negatives that were printed too bright, someone or something made the choice to print them that way. All you have to do to fix that problem is tell the printer what you want and print again.
You have to make that choice, if you simply underexpose and don't tell to processor what you want, they will try and fix your "mistake" and the result still won't be what you want.
- Joined
- Jun 21, 2003
- Messages
- 29,810
- Format
- Hybrid
It should be noted I own a Mamiya RZ67 and Mamiya 7 not a Hassleblad/Leica, is that why my shots end up like this instead?
Those are all about a minute exposure...
Sadly I can't recall what film, probably Tmax100 or tmax400 35mm in my M7 with pano adapter. It could be something else, I'm not home to look right now...
~Stone
Mamiya: 7 II, RZ67 Pro II / Canon: 1V, AE-1, 5DmkII / Kodak: No 1 Pocket Autographic, No 1A Pocket Autographic | Sent w/ iPhone using Tapatalk
well,
you might have had some sort of hasselblad film in there without knowing it ?
i've used lomo film in my leica, and the photographs look kind of low-fi.
aside from that, i am not sure how you got such nice photographs out of your mamiya's,
were you thinking about using a hasselblad, or wishing you had one ?
i have sometimes thought of the wrong things while makingexposures ...
like warm summer days when it was cold and wintery, or the french countryside while photographing
in some sort of new england rust belt town / city, and when the film was processed it was
as if it was shot on vacation somewhere else ... maybe that is what was going on ?
whatever it is, its nice work, and goes to show that you don't need a hassleblad to make good photographs
Last edited by a moderator:
Dammit, I need to sell my Hasselblad right now! It's obviously not working properly 
well,
you might have had some sort of hasselblad film in there without knowing it ?
i've used lomo film in my leica, and the photographs look kind of low-fi.
aside from that, i am not sure how you got such nice photographs out of your mamiya's,
were you thinking about using a hasselblad, or wishing you had one ?
i have sometimes thought of the wrong things while makingexposures ...
like warm summer days when it was cold and wintery, or the french countryside while photographing
in some sort of new england rust belt town / city, and when the film was processed it was
as if it was shot on vacation somewhere else ... maybe that is what was going on ?
whatever it is, its nice work, and goes to show that you don't need a hassleblad to make good photographs
It was certainly cold as windy, perhaps a Hassleblad isn't so much a camera but a way if being that is often brought out by that camera but does t require that camera.
And honesty if you have seen enough of my posts I always comment that a Hassleblad is a foolish purchase when a Mamiya is just as good at 1/4 the price.
Also I don't think they are great exposures by any means, just wanted to put examples up and that's all I had on hand in my phones photo library at the time.
~Stone
Mamiya: 7 II, RZ67 Pro II / Canon: 1V, AE-1, 5DmkII / Kodak: No 1 Pocket Autographic, No 1A Pocket Autographic | Sent w/ iPhone using Tapatalk
Dammit, I need to sell my Hasselblad right now! It's obviously not working properly
Haha
~Stone
Mamiya: 7 II, RZ67 Pro II / Canon: 1V, AE-1, 5DmkII / Kodak: No 1 Pocket Autographic, No 1A Pocket Autographic | Sent w/ iPhone using Tapatalk
OP
OP
- Joined
- Sep 15, 2012
- Messages
- 30
- Format
- Medium Format
You have to make that choice, if you simply underexpose and don't tell to processor what you want, they will try and fix your "mistake" and the result still won't be what you want.
That makes sense, though when you say "print" do you mean the creation of negatives, or actual prints? Because I've only had the lab produce negatives for me, which I then scanned using a film scanner without making any exposure adjustments or having any brightness controls enabled, and they all came out too bright.
That makes sense, though when you say "print" do you mean the creation of negatives, or actual prints? Because I've only had the lab produce negatives for me, which I then scanned using a film scanner without making any exposure adjustments or having any brightness controls enabled, and they all came out too bright.
They mean going into a dark room that has an enlarger and "optically" printing... As in sending light through the film, through an enlarging lens, and adjusting light output/time to get a correct print on paper and develop that paper for best results.
~Stone
Mamiya: 7 II, RZ67 Pro II / Canon: 1V, AE-1, 5DmkII / Kodak: No 1 Pocket Autographic, No 1A Pocket Autographic | Sent w/ iPhone using Tapatalk
That makes sense, though when you say "print" do you mean the creation of negatives, or actual prints? Because I've only had the lab produce negatives for me, which I then scanned using a film scanner without making any exposure adjustments or having any brightness controls enabled, and they all came out too bright.
I'm doing my best here to speak metaphorically with regard to the process because your question is good. Talking specifics about digital is off topic at APUG.
What you have created is a proof, not a finished work. Proofs from negatives are simply used to decide what you want to do next, they are not meant for display or sharing.
Metaphorically, you have not adjusted the second exposure yet. Whether using an enlarger or a digital processes you need to adjust to get the output you want.
- Joined
- Jun 21, 2003
- Messages
- 29,810
- Format
- Hybrid
Pandysloo
the negative is a film stencil
the print is what is made when light is shone through it
whether it is transferred to another media ( numerically )
or chemically ( paper )
the trick is to have fun making whichever one you decide you want to make ..
john
the negative is a film stencil
the print is what is made when light is shone through it
whether it is transferred to another media ( numerically )
or chemically ( paper )
the trick is to have fun making whichever one you decide you want to make ..
john
OP
OP
- Joined
- Sep 15, 2012
- Messages
- 30
- Format
- Medium Format
Metaphorically, you have not adjusted the second exposure yet. Whether using an enlarger or a digital processes you need to adjust to get the output you want.
It was my understanding that my need to give the exposure a "second pass" (so to speak) was evidence of my incompetence. Meaning, that if I had exposed correctly, that no post adjustment would need to be made. But the correct way to go about is it capture as much tonality on the negative, then adjust exposure to taste when enlarging (or scanning), correct?
It was my understanding that my need to give the exposure a "second pass" (so to speak) was evidence of my incompetence. Meaning, that if I had exposed correctly, that no post adjustment would need to be made. But the correct way to go about is it capture as much tonality on the negative, then adjust exposure to taste when enlarging (or scanning), correct?
There isn't one absolute answer here. There are a variety of ways to shoot negatives "correctly".
For example TXP (Tri-X Professional 320) is a film with a very long toe. Some of us very much like the effect of the toe when shot at box speed, others prefer to give more exposure to get the subject matter up off the toe a ways; Both approaches are "correct".
Both approaches can also be "standardized" for an individual. The adjustments required "to print" can become standard and applied automatically so that the proofs are much closer to what the individual expects on the first try.
Still, a fine print almost always requires more adjustments.
I think basically that what everyone is saying is expose for the shadows to get detail in them, and then if you want to print them black you can do so. But if you underexpose you will never be able to get information from them.
I think basically that what everyone is saying is expose for the shadows to get detail in them, and then if you want to print them black you can do so. But if you underexpose you will never be able to get information from them.
Actually I'm not trying to encourage extra exposure "just in case".
If I'm going to use TXP's toe to my advantage I need to expose accurately, extra exposure takes my toe away.
Hi Pandysloo,
The best advice I can give is to stop trying to do it in the camera. Prints happen in the darkroom. We have an old saying: " you can't print what isn't there" and it is very true. You can on the other hand choose not to print what is there by controlling your contrast and exposure during printing. Add dodging and burning to that and you are on your way. Prints that look like the one you referenced usually start out with the photographer striving to make the most expansive negative he can, and then printing it a little hard. When you have a negative that goes to ten you can do that, have your hard blacks, and still hold the highlights. If you printed the negative I've attached straight up it would look like mud, because in order to get the latitude to handle the contrast that's the way I made it. You could use this negative for welding goggles. If it hasn't been made that way there wouldn't have been a hope in hell for the stuff in the middle and on down. I chose where to have black fall, something I wouldn't have been able to do with a negative that had been truncated by under exposure. I hope that makes some sense.
The best advice I can give is to stop trying to do it in the camera. Prints happen in the darkroom. We have an old saying: " you can't print what isn't there" and it is very true. You can on the other hand choose not to print what is there by controlling your contrast and exposure during printing. Add dodging and burning to that and you are on your way. Prints that look like the one you referenced usually start out with the photographer striving to make the most expansive negative he can, and then printing it a little hard. When you have a negative that goes to ten you can do that, have your hard blacks, and still hold the highlights. If you printed the negative I've attached straight up it would look like mud, because in order to get the latitude to handle the contrast that's the way I made it. You could use this negative for welding goggles. If it hasn't been made that way there wouldn't have been a hope in hell for the stuff in the middle and on down. I chose where to have black fall, something I wouldn't have been able to do with a negative that had been truncated by under exposure. I hope that makes some sense.
Attachments
OP
OP
- Joined
- Sep 15, 2012
- Messages
- 30
- Format
- Medium Format
Some of us very much like the effect of the toe when shot at box speed
Pardon my ignorance, but what exactly is a "toe?"
Prints that look like the one you referenced usually start out with the photographer striving to make the most expansive negative he can, and then printing it a little hard.
Ah thank you; that makes sense. I plan on eventually getting into optical printing, but in the meantime I am using my school's film scanners.
| Photrio.com contains affiliate links to products. We may receive a commission for purchases made through these links. To read our full affiliate disclosure statement please click Here. |
PHOTRIO PARTNERS EQUALLY FUNDING OUR COMMUNITY:  |