Film Cannister Pinhole Cameras

Oranges

A
Oranges

  • 1
  • 0
  • 16
Charging Station

A
Charging Station

  • 0
  • 0
  • 16
Paintin' growth

D
Paintin' growth

  • 2
  • 0
  • 36
Spain

A
Spain

  • 5
  • 0
  • 42

Forum statistics

Threads
198,105
Messages
2,769,678
Members
99,562
Latest member
jwb134
Recent bookmarks
0

mcfitz

Member
Joined
Nov 9, 2006
Messages
144
Format
Multi Format
I've been turning 35mm film cannisters into pinhole cameras lately, and after a certain amount of trial, error and limited success, have at last worked out the problems that were encountered. The pinholes are home made, and are about f130. In order to use a tripod, I've taped small, extra strong magnets inside the cannisters, and there is a corresponding magnet taped to the outside, on the bottom. A small metal L bracket is bolted to one of my tripod quick release plates, and with the magnets, the cannister-cameras are quite stable on that. The lens caps are also made from film cannisters, cut to size and cut open, so they slip over the pinhole and can be slipped aside for the exposure.

I cut 7.5cm strips of 35mm film to load in the cameras, and that length is just short of the circumference of the cannisters. As a result, the effects are unexpected, like distorted panoramic images. Which I really like!

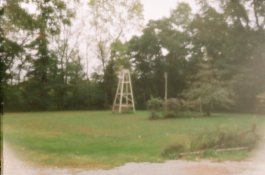
Here are some of the results. The building is the Natural History Museum, the facade, and under its arcades.

JdP4.jpg JdP2.jpg JdP3.jpg JdP7.jpg
 

narsuitus

Member
Joined
Nov 24, 2004
Messages
1,813
Location
USA
Format
Multi Format
I, too, like the distorted panoramic images produced by cylindrical pinhole cameras.

I once used 35mm and APS film canister cameras but abandoned them for the better image quality I was able to get from 4x5 film used in Pringles cans, PVC pipe, and oatmeal cans.


Cylindrical Pinhole Cameras by Narsuitus, on Flickr
 
OP
OP
mcfitz

mcfitz

Member
Joined
Nov 9, 2006
Messages
144
Format
Multi Format
Thanks guys, it is lots of fun!

Here are a couple of pictures of them.
pinholes1.jpg


From left to right, the front of the camera with the shutter closed, the back of the camera, shutter closed, and front again, shutter raised. Each one is numbered and has a mark below the location of the pinhole and at the backside of it, so I know where to aim the thing.

pinholes2.jpg


This is looking down into the cannister. I placed a piece of double sided foam tape 5mm wide above the location of the pinhole. It tells me where the pinhole is, and helps to guide the film strip into place. It also prevents the film strip from shifting - and covering the pinhole! That was one of the things that happened during the trial and error phase of making these. I use a hole punch to make a 5mm wide hole in the film cannister, and tape the pinhole over it, from the outside.

And a few more images, just because. :smile:

JdP1.jpg JdP6.jpg
 

Papercut

Member
Joined
Mar 20, 2008
Messages
17
Location
NY
Format
35mm RF
Looking good -- both the results and the cameras! The cameras and your magnetic mounting idea are fairly similar to Joe Van Cleave's 35mm canister camera(s) -- his youtube vids on them are worthwhile -- though Joe uses direct positive paper. I'm going to do a project along these lines this summer. Just need to use up a few more rolls of HP5+ so I can get enough canisters.
 

Grandpa Ron

Member
Joined
Sep 4, 2018
Messages
112
Location
Northwest Indiana
Format
35mm
Great job on the pictures.

Could you please tell me what size pinhole you used. The smallest I have been able to make is .36 mm (.014").
 
OP
OP
mcfitz

mcfitz

Member
Joined
Nov 9, 2006
Messages
144
Format
Multi Format
Ron, those pinholes vary between .2 and .22mm.

The successful ones, that is. The failure rate we won't talk about. :laugh:

What method are you using to make your pinholes?

Papercut, I saw Joe Van Cleave's video after I finished working out all the details on mine. I went searching, mainly out of curiousity, to see what other people might be doing while using film cannisters. His images are wonderful, with the paper negatives. Good luck with making your own, and please post some results when you get them.
 

Grandpa Ron

Member
Joined
Sep 4, 2018
Messages
112
Location
Northwest Indiana
Format
35mm
mcfitz, Since you asked,

I have made a number of pinholes using Pepsi can material and a needle. The finest needle I can find is .0135" (.343 mm). After making the needle hole and sanding both side down with 600 grit paper. The holes looks good with a 6x loop.

I was working with 35 mm Fujicolor 200 film and a modified SLR. I made a pair of black paper tubes with the pinholes on the end that replaced the camera lens. The shorter tube was focal length was 52 mm and longer tube focal length was 69 mm for f stops of about f 150 and f 190. I have attached a couple of photo from each. They show an old windmill tower in my yard and a bend in the Tippecanoe river.

My issue is when I enlarge the photos to 4x6 for printing, they are rather fuzzy. I am working with a 4x6 view camera so I will not have to enlarge the image. But that is another can of worms.

I was impressed buy clarity of your film can photos with an F 130 aperture.
 

Attachments

  • tower 52mm.jpg
    tower 52mm.jpg
    669.7 KB · Views: 167
  • Tower 69 mm.jpg
    Tower 69 mm.jpg
    685.6 KB · Views: 168
  • Tippy 52 mm.jpg
    Tippy 52 mm.jpg
    701.8 KB · Views: 155
  • Tippy 69mm.jpg
    Tippy 69mm.jpg
    681.5 KB · Views: 151

ced

Member
Joined
Oct 10, 2011
Messages
866
Location
Belgica
Format
Multi Format
Nice results!
I think one can get slightly crisper/sharper results when using very thin brass shimming sheets that result in smoother & cleaner holes than aluminium after sanding away the piercing burrs.
 

Grandpa Ron

Member
Joined
Sep 4, 2018
Messages
112
Location
Northwest Indiana
Format
35mm
ced,

I will have to try that. The only brass stock I had was .005", .010" and .035", so I went with the pop can.

I find some 002" brass and we will see what happens. thanks again.
 

Papercut

Member
Joined
Mar 20, 2008
Messages
17
Location
NY
Format
35mm RF
The finest needle I can find is .0135" (.343 mm).

This is coming from someone who has only purchased laser pinholes (that will soon be remedied), but I've heard that some pinholers use sewing pins, rather than needles, for finer holes. Might be worth a try if you've been using needle-needles thus far.
 

NedL

Subscriber
Joined
Aug 23, 2012
Messages
3,376
Location
Sonoma County, California
Format
Multi Format
I recently made a tiny pinhole for a macro camera... using the "dimple and sand" method and a regular sewing needle.
The pinhole is somewhere between 0.11 and 0.12mm. Made on square of aluminum from a drink can, I used emery paper and elbow grease on the aluminum until it was quite thin before making the hole... put the metal on a piece of soft wood and then pressed the needle until the tip just barely pierced the metal and then sanded more with 600 grit paper on the "dimple" side. Before that, the smallest one I'd managed to make was around 0.15mm ( without much extra thinning of the aluminum, and just trying to make it as small as I could. )
 
OP
OP
mcfitz

mcfitz

Member
Joined
Nov 9, 2006
Messages
144
Format
Multi Format
I recently made a tiny pinhole for a macro camera... using the "dimple and sand" method and a regular sewing needle.
The pinhole is somewhere between 0.11 and 0.12mm. Made on square of aluminum from a drink can, I used emery paper and elbow grease on the aluminum until it was quite thin before making the hole... put the metal on a piece of soft wood and then pressed the needle until the tip just barely pierced the metal and then sanded more with 600 grit paper on the "dimple" side.

Pressing the needle so the tip just pierces the metal is crucial, so it's no wonder you can get such small pinholes.

Myself, I use a number 10 hand sewing needle, inserting the eye into the eraser end of a lead pencil so it is easy to use. I've just compared the tip of a straight pin and the tip of the N° 10 sewing needle. The point on the pin is blunter than that of the needle, something to keep in mind if using one. The straight pin is easier to handle since it is a sturdier bit of metal.

The higher the number of a needle, the finer it is. I think I have some size 11 or 12's somewhere, I'll have to find them and check them out compared to the 10.
 

Jim Jones

Subscriber
Joined
Jan 16, 2006
Messages
3,740
Location
Chillicothe MO
Format
Multi Format
For very small pinholes, I lay 0.002" brass shim stock on a piece of cardboard and thrust a sewing pin barely into it. Then I place the shim stock on a fine whet stone with the pin still in the hole, and grind both pin and the dimple made in the brass by the pin down together. To measure the pinhole diameter, scan it at high resolution and count the diameter in pixels. The scan exposure should be manually set at the minimum that gives a well defined image of the pinhole. Overexposure quickly makes the pinhole seem larger than it actually is. I have to make many of these pinholes to arrive at the right diameter. Use a new pin for each one. Experience taught me about how much grinding it takes for the desired pinhole diameter. While writing this it occurred to me to grind the tip of the pin to about a 90 degree conical tip until the remaining pin tip is still slightly smaller than the desired pinhole diameter. Then twirl the pin as you push it into the brass.This might make a better defined dimple. A pin vise is a handy tool for anyone making pinholes. A micrometer or vernier calipers is also a useful tool. Long ago I had a comparator micrometer that made measuring pinhole diameters quick and easy, and the high magnification helped in quality control.
 

Joe VanCleave

Member
Joined
Jan 20, 2004
Messages
677
Location
Albuquerque,
Format
Pinhole
Ron, those pinholes vary between .2 and .22mm.

The successful ones, that is. The failure rate we won't talk about. :laugh:

What method are you using to make your pinholes?

Papercut, I saw Joe Van Cleave's video after I finished working out all the details on mine. I went searching, mainly out of curiousity, to see what other people might be doing while using film cannisters. His images are wonderful, with the paper negatives. Good luck with making your own, and please post some results when you get them.

Here's a link to my video:
 

Papercut

Member
Joined
Mar 20, 2008
Messages
17
Location
NY
Format
35mm RF
Here's a link to my video:


FWIW Joe, your videos were the inspiration for me to start two small projects that i'm going to start this summer, both using these canister cameras. I've been assembling most of the stuff to make the cameras and once this semester is done and dusted (all my grades in), I'm going to start in on them. So, thank you for posting your vids!
 
Photrio.com contains affiliate links to products. We may receive a commission for purchases made through these links.
To read our full affiliate disclosure statement please click Here.

PHOTRIO PARTNERS EQUALLY FUNDING OUR COMMUNITY:


Ilford ADOX Freestyle Photographic Stearman Press Weldon Color Lab Blue Moon Camera & Machine
Top Bottom