Faceplate removal

Thirsty

D
Thirsty

  • 4
  • 0
  • 894
Cowboying up in Kiowa.

Cowboying up in Kiowa.

  • 3
  • 0
  • 1K
Cowboying up in Kiowa.

Cowboying up in Kiowa.

  • 6
  • 2
  • 1K
Cowboying up in Kiowa.

Cowboying up in Kiowa.

  • 1
  • 0
  • 967
Cowboying up in Kiowa.

Cowboying up in Kiowa.

  • 3
  • 2
  • 1K

Forum statistics

Threads
199,387
Messages
2,790,789
Members
99,890
Latest member
moenich
Recent bookmarks
0

LimeyKeith

Member
Joined
Jun 10, 2016
Messages
120
Location
England
Format
Multi Format
I have been given an old Schneider Kreuznach Xenar (Technica) 150mm f4.5 lens in a Linhof Synchro Compur shutter - see picture.
I don't think it has been used in decades. There is slight internal haze and the shutter speeds are all over the place, sometimes it even fails to close on the 1/2, 1, B and T settings. I assume it is a bit gummed up so I have tried the dodge of exercising it several hundered times but to no avail so, as I don't think it's worth spending money on I, thought I would do a partial dismantle and see if it could be cleaned etc.
I have the tools and I've printed off the manual but nowhere can I find out how to remove the Linhof cover plate. I assume that the ring (arrowed) unscrews but I need to be sure. I think there was a locking screw in a small hole (arrowed) but it is missing. I'm sure I've seen the answer in a forum post but my countless searches have revealed nothing. Can anyone point me to the appropriate thread?
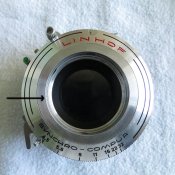
Shutter.jpg

Thanks in advance.

P.S Sorry if this is in the wrong place but I'm sure the Mods will rectify the matter.
 
OP
OP

LimeyKeith

Member
Joined
Jun 10, 2016
Messages
120
Location
England
Format
Multi Format
Thanks for your response Agx. The hole is countersunk and I can see threads deep into the hole so I'm sure it's missing.
 

AgX

Member
Joined
Apr 5, 2007
Messages
29,973
Location
Germany
Format
Multi Format
A locking screw likely can deform a thread flank, thus hampering a unscrewing action.

(If this is the way to release that ring, though what I think it is.)
 
Last edited:

shutterfinger

Member
Joined
Feb 25, 2013
Messages
5,020
Location
San Jose, Ca.
Format
4x5 Format
Other Compurs have an eccentric in the ring that is flat on one side and have two small holes. The eccentric is turned until the flat is against the shutter center then the ring turns counterclockwise until the locking ears align with the notches in the shutter barrel. I can see the notches in your picture but I do not see the eccentric, blocked by the arrow?
Check the manual for special shutter or mount.

I checked my printed version and downloaded version, both list CS-1307-609 for the special shutter but there is no illustration or repair instructions.

The inner chrome ring should turn counterclockwise, align with the center barrel notches, and lift off.
Lock screws or pins should go into the shutter case not the speed ring.
 
Last edited:
OP
OP

LimeyKeith

Member
Joined
Jun 10, 2016
Messages
120
Location
England
Format
Multi Format
Shutterfinger: The features you refer to (image from manual shown below) seem to be under the 'faceplate locking ring?) as I can just make out their edges beneath it (they can also be seen in the first image). From this manual image I still can't fathom out what this darned ring/faceplate screws into - which is why I am loathe to apply brute force until I am sure. :mad:

Without_Faceplate.jpg
 
OP
OP

LimeyKeith

Member
Joined
Jun 10, 2016
Messages
120
Location
England
Format
Multi Format
Is there a release hiding in this slot? Sadly not. As Sherlock Holmes said: " When you have exhausted all likely explanations, what is left, no matter how unlikely, must be the answer" so tomorrow I think I'll have to get to work with the friction spanner and see if the ring unscrews! Thanks again for your input guys.
 

Leigh B

Member
Joined
Jan 17, 2011
Messages
2,059
Location
Maryland, USA
Format
Multi Format
There's a flat black screw at top center, engaging a recess in the silver threaded front section of the shutter.

That screw head has a flat side. Rotate it 180 degrees so the flat is pointed down.
Then you can unscrew the black ring and remove the front cover.

- Leigh
 

AgX

Member
Joined
Apr 5, 2007
Messages
29,973
Location
Germany
Format
Multi Format
Leigh, that shutter from post #7 is not the one in question, but the one at post #1.

And yes, there too is that asymmetrical screwhead visible (or rather the respective recess of the female part) at the N-F position of Linhof. But as described above, access to that screw is blocked.
 
Last edited:
OP
OP

LimeyKeith

Member
Joined
Jun 10, 2016
Messages
120
Location
England
Format
Multi Format
Sorry this has developed into a rather confusing issue guys, all I am trying to do initially is get the blasted Linhof faceplate off. See posts #1 thro #3, I am pretty sure there is no locking screw in the hole so I am going to try unscrewing the ring arrowed.
 

shutterfinger

Member
Joined
Feb 25, 2013
Messages
5,020
Location
San Jose, Ca.
Format
4x5 Format
The special shutters that are listed in the service manual for Linhof show a 3 notch center ring that threads onto the center of the shutter barrel with a lock screw that goes in one of the slots and a plate with three screws that hold it.
The special shutter, listed in post #7, is not included in the manual. I assume its a Linhof proprietary thing that is available to their service people only.
 
OP
OP

LimeyKeith

Member
Joined
Jun 10, 2016
Messages
120
Location
England
Format
Multi Format
.......... I assume its a Linhof proprietary thing that is available to their service people only.

It came on a old Linhof lens board so you probably right.

With a new day and fresh eyes I'm going to pop into town and buy a dental mirror, that will alow me to see into the bottom of the hole. If there is is screw hiding in there I will have to find a screwdriver bit short enough to fit within the internal diameter of the ring in order to get at it. Once I am sure the hole is clear I have a variety of tools to remove the ring now that I'm confident that it should unscrew. Watch this space.:smile:
 
OP
OP

LimeyKeith

Member
Joined
Jun 10, 2016
Messages
120
Location
England
Format
Multi Format
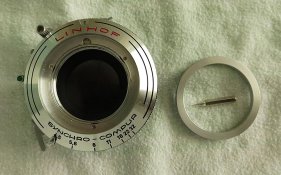
Sucess!! Once I got the dental mirror I could see that the hole had some 'debris' in it and once this was removed I could see the head of a screw deep in the hole. I could also see that the slot in the screw was damaged as were the threads at the top of the hole. Nonetheless I decided to give it a go so, to avoid damage to blades, I opened the aperture to it's max and held the shutter open and got to work with the bit. It only took half a turn and the ring became loose and was obviously not a screw fit. A few more turns and the ring dropped out! As can be seen from the image, everything seems to look as expected so I'm looking forward to seeing what I can do with it.

Thanks again for your thoughts guys and I'll take pictures of my progress and if successful I'll post them in APUG.

Faceplate_Ring_Out.jpg
 
OP
OP

LimeyKeith

Member
Joined
Jun 10, 2016
Messages
120
Location
England
Format
Multi Format
UPDATE - DISASTER
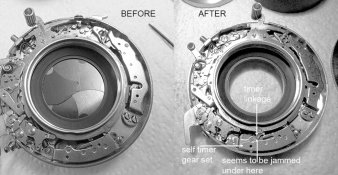
Continuing with my attempts to restore this shutter to a more usable condition I lifted the cam plate off the shutter and then went to make a coffee. When I got beck to my bench I found that my 'friend' had tried cocking the shutter despite my warnings not to touch it! After I had recovered my composure I tried to put things back to where they should be according to my previous photos but it looks as though the self-timer link is solidly jammed inside the gear set housing (see before and after images). The published literature is short on both pictures and information as to how the self-timer and link work so before I get out the hammer and chisel (for use on my 'friend') I thought I would ask you fine folk here in APUG for your considered advice.

Before&After_Jammed_Linkage.jpg
 

shutterfinger

Member
Joined
Feb 25, 2013
Messages
5,020
Location
San Jose, Ca.
Format
4x5 Format
If it were me that friend and I would be having a 3 legged race to the hospital to get my foot out of his ___.
CN-1307-000 Tafel 1 is the best you'll get.
Work around the cocking ring 528 and seat it correctly into place. The self timer actuator catch is spring loaded to the cocking ring and a PIA to deal with.
Look at your pictures, pallet 305 is in its fully retracted position in the left picture, it is fully extended and under the cocking ring on the right one. Press the release at the top of the delay timer which is not numbered, return the pallet to its retracted position, then work 528 back into position. The correct position is shown clearly in figure 1 on Tafel 8.
You may have to remove the cocking ring and reset it.
This shutter cannot be cocked and released with the speed ring removed.
 
OP
OP

LimeyKeith

Member
Joined
Jun 10, 2016
Messages
120
Location
England
Format
Multi Format
Thanks Shutterfinger. If my (ex) friend hadn't been the one that gave me the lens in the first place we would certainly have been taking that journey!
Unfortunately I can't identify '...the release at the top of the delay timer which is not numbered' and the cocking ring is such a close fit around the barrel that I can't remove it whilst the actuator spring catch is stuck in the self-timer so it looks as though I am going to have to remove that to free the locking ring.

EDIT UPDATE.
Whilst sitting gazing at the shutter in frustration I was increasingly convinced there was something else wrong - then I realised that the cocking ring spring has come adrift from it's anchor (see edited picture below)! Now that looks a bit of a complicated problem to me so work is suspended until I can muster up the the nerve to try and fix it!
Before&After_Jammed_Linkage2.jpg
 
Last edited:

shutterfinger

Member
Joined
Feb 25, 2013
Messages
5,020
Location
San Jose, Ca.
Format
4x5 Format
Your obliviously in over your head. Quit while you're still ahead.
CN-1307-000.jpg

1.
doohickey that mates into the speed ring. its position, when against the cocking ring is 1 second, against the outer case is 1/100.
2. delay pallet. item 305 CN-1307-000 tafel 2.
3. set latch, item 669 CN-1307-000 tafel 1.
4. cocking lever home/released position.

Left picture you shutter picture modified, right side fig 1 CN-1307-000 tafel 1.
Moving 1 to its travel limit toward the outer case allows pallet 2 to travel freely. If the timing delay were removed from the shutter and 1 was moved to its outer limit 2 would disengage from the delay gearing and release the coil torsion spring AKA mainspring (like a clock) tension. All speeds from 1 second to 1/125 are controlled by this spring and its tension. They are a PITA to reset as 1 gear tooth on the gear the coil torsion spring is attached to makes the difference between some speeds good and all speeds good.
The cocking ring on your shutter is currently in the cocked position. Press 1 toward the outside of the case and hold, move 2 toward the outside of the case, press down on the cocking ring and release 1 and 2 when the edge of the ring is in the path of 1 and 2. Keeping downward on the cocking ring press the shutter release and push the setting lever toward the home position 4.

The shutter only gets more complicated after this especially the release and flash sync section.
 
OP
OP

LimeyKeith

Member
Joined
Jun 10, 2016
Messages
120
Location
England
Format
Multi Format
Your obliviously in over your head. Quit while you're still ahead.

You are right of course Shutterfinger and that's part of the fun. The assembly was heading for my friends trash can until I intervened and as it cost me nothing I have nothing to lose except a few hours of my time - but as I retired a decade ago that's not a problem.
Many thanks for your invaluable advice and even if I can't fix it I will have learned a lot and my boxes containing a myriad 'useful items' will be all the richer.
 

shutterfinger

Member
Joined
Feb 25, 2013
Messages
5,020
Location
San Jose, Ca.
Format
4x5 Format
If this is the first shutter you have serviced then you are in for a challenge akin to walking to Dover, climbing down the cliffs without any support ropes, swimming out a mile and back in the ocean then free climbing back up the cliffs and walking home without taking a break. :smile:

I had serviced several Flash Supermatics, a few Betax, a few Graphex , a Compur Rapid or two and still the Synchro Compur was like free climbing Half Dome.
The Compur manual available online assumes you know how to service shutters.
Hold the shutter and part in the same orientation as shown in the manual to better understand the assembly.
 
OP
OP

LimeyKeith

Member
Joined
Jun 10, 2016
Messages
120
Location
England
Format
Multi Format
..... a challenge akin to walking to Dover, climbing down the cliffs without any support ropes, swimming out a mile and back in the ocean then free climbing back up the cliffs and walking home without taking a break. :smile:

........ and then I can carry on with the shutter work after lunch I suppose. :laugh:

I've just realised the time in your part of the world - I hope this isn't keeping you awake at night! :sad:
 

shutterfinger

Member
Joined
Feb 25, 2013
Messages
5,020
Location
San Jose, Ca.
Format
4x5 Format
I've just realised the time in your part of the world - I hope this isn't keeping you awake at night! :sad:
No, I made a last minute check before I shut down for the night.

Get an Ultrasonic Cleaner http://www.ebay.co.uk/itm/GemOro-Sp...826016?hash=item41be5093e0:g:3zkAAOSwtfhYqRdx or similar and a pint or two of 90% Isopropyl Alcohol. Put the shutter with the face plate and speed ring removed in the tank face down, cover with the alcohol, and run cleaning cycles for 15 minutes cleaning time. The alcohol will starting getting warm after 5 minutes and hot at 10 minutes. When the alcohol get hot paint will start peeling off where finger oils have penetrated to the base metal. Allow the alcohol to cool between cycles.
When clean and dry apply a drop of light weight machine oil the size of a straight pin point to all pivots.
This should give about the same results as a complete tear down, clean, reassembly.

Do not disassemble the aperture unless absolutely necessary.
 
OP
OP

LimeyKeith

Member
Joined
Jun 10, 2016
Messages
120
Location
England
Format
Multi Format
I've made a device to hook the end of the cocking ring spring that has come adrift so I can reinstall that when it's time but I'm still no nearer being able to un-jam the timer linkage as this also stops the cocking ring removal - it looks like time for more drastic action.

On the other point I didn't realise that an ultrasonic cleaner was so cheap - £45 here in the UK.
 
Photrio.com contains affiliate links to products. We may receive a commission for purchases made through these links.
To read our full affiliate disclosure statement please click Here.

PHOTRIO PARTNERS EQUALLY FUNDING OUR COMMUNITY:


Ilford ADOX Freestyle Photographic Stearman Press Weldon Color Lab Blue Moon Camera & Machine
Top Bottom