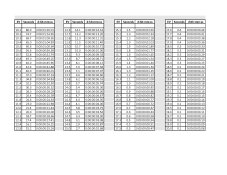
Exposure tables/spreadsheets using incorrect actual f/stop and time values

Blood Moon Zakynthos

H
Blood Moon Zakynthos

  • 0
  • 0
  • 109
Alexandra

H
Alexandra

  • 1
  • 0
  • 214
Prison

D
Prison

  • 2
  • 1
  • 279
Historic Silhouette

A
Historic Silhouette

  • 2
  • 0
  • 540
Sonatas XII-52 (Life)

A
Sonatas XII-52 (Life)

  • 0
  • 1
  • 1K

Recent Classifieds

Forum statistics

Threads
199,765
Messages
2,796,289
Members
100,030
Latest member
prodirec
Recent bookmarks
0
OP
OP

DonF

Member
Joined
Jul 19, 2016
Messages
285
Location
Saint Charles, Il
Format
Large Format
I looked it over and it looks great!

My light meter reads different EV values depending upon the ISO setting when in EV mode. I believe the "standard" EV is referenced to ISO 100. Would that be the case for the EV values as they affect exposure times in the spreadsheet? In other words, should I set the ISO to 100 before taking an EV measurement with the meter and using the sheet?

Thanks,

Don
 

Chan Tran

Subscriber
Joined
May 10, 2006
Messages
6,925
Location
Sachse, TX
Format
35mm
My light meter reads different EV values depending upon the ISO setting when in EV mode. I believe the "standard" EV is referenced to ISO 100. Would that be the case for the EV values as they affect exposure times in the spreadsheet? In other words, should I set the ISO to 100 before taking an EV measurement with the meter and using the sheet?

Thanks,

Don

Some meters only display EV for ISO 100 and then relying on your use of the calculator dial for other ISO. One example is the Pentax spotmeter. Some call this value LV. With your meter the Minolta Auto IVF the EV is for the ISO set and since you will set the ISO according to your film speed no further calculation is needed.
 

Nodda Duma

Member
Joined
Jan 22, 2013
Messages
2,685
Location
Batesville, Arkansas
Format
Multi Format
The spreadsheet is great, thanks!

You can turn your pinhole sideways and re-scan to verify the source of the distortion.

-Jason

That's an interesting idea!

I tried it and found the lateral distortion of my inexpensive scanner was pretty bad. Plus, the pinhole mounting prevented contact of the copper foil with the scanner bed. Backlighting the pinhole with a portable light table, inverted seemed to give the clearest results. I scanned at 2400dpi in close zoom and enlarged further in Photoshop so the pixel blocks could be seen. I boosted the contrast to reduce the fuzzy boundaries and drew a circle using the vertical axis to set the diameter, as there seemed to be less distortion. I counted the pixel blocks and came up with 29.

That's 29/2400 of an inch or .012 inch x 25.4 = 0.304mm for a pinhole with an advertised 0.3mm diameter. That's a pretty good result.

Best,

Don

View attachment 193388

View attachment 193389
 
OP
OP

DonF

Member
Joined
Jul 19, 2016
Messages
285
Location
Saint Charles, Il
Format
Large Format
Some meters only display EV for ISO 100 and then relying on your use of the calculator dial for other ISO. One example is the Pentax spotmeter. Some call this value LV. With your meter the Minolta Auto IVF the EV is for the ISO set and since you will set the ISO according to your film speed no further calculation is needed.

...except
Some meters only display EV for ISO 100 and then relying on your use of the calculator dial for other ISO. One example is the Pentax spotmeter. Some call this value LV. With your meter the Minolta Auto IVF the EV is for the ISO set and since you will set the ISO according to your film speed no further calculation is needed.

Ahh, makes sense. Of course.

I found that some of the very long times at low EV values were wrapping on full-day boundaries, so I changed the formatting of the time to show:days:minutes:seconds. On the other side, I added two decimal places of display to show sub-second exposure in high-EV situations.

http://projectmf.homelinux.com/Pinhole_Exposure_by_EV.xlsx

I like this approach a lot! Thanks!

Regards,

Don
 
Last edited:
OP
OP

DonF

Member
Joined
Jul 19, 2016
Messages
285
Location
Saint Charles, Il
Format
Large Format
I tried a few readings with both my table using Joe V's method and the precise f/stop values, and the new EV chart using Chan Tran's formula. They agree exactly!

Don
 
OP
OP

DonF

Member
Joined
Jul 19, 2016
Messages
285
Location
Saint Charles, Il
Format
Large Format
I cleaned up the EV-based spreadsheet a bit and replaced the web link file with the updated version.

So, the final sheet takes pinhole diameter and pinhole-to-film ("focal length"} distance and calculates the effective pinhole aperture and pinhole-to-film distance in inches.

For EV values from 0.1 to 20.0 in tenth EV steps, the exposure in seconds and in days:hour:minutes:seconds is shown.

This works best for electronic meters that take the set ISO value into account when in EV mode. Mechanical meters and some electronic meters display ISO referenced to ISO 100 regardless of the set ISO. This chart is less convenient for those meters, since further correction is needed to get correct times.

To use, simply set ISO, but meter in EV mode, take reading, and look up exposure in the tables. This method eliminates issues with imprecise time and f/stops, as exposure time is calculated directly.

No adjustment for reciprocity failure is made in the tables.

http://projectmf.homelinux.com/Pinhole_Exposure_by_EV.xlsx

The example images show a table for the parameters I have been using.

I believe the formulas to be accurate and cross-checked the results with some other tools with good results, but user beware!

Best,

Don
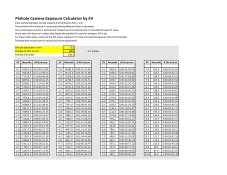
Pinhole_Exposure_by_EV_Custom_ALL_Page_1.jpg Pinhole_Exposure_by_EV_Custom_ALL_Page_2.jpg
 
Last edited:

europanorama

Member
Joined
Aug 10, 2004
Messages
381
Location
Basel-CH
Format
Large Format Pan
pinhole_clack20287067_10207744590252433_2826120293713102224_o.jpg
I remember back in darkroom times when the creator of a dial told to adjust something during photocopy-work. but i dont remember exactly. its about distortion during copy-process.
2. i was shooting my unknown pinhole of my clack 6x9 with APS-C and Luminar-handhold.... counter checked by looking through with peakloupe. its 0.29mm on a clack-6x9 curved filmplane. will now calculate the real fstop.... no images yet taken.
81.48mm on the center-side and 74.22mm in center if filmplane would be flat... now calculate pls. which is eff. aperture?
I learned regarding sharpness for pinholes exact hole in correspondence to FL is not so evident but for zoneplate and sieve it is.
NB: aupremierplan has now flexible pinholes.
 
Last edited:

M Carter

Member
Joined
Jan 23, 2013
Messages
2,147
Location
Dallas, TX
Format
Medium Format
I've been going through my own math-challenged version of exposure issues - made a very wide 4x5 pinhole, about 56mm with a .3mm laser-drilled hole. My current pinhole was a converted Isolette 6x6 with a home made hole of about .3mm. Got very good exposure with it.

But the 4x5 tested as consistently underexposed. I used the Mr. Pinhole calculator and copied the resulting HTML file and edited it to be printable. "Laminated" it with packing tape. Then got the recip. charts for my films - and damn, even finding agreement on reciprocity can be hard!

Anyway, my chart uses an F16 reading with a row of exposure times, with a corresponding row of pinhole times. Very easy to use, get your time, then check recip. and expose. But consistent underexposure in my tests was a problem. I've been adding a stop or more when I do the initial time conversion and I've been happier. Not shooting E6, just B&W, so looking for shadow detail.
 
OP
OP

DonF

Member
Joined
Jul 19, 2016
Messages
285
Location
Saint Charles, Il
Format
Large Format
4x5 super-wide angle pinhole image taken with a Graflex Super Graphic view camera using my exposure spreadsheet, detailed here. The image was taken directly onto graded #2 enlarger paper and reversal processed. The end result is a pseudo-tintype, as the image is one of a kind and reversed left to right.

0.3mm pinhole, 88.9mm pinhole to film plane distance, yielding an effective aperture of f/296.3. Exposure was 3 minutes and 3 seconds with an average reflected exposure meter reading of EV8.9. The paper was metered at ISO 3. The processing of the paper is almost identical to that used in old-school black and white photo booths.

img885C.jpg
 
Last edited:

DWThomas

Subscriber
Joined
Jun 13, 2006
Messages
4,611
Location
SE Pennsylvania
Format
Multi Format
Excellent! That's a very impressive result. Remembering the early part of this thread, I will admit bringing reversal processing into the mix likely wants more precision in exposure than I'm used to worrying about. Printing from negatives offers an easy path to compensate minor exposure variations in the original negative. (Some day you have nothing to do :whistling: ) it might be interesting to do some bracketing at fractional stops just to get a practical feel of the effects of exposure precision (or perhaps you already have).
 

LJClark

Member
Joined
Jul 24, 2017
Messages
14
Location
Omaha, Nebraska USA
Format
Multi Format
4x5 super-wide angle pinhole image taken with a Graflex Super Graphic view camera using my exposure spreadsheet, detailed here. The image was taken directly onto graded #2 enlarger paper and reversal processed. The end result is a pseudo-tintype, as the image is one of a kind and reversed left to right.

0.3mm pinhole, 88.9mm pinhole to film plane distance, yielding an effective aperture of f/296.3. Exposure was 3 minutes and 3 seconds with an average reflected exposure meter reading of EV8.9. The paper was metered at ISO 3. The processing of the paper is almost identical to that used in old-school black and white photo booths.

Nice. Certainly has a historical feel.

Are we looking at the final product, or an intermediate step? If intermediate, and if scanning would be the route to the final print, does a negative or positive original make any difference?
 

DWThomas

Subscriber
Joined
Jun 13, 2006
Messages
4,611
Location
SE Pennsylvania
Format
Multi Format
Just occurred to me that reversal processed paper means there will be a left-right reversal. That can be part of the fun, but will also show any text on signs and such as backwards. Other scenes it wouldn't matter much unless it's some iconic thing viewers would be familiar with. Interesting!

That's maybe a partial answer to LJClark's question -- of course if scanning, the results can be flipped in a click or three if desired.
 

NedL

Subscriber
Joined
Aug 23, 2012
Messages
3,398
Location
Sonoma County, California
Format
Multi Format
I think pinhole and paper reversal go together really well.
You're right Dave, the exposure is a little more critical ( at least the way I've been doing it -- I'm using a different process than Don is )

But I have to admit, even if it's subconscious, the left-right reversal bothers me and for me it is a drawback. I often feel strongly that I like a composition flipped one way but not the other, even if there's nothing obvious like backwards letters. There is a painting of Mt Tamalpais in my dentist's waiting room.. and the light in the painting comes from a direction where the sun can never be... and it gives me an uneasy, almost queasy feeling when I see it. When I look at my reveral paper negatives, I get a similar feeling.. "just doesn't feel right"...

I guess if it bothers me enough, I might try sticking a 45 degree mirror in front of one of my pinholes and see what happens....
 
OP
OP

DonF

Member
Joined
Jul 19, 2016
Messages
285
Location
Saint Charles, Il
Format
Large Format
Excellent! That's a very impressive result. Remembering the early part of this thread, I will admit bringing reversal processing into the mix likely wants more precision in exposure than I'm used to worrying about. Printing from negatives offers an easy path to compensate minor exposure variations in the original negative. (Some day you have nothing to do :whistling: ) it might be interesting to do some bracketing at fractional stops just to get a practical feel of the effects of exposure precision (or perhaps you already have).

The reversal process is inherently high-contrast. It is necessary to expose for a negative image (after first development) with very high density. The first development step needs to be to completion (1.5 minutes in Ilford Multigrade developer), or spots and dark areas may appear after bleaching, re-exposure and 2nd development. I have tried bracketing experiments with conventional large format lenses and found that metering at ISO 3 gives the best results.

The other issue is that the whites are never really white as what is rendered is bleached exposed silver rather than the white of the paper backing.

Still, I enjoy it. The prints have a sort of tintype look to them.

Don
 
OP
OP

DonF

Member
Joined
Jul 19, 2016
Messages
285
Location
Saint Charles, Il
Format
Large Format
Nice. Certainly has a historical feel.

Are we looking at the final product, or an intermediate step? If intermediate, and if scanning would be the route to the final print, does a negative or positive original make any difference?

This is a scan of the actual positive developed image from the camera. I did cheat on this one and flipped it right to left in the scanning process to correct for the natural reversal.

Don
 
OP
OP

DonF

Member
Joined
Jul 19, 2016
Messages
285
Location
Saint Charles, Il
Format
Large Format
I think pinhole and paper reversal go together really well.
You're right Dave, the exposure is a little more critical ( at least the way I've been doing it -- I'm using a different process than Don is )

But I have to admit, even if it's subconscious, the left-right reversal bothers me and for me it is a drawback. I often feel strongly that I like a composition flipped one way but not the other, even if there's nothing obvious like backwards letters. There is a painting of Mt Tamalpais in my dentist's waiting room.. and the light in the painting comes from a direction where the sun can never be... and it gives me an uneasy, almost queasy feeling when I see it. When I look at my reveral paper negatives, I get a similar feeling.. "just doesn't feel right"...

I guess if it bothers me enough, I might try sticking a 45 degree mirror in front of one of my pinholes and see what happens....


I'm used to living with the reversal from my actual wet plate collodion work. I find it disturbs some people to see a reversed image of themselves, as they are used to seeing a "normal" photo. On certain images (like this) I flip it just so the origin of the scene may be recognized.

Don
 
OP
OP

DonF

Member
Joined
Jul 19, 2016
Messages
285
Location
Saint Charles, Il
Format
Large Format
Another example. I was only perhaps 35 feet from this barn. The wide angle is extreme at this pinhole to film distance (90mm with .3mm laser-drilled pinhole). Any longer and exposure times would be much too long for me.
Don
img836D.jpg
 
OP
OP

DonF

Member
Joined
Jul 19, 2016
Messages
285
Location
Saint Charles, Il
Format
Large Format
View attachment 201991 I remember back in darkroom times when the creator of a dial told to adjust something during photocopy-work. but i dont remember exactly. its about distortion during copy-process.
2. i was shooting my unknown pinhole of my clack 6x9 with APS-C and Luminar-handhold.... counter checked by looking through with peakloupe. its 0.29mm on a clack-6x9 curved filmplane. will now calculate the real fstop.... no images yet taken.
81.48mm on the center-side and 74.22mm in center if filmplane would be flat... now calculate pls. which is eff. aperture?
I learned regarding sharpness for pinholes exact hole in correspondence to FL is not so evident but for zoneplate and sieve it is.
NB: aupremierplan has now flexible pinholes.

With a pinhole diameter of 0.29mm and a pinhole-to-film distance of 74.22mm, the effective aperture is 74.22/0.29 = f/255.9 at the center of your film. If the distance is different at the edges of your film due to curvature of the film plane, there may be slight variation of sharpness and exposure from center to edge. I'd calculate exposure for the center and accept the variation.

Don
 
Last edited:
Photrio.com contains affiliate links to products. We may receive a commission for purchases made through these links.
To read our full affiliate disclosure statement please click Here.

PHOTRIO PARTNERS EQUALLY FUNDING OUR COMMUNITY:


Ilford ADOX Freestyle Photographic Stearman Press Weldon Color Lab Blue Moon Camera & Machine
Top Bottom