-
Welcome to Photrio!Registration is fast and free. Join today to unlock search, see fewer ads, and access all forum features.Click here to sign up
You are using an out of date browser. It may not display this or other websites correctly.
You should upgrade or use an alternative browser.
You should upgrade or use an alternative browser.
Exposure/developing to keep the sparkle in snow scenes.
-
A
- Thread starter Vetus
- Start date


Recent Classifieds
-
For Sale Calumet CC-400 Monorail 4x5 Camera
- Started by Jon Shiu
-
For Sale Nikon W-NikkorC 2.5cm F4 LTM / L39 / M39 Leica Thread Mount
- Started by RoboRepublic
-
For Sale Hermagis Eidoscop #2 385mm 15" f4.5 Soft Focus Poor Mans Pinkham IV
- Started by jimgalli
Forum statistics
Ivo Stunga
Member
I guess that'd be film dependent - what films retain details in highlights the best?
Your meter may underexpose a bit when you take it out in a lot of snow. You want the sunlit snow to be white in your photos, so you need to add exposure to make sure that happens. Add too much exposure, though, and the sparkles in the snow will disappear.
I personally prefer to make the snow grey because I absolutely hate it....
I personally prefer to make the snow grey because I absolutely hate it....
- Joined
- Feb 17, 2008
- Messages
- 2,189
- Format
- Multi Format
Sunny 22. This used to be the instructions printed on the little piece of paper or on the inside of the box. Works. And let the shadows fall where they may. Sunlit snow is a predictable scene. Save your meter for difficult to guesstimate situations, like dusk or under deep tree cover;
Save your meter for difficult to guesstimate situations
I was assuming the camera had a meter.
- Joined
- Feb 8, 2009
- Messages
- 1,335
- Format
- Large Format
The lighting has much to do with it. “Sparkling highlight” snow scenes are generally the result of photographing under a sunny blue sky in which the angle between the sun and the ground is not too great, say 45º or less.
Depending on the angle between the sun and the lens axis, a polarizer can boost the contrast by rejecting light other than that aligned to the axis of polarization. This works with both color and black-and-white film. This also works with “non-film” cameras.
For black-and-white film, a yellow filter can increase the contrast. This can be especially important in photographing snow scenes in sunlight. See post #19 in the following thread for further comments about how this works in a snow scene.
[Note: The "dead link" referred to in the following thread was a link to the Kodak Filter book, which can still be found via Amazon or eBay]
https://www.photrio.com/forum/threads/light-yellow-filter.158998/
To maximize this effect, you should try to use a yellow filter, such as a Wratten #8 (older Kodak designation is K2) combined with a polarizer. The yellow filter is mounted on the lens, while the polarizer is mounted forward of the yellow filter.
Note that the polarizer has to be rotated to the proper orientation relative to the sun for proper effect, and polarizers only work within a particular range of angles relative to the principle light source (the sun, in this case).
Sirius Glass
Subscriber
Using the light meter built in to the camera would give me dark silhouette against the snow with great snow contours, but not a good print or a slide most of the time. Then I learned two ways that I measure the light in the snow to get good exposures. The first I learned was to take a light reading of my hand and then open one stop. I used that for years, and then I started using an incident meter which I have found even better.
pentaxuser
Member
What problem arises if you screw the polariser onto the yellow filter or do you simply mean by " forward of the yellow filter that the yellow goes on first, followed by screwing the polariser onto the yellow ?The yellow filter is mounted on the lens, while the polarizer is mounted forward of the yellow filter.
Thanks
pentaxuser
Ivo Stunga
Member
That's something I do with TTL metering in complicated scene, haven't applied it to snowy scene, though.first I learned was to take a light reading of my hand
This picks my curiously too: is there a difference like at all in filter stacking order, should there be difference? Because my filter sizes dictate that I use CPL before IR, and it works without problems.What problem arises if you screw the polariser onto the yellow filter or do you simply mean by " forward of the yellow filter that the yellow goes on first (...)
Last edited:
Measure the exposure of the bright part of the picture, so that the snow falls in the best, flat zone of the film curve & then make a 1/2-1 step longer.
Use the contrast light, the sun or street lights
Use yellow filter for B\W, or Polariser for color film, to avoid "white" sky
Also there are some tricks with "curves & levels" in PS postprocessing
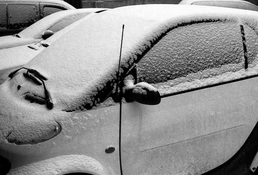
The car is film, but cloudy weather
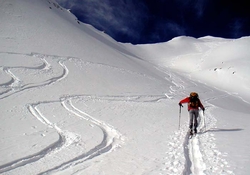
The color two -Alpes, snow & sun, digital
Use the contrast light, the sun or street lights
Use yellow filter for B\W, or Polariser for color film, to avoid "white" sky
Also there are some tricks with "curves & levels" in PS postprocessing
The car is film, but cloudy weather
The color two -Alpes, snow & sun, digital
Attachments

Last edited:
Don't over expose or under expose. Under-exposure will lose the shadow detail, and over-exposure will flatten the detail in the snow highlights. Looking back, I have very few excellent prints of snowy scenes that were illuminated by direct sunlight. Overcast lighting will make the negative easier to print.
The most important step is careful printing which may involve dodging, burning and or bleach to achieve an excellent print.

The most important step is careful printing which may involve dodging, burning and or bleach to achieve an excellent print.
- Joined
- Feb 8, 2009
- Messages
- 1,335
- Format
- Large Format
Regarding the question of post #8 about the stacking order when using 2 filters simultaneously. Yes, install the yellow filter on the lens, then install the polarizer onto the yellow filter.
The stacking order, when one of the filters is a polarizer, has often been given in filter-use books and filter-maker’s brochures as: standard filter on lens, followed by the polarizer facing the scene, though I don’t recall ever reading an explanation for this advice.
One reason for this is practical. Generally, I keep the yellow filter on the lens for most B&W photography, The polarizer is appropriate for some scenes, but not others. The angle between the sun and the lens axis determines whether the polarizer will even have an effect or not. When the polarizer isn’t wanted, or won’t have an effect, it’s easer to make the change when the polarizer is the forward-most filter. It can also complicate removal if the one-piece filter gets stuck onto the front of the polarizer out in the field and you don’t have a pair of filter ring wrenches handy.
Note: This also makes sense for any rotating indexable filter, such as Pola-Color (old Hoya “POP” filters), indexable color and split or graduated ND filters, cross-screen “star” filters, multi-image faceted filters, various diffraction grating filters, split-field, and all sorts of special effects filters.
- Joined
- Sep 10, 2009
- Messages
- 3,588
- Format
- Medium Format
A reflective meter will record snow as grey. Use an exposure calculator-table or an incident meter along with a yellow filter. Extreme brightness of scene would also suggest a slow film.
A cinematic example of filming snow and ice are the movies by Frank staring Leni Riefenstahl.
A cinematic example of filming snow and ice are the movies by Frank staring Leni Riefenstahl.
pentaxuser
Member
Regarding the question of post #8 about the stacking order when using 2 filters simultaneously. Yes, install the yellow filter on the lens, then install the polarizer onto the yellow filter.
Thanks Ian C I thought this was what you meant. I had just wondered if by the use of the word forward you had meant that the two should not be stacked on top of each other but separated so they were not stacked
I could not think of why they needed to be separated but just in case, it was worth me asking. Certainly one of the practical reasons any filter first then the polariser is that I find it easier to adjust the polariser if it is not sandwiched between the lens and another filter such as yellow
pentaxuser
Sunny 22. This used to be the instructions printed on the little piece of paper or on the inside of the box. Works. And let the shadows fall where they may. Sunlit snow is a predictable scene. Save your meter for difficult to guesstimate situations, like dusk or under deep tree cover;
Good advice, another good source are the old Kodak pocket guides. The little paper info sheet that used to come with film was awesome source of sound advice.
There is totally NO difference in the order for transparent filters. It is just the conclusion from the Optics (as a part of physics)Thanks Ian C I thought this was what you meant. I had just wondered if by the use of the word forward you had meant that the two should not be stacked on top of each other but separated so they were not stacked
I could not think of why they needed to be separated but just in case, it was worth me asking. Certainly one of the practical reasons any filter first then the polariser is that I find it easier to adjust the polariser if it is not sandwiched between the lens and another filter such as yellow
pentaxuser
There is difference for soft-filters, for star-filters, for extra lenses or lenses with a central flat zone.
- Joined
- Jul 14, 2011
- Messages
- 15,183
- Format
- 8x10 Format
Nothing kills "sparkle" worse than overdoing it with a polarizing filter. I'd consider myself expert when it comes to dealing with snow scenes; and I don't carry a polarizer at all. But being without a real light meter? No way. And without understanding the basics of metering, the rest of this is just an exercise in futility. Snow is not a constant luminance value.
A reflective meter will record snow as grey. Use an exposure calculator-table or an incident meter along with a yellow filter. Extreme brightness of scene would also suggest a slow film.
A cinematic example of filming snow and ice are the movies by Frank staring Leni Riefenstahl.
For the picture like ic-racer posted no need to make any compensation. For the white landscapes you will need it. If the main target of the photo is snow -you have to put it to the flat zone of the film curve to have details, but to make it white with details you have to overexpose. The main question- what are you metering? Snow, face, buildings... all together
Nothing kills "sparkle" worse than overdoing it with a polarizing filter. I'd consider myself expert when it comes to dealing with snow scenes; and I don't carry a polarizer at all. But being without a real light meter? No way. And without understanding the basics of metering, the rest of this is just an exercise in futility. Snow is not a constant luminance value.
You can delete reflections with polariser, and you can enhance them -just rotate to different position

Doremus Scudder
Member
Polarizing filters will remove specular reflections (depending on the orientation, of course). If you're looking for "sparkle" from specular reflections and want to use a polarizer, be sure to view the scene through the polarizing filter first to determine if it will do what you want it to. Often, making the sky darker with a polarizer will kill the specular highlights.
The trick to metering in snow with in-camera/averaging meters is that you have to be aware that the meter often wants to underexpose the scene, especially if it is very high-key. That's what exposure compensation on your camera is for. Underexposure will kill the shadows.
If you can take a reading from a shadow (for negative film) or highlight (for transparency film) and place that appropriately, that will get you in the ballpark.
Overexposure can get the highlights up onto the film's shoulder and kill separation there, so be careful of that too.
And, since highlights get compressed as part of the black-and-white tone-reproduction process, there's often a built-in disappointment with highlight separation. The film has a shoulder that you end up printing on the paper's toe, which can give you a double-whammy of reduced separation. Using a film with a long straight-line portion of the curve (TMX/TMY) helps the first.
Best,
Doremus
Sirius Glass
Subscriber
Polarizing filters will remove specular reflections, glints and reflections. They are useful for darkening the sky, but when on wide angle or very wide angles lenses the sky darkness will vary by sun angle and the effect can be completely missing in part of the sky.
Thank you for the informative answers, I will be bracketing my exposures and adjusting my developing times to find what works best with my equipment. The use of filters sounds like an interesting option to try. Can't wait for a crisp winter morning and some snow.
- Joined
- Feb 17, 2008
- Messages
- 2,189
- Format
- Multi Format
Lots of (IMO) relevant information in this thread of ~2yrs ago:

 www.photrio.com
My extra 2¢:
www.photrio.com
My extra 2¢:
- yellow filter is a double edged sword. it will darken the open-shadow areas, and, to nevertheless keep them above some not-too-dark tone on the final print, you will need to decrease contrast...
- avoid compensating dev, of course
- maybe not the only one, but FP4 is remarkable for its long straight D/logE curve. See:
and take your pick for developer (or another film). FP4 in D-76 1+1 has been my baseline for decades.
Snow Exposure advice needed
I like shooting outside landscapes on snowy overcast days (snowy scenes - not while it's actually snowing) with close to white-out conditions. My negatives always come out very flat, and the snow has no detail and is terribly grainy. I use Ilford delta 100 (exposed at 80) and processed in xtol...
www.photrio.com
- yellow filter is a double edged sword. it will darken the open-shadow areas, and, to nevertheless keep them above some not-too-dark tone on the final print, you will need to decrease contrast...
- avoid compensating dev, of course
- maybe not the only one, but FP4 is remarkable for its long straight D/logE curve. See:
Doremus Scudder
Member
Putting the snow on the "flat zone" of the curve (I might call it the straight-line portion) to enhance separation, even if it is "underexposed" compared to "normal" highlights does not mean it can't be printed white. That has to do with print exposure and contrast. I'll often "underexpose" highlights, develop a bit more and print on contrastier paper to get more separation in the highlights. We Zone System users call that N+ or expansion developmentFor the picture like ic-racer posted no need to make any compensation. For the white landscapes you will need it. If the main target of the photo is snow -you have to put it to the flat zone of the film curve to have details, but to make it white with details you have to overexpose. The main question- what are you metering? Snow, face, buildings... all together
 It works for increasing highlight contrast in normal scenes too.
Yes, you can "delete" reflections with the polarizer, but you can't enhance them. The most you can get is the same as if you had used no polarizer at all. Sometimes, though, you can get the desired darkening of blue skies without impacting the reflections you want too much by judicious positioning of the polarizer.You can delete reflections with polariser, and you can enhance them -just rotate to different position
Best,
Doremus
ic-racer's photo shows lots of gradations of white, but it's not a photo with sparkling snow. The suggestions for incident metering are right on the money.
(Fuji GW690lll, Tri-X, orange filter. f5.6/ 1/250th...print on Forte FB)

(Fuji GW690lll, Tri-X, orange filter. f5.6/ 1/250th...print on Forte FB)
Last edited:
| Photrio.com contains affiliate links to products. We may receive a commission for purchases made through these links. To read our full affiliate disclosure statement please click Here. |
PHOTRIO PARTNERS EQUALLY FUNDING OUR COMMUNITY:  |