Experiences re: Calumet Archival Print Washer

Recent Classifieds

Forum statistics

Threads
198,695
Messages
2,779,407
Members
99,680
Latest member
Antoni Pallicer
Recent bookmarks
0

AnneArden

Member
Joined
Jan 12, 2022
Messages
3
Location
Brooklyn
Format
Plastic Cameras
Hello !!
Someone donated me a Calumet print washer with no tubing, and I'm trying to hook up the tubing, clamps and valves--
Could someone send me a photo of theirs with tubes in place ?
Thanks so much !! From reading around on the internet, I've gotten this far, thanks for the instruction sheet--
http://www.rangeoflightphotography.com/Technical Manuals/Calumet Archival Washer.pdf
But I'm confused when they say--
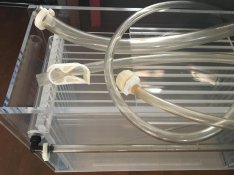
"Filling: a clip is provided at end of the exit hose. Close it completely before you fill the washer (also close the clip when the water supply has been turned off).
What kind of clip / clamp are they talking about?
Someone mentioned that they got them here--
https://www.usplastic.com/default.aspx
But I can't find them, can you send a picture? Or let me know what to google?
I get that this thread is several years old, but any help would be very welcome, thanks so much--
Best wishes--Anne
 

Attachments

  • calumet.JPG
    calumet.JPG
    1.7 MB · Views: 116

MattKing

Moderator
Moderator
Joined
Apr 24, 2005
Messages
52,820
Location
Delta, BC Canada
Format
Medium Format
Welcome to Photrio Anne.
I'm sure someone here will be able to help.
 

MattKing

Moderator
Moderator
Joined
Apr 24, 2005
Messages
52,820
Location
Delta, BC Canada
Format
Medium Format
That is probably the sort of thing you need, but I'll let others chime in.
 

Bill Burk

Subscriber
Joined
Feb 9, 2010
Messages
9,289
Format
4x5 Format
69D45EB7-BFD3-4A29-AADB-FBEC618AF4C0.jpeg


Here you go!

Big hose is main drain and always open to the sink.

Small hose under it needs to be clamped or (as in my setup) held above waterline. It’s the “done for the day” drain that you open to let all the water out.

Upper back side goes to left and right and is where the water goes in. 12 slots, each gets a left and right jet that lets water in and eventually fills up and waterfalls over into the outer tank where it goes out the big drain.
 

Bill Burk

Subscriber
Joined
Feb 9, 2010
Messages
9,289
Format
4x5 Format
Looks like you are missing all the inserts. They should be pretty easy to replace. The piece of plastic on top I have cris-crossed but normally it goes over the inserts to hold down the prints under the water. You don’t need a clamp if you hold the hose up.

I assume there is a small hose fitting under the big hose, right?
 

mshchem

Subscriber
Joined
Nov 26, 2007
Messages
14,612
Location
Iowa City, Iowa USA
Format
Medium Format
The issue of the plexiglass dividers is the first thing to address. My Calumet print washer came to me 2nd hand. The person before me bought it and never used it, took forever to get the aged protective film off the dividers.

These washers are not for resin coated papers, only fiber base. Any quality clip will do the Bel-Art item Bill mentions looks like a good one. Bel-Art is a supplier of quality labware.
 
OP
OP
Nokton48

Nokton48

Member
Joined
Oct 8, 2006
Messages
2,987
Format
Multi Format
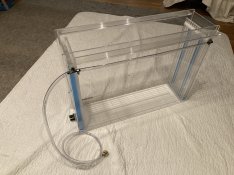
16x20 Calumet Print Washer Plumbing by Nokton48, on Flickr

The tubing and connectors I bought at the local lowes. The valve for a beer tap I bought on Ebay. Took a few trips to get everything just right, not hard to do. Hopefully this year I will start fibre printing. I'm still going through several boxes of 250 sheet 8x10 and 5x7 Aristo #2 RC. Have made quite a few "work prints" so far.

The yellow "sink" is a slop tray for two 55 gallon drums, purchased on the internet. I think it was 3D printed? Anyway under $70 so makes a good "sink" for holding the washer and a B&W 8x10 basket line. Bought a nice sink drain on the internet and it drains quickly and completely
 

Bill Burk

Subscriber
Joined
Feb 9, 2010
Messages
9,289
Format
4x5 Format
From the side view I didn't understand how that little white clip worked but sure... hose goes through it! I like that best because it stays there when you need it again. You would have to hunt for the blue one every time. Anyway I rigged a chain with hook to hold the hose above water level so short circuited the whole clip issue.

Looking closer at Anne's picture I see the output is large plug over small plug, it was hard to see on the phone (looks at first glance like a shiny reflection on a huge plug).
 

Sirius Glass

Subscriber
Joined
Jan 18, 2007
Messages
50,338
Location
Southern California
Format
Multi Format
No need for the clip, I put my finger over the hose until the tank fills with water.
 

George Collier

Subscriber
Joined
Feb 23, 2005
Messages
1,363
Location
Richmond, VA
Format
Multi Format
The clip should have notches or steps (like in Anne's link notice the steps on the right end - https://labelpeelers.com/large-siph...MI7K_JtuCt9QIVdP_jBx2GFAIFEAQYCSABEgKDYfD_BwE) that allow you to control the amount of water draining, with the supply just enough to exit the top overflow hose, to ensure the level doesn't drop. Mine are Gravity Works, who at one time made them for Calumet, slightly different but same operating principle.
You fill with the exit hose clamped. Then open the clip slowly, measuring exit volume (x quarts per minute - 2 to 3 for me, slow but sure). Opening 2 clicks does this.
Then adjust the supply flow so that a tiny dribble exits the top overflow hose, with the bottom drain as set above. Once you know the right number of clicks, it's always the same. The bottom drain comes from a lower compartment with holes under all the prints (based on fixer being heavier than water). Mine is hooked to a temp control valve for temp setting. When finished, close the clip and place the hose into the top and turn off the water. Ready to go for next time without filling the whole thing again.
 

Bill Burk

Subscriber
Joined
Feb 9, 2010
Messages
9,289
Format
4x5 Format
The clip should have notches or steps (like in Anne's link notice the steps on the right end - https://labelpeelers.com/large-siph...MI7K_JtuCt9QIVdP_jBx2GFAIFEAQYCSABEgKDYfD_BwE) that allow you to control the amount of water draining, with the supply just enough to exit the top overflow hose, to ensure the level doesn't drop. Mine are Gravity Works, who at one time made them for Calumet, slightly different but same operating principle.
You fill with the exit hose clamped. Then open the clip slowly, measuring exit volume (x quarts per minute - 2 to 3 for me, slow but sure). Opening 2 clicks does this.
Then adjust the supply flow so that a tiny dribble exits the top overflow hose, with the bottom drain as set above. Once you know the right number of clicks, it's always the same. The bottom drain comes from a lower compartment with holes under all the prints (based on fixer being heavier than water). Mine is hooked to a temp control valve for temp setting. When finished, close the clip and place the hose into the top and turn off the water. Ready to go for next time without filling the whole thing again.
Oh I get it! I wondered how flow over top could be archival. I don't believe fixer heavier than water, turbulence and diffusion account for a lot more than weight. But without water flow down and out I felt something was wrong with the design.
 

Sirius Glass

Subscriber
Joined
Jan 18, 2007
Messages
50,338
Location
Southern California
Format
Multi Format
The clip should have notches or steps (like in Anne's link notice the steps on the right end - https://labelpeelers.com/large-siph...MI7K_JtuCt9QIVdP_jBx2GFAIFEAQYCSABEgKDYfD_BwE) that allow you to control the amount of water draining, with the supply just enough to exit the top overflow hose, to ensure the level doesn't drop. Mine are Gravity Works, who at one time made them for Calumet, slightly different but same operating principle.
You fill with the exit hose clamped. Then open the clip slowly, measuring exit volume (x quarts per minute - 2 to 3 for me, slow but sure). Opening 2 clicks does this.
Then adjust the supply flow so that a tiny dribble exits the top overflow hose, with the bottom drain as set above. Once you know the right number of clicks, it's always the same. The bottom drain comes from a lower compartment with holes under all the prints (based on fixer being heavier than water). Mine is hooked to a temp control valve for temp setting. When finished, close the clip and place the hose into the top and turn off the water. Ready to go for next time without filling the whole thing again.

Without the click steps, the level of the water in the tank is controlled by the water amount flowing in to the tank.
 

Bill Burk

Subscriber
Joined
Feb 9, 2010
Messages
9,289
Format
4x5 Format
Without the click steps, the level of the water in the tank is controlled by the water amount flowing in to the tank.

I was blocking all water flow down the bottom holes of the chambers by holding the hose above waterline. So I was getting all water flow over the overflow.

The click steps give you a chance to let some water out the bottom drain which comes from bottom holes of the chambers, with the idea that inflow is slightly greater and still causes a little water to flow over the top to the upper drain. But you're always removing some water from the bottom. I wasn't doing that.
 
Photrio.com contains affiliate links to products. We may receive a commission for purchases made through these links.
To read our full affiliate disclosure statement please click Here.

PHOTRIO PARTNERS EQUALLY FUNDING OUR COMMUNITY:


Ilford ADOX Freestyle Photographic Stearman Press Weldon Color Lab Blue Moon Camera & Machine
Top Bottom