Evaluate my cyanotype...

about to extinct

D
about to extinct

  • 1
  • 0
  • 58
Fantasyland!

D
Fantasyland!

  • 9
  • 2
  • 121
perfect cirkel

D
perfect cirkel

  • 2
  • 1
  • 125

Recent Classifieds

Forum statistics

Threads
198,748
Messages
2,780,326
Members
99,693
Latest member
lachanalia
Recent bookmarks
1

ChristopherCoy

Subscriber
Joined
Aug 9, 2011
Messages
3,599
Location
On a boat.
Format
Multi Format
I need advice on how to proceed. This is my first cyanotype attempt from a DNG.

I used the chartthrob wedge and analyzed the print to get my base curve.
fc021190-9303-48ad-990b-581599dc50c0-jpeg.245411


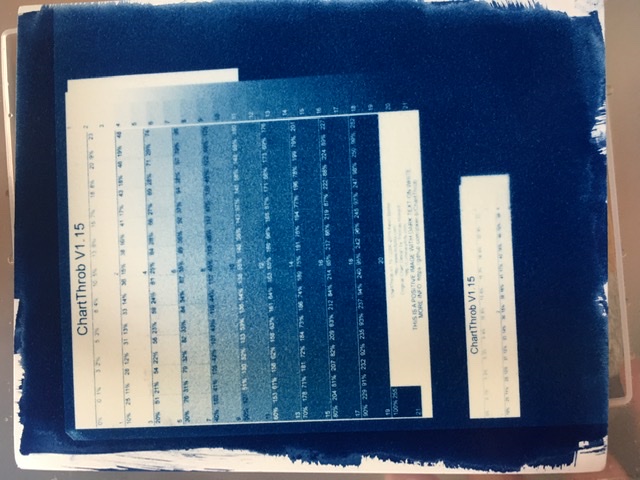
I then coated my paper, and it ended up drying for about 24 hours. I started with a base time of 4 minutes, and got this result.
IMG_0782.JPG

Noting the darkness of the image, I decreased my time to 2 minutes, and made another. This is the result.
IMG_0781.JPG

It was still quite dark so I took the exposure down to 1 minute, and made a third print.
IMG_0780.jpg

Third image still wasn't satisfactory, so I thought perhaps it was because I let the coating dry too long, so I made a freshly coated paper, dried it with the hair dryer, and made a 4th print, at 1 minute exposure. This is the result.
IMG_0783.JPG


I'm not sure how to proceed on this one. I have a feeling its going to be a curves adjustment, I'm just not sure how to go about it. Also this is a 4x5 negative. My goal is to print it in 8x10 so I'm assuming that I should just go ahead and print the negative at 8x10 since exposure and contrast setting will change from size to size, correct?

This is the digital image that I'm trying to print.

Sailing by Christopher Coy, on Flickr
 

nmp

Member
Joined
Jan 20, 2005
Messages
2,014
Location
Maryland USA
Format
35mm
The printing conditions for the actual image must be the identical to the ones that produced the ChartThrob print and calculated the correction curve with, including the exposure time, drying time, coating methods etc. Otherwise the curve that you come up with will not be applicable. The standard exposure time (also referred to as minimum time for maximum density) should be calculated independently (actually prior to) of the ChartThrob printing.
 
OP
OP
ChristopherCoy

ChristopherCoy

Subscriber
Joined
Aug 9, 2011
Messages
3,599
Location
On a boat.
Format
Multi Format
The printing conditions for the actual image must be the identical to the ones that produced the ChartThrob print and calculated the correction curve with, including the exposure time, drying time, coating methods etc. Otherwise the curve that you come up with will not be applicable. The standard exposure time (also referred to as minimum time for maximum density) should be calculated independently (actually prior to) of the ChartThrob printing.

Everything was the same. I coated the paper like I did for the chartthrob test, put it in the same frame, and exposed it at the same time of day. 11am, off the front of our boat, in direct sunlight.
 

nmp

Member
Joined
Jan 20, 2005
Messages
2,014
Location
Maryland USA
Format
35mm
Everything was the same. I coated the paper like I did for the chartthrob test, put it in the same frame, and exposed it at the same time of day. 11am, off the front of our boat, in direct sunlight.

Yeah, sun exposure times can be tricky. I have a UV box so I don't have a great experience with figuring out proper exposure with the sun. Never mind about the standard exposure time etc I talked about. That would all be applicable to an UV box but not as easily to the sun, unless you have one of those UV meters. When using the sun, folks look at the print (if using a split-back contact printing frame) and expose until the shadows are just beginning to revert or solarize.

Actually the last two prints don't look too bad. #3 looks nearly right to me. #4 being exposed with the same length of time but being that it was fresher has ended up lighter. The 24 hour time lapse between coating and exposing probably created a background stain that darkened the #3 compared to #4. So I would repeat with may be 2 minutes with fresh coated paper and see.

These are very good for the first try, by the way.

:Niranjan.

Add:
One recommendation I would make is to add a 21-step stepwedge on the side of the print that can be analyzed afterwards to see if the printing gives the full tonal range as well how good the Dmax and Dmin are.
 
Last edited:

Dan Dozer

Subscriber
Joined
Dec 10, 2004
Messages
411
Format
Large Format
I don't do a lot of cyanotype, but I do have some suggestions. There could be a few different sources of your "problems".

First - which cyanotype method are you using? There are two typical ones out there (the old method and the new method). The newer method is supposed to give you better color saturation and density.

Second - which paper are you using. The new method especially has problems with some paper types. If your coating is greenish instead of yellowish after it dries, your paper is probably the wrong type.

Third - have you been coating the paper in an area where some level of UV light has sneaked in and somewhat contaminated your cyanotype liquid before you coat the paper?

I have no experience with digital negatives so don' t know if this might be problem or not. You shouldn't be getting this level of graininess that these images show.

I've attached a cyanotype of mine printed on Bergger COT 320 paper with the new method and exposed with a UV light box.

Hope this helps.

Dan
cyanotype 1s.jpg
 

Vaughn

Subscriber
Joined
Dec 13, 2006
Messages
10,079
Location
Humboldt Co.
Format
Large Format
Get a UV meter...or learn to judge exposure by the printing-out image. Just sitting out on a cloudless day I can feel the intensity of the sunlight on my face changing, seemingly at random -- depending on where you live, there can be lots of UV-blocking water in the air moving around that does not form clouds.

And keep the amount of sensitizer you use per square inch constant.
 
OP
OP
ChristopherCoy

ChristopherCoy

Subscriber
Joined
Aug 9, 2011
Messages
3,599
Location
On a boat.
Format
Multi Format
I don't do a lot of cyanotype, but I do have some suggestions. There could be a few different sources of your "problems".
First - which cyanotype method are you using? There are two typical ones out there (the old method and the new method). The newer method is supposed to give you better color saturation and density.
Second - which paper are you using. The new method especially has problems with some paper types. If your coating is greenish instead of yellowish after it dries, your paper is probably the wrong type.
Third - have you been coating the paper in an area where some level of UV light has sneaked in and somewhat contaminated your cyanotype liquid before you coat the paper?
I have no experience with digital negatives so don' t know if this might be problem or not. You shouldn't be getting this level of graininess that these images show.
I've attached a cyanotype of mine printed on Bergger COT 320 paper with the new method and exposed with a UV light box.
Hope this helps.
Dan

I guess I'm using the "old" method. I just bought a kit from Bostick & Sullivan and I'm using the chemicals straight out of the bottle. I'm not adding anything.

The paper I'm using is Bergger COT 320 as well. The coating is a neon yellowish color when it's applied and dried.

I'm coating the paper in my bathroom without any lights on. The only light is from a crack in the door from ambient room light, that passes through windows covered with mini-blinds.

Although now that I've gotten a somewhat successful CT print that you can see here I believe this negative is lacking contrast severely. I think I need to redo this one in 8x10 size and make the curve more severe.
 

MattKing

Moderator
Moderator
Joined
Apr 24, 2005
Messages
52,875
Location
Delta, BC Canada
Format
Medium Format
You don't need darkness for cyanotype coating.
Reasonably dim light from an incandescent bulb works fine.
 

Vaughn

Subscriber
Joined
Dec 13, 2006
Messages
10,079
Location
Humboldt Co.
Format
Large Format
But don't let the coated paper hang out too long in the white light (I use old yellow bug lights) and dry in complete darkness....
 
Photrio.com contains affiliate links to products. We may receive a commission for purchases made through these links.
To read our full affiliate disclosure statement please click Here.

PHOTRIO PARTNERS EQUALLY FUNDING OUR COMMUNITY:


Ilford ADOX Freestyle Photographic Stearman Press Weldon Color Lab Blue Moon Camera & Machine
Top Bottom