Epson v850 Pro vs Epson GT-X980 scanner

Charging Station

A
Charging Station

  • 0
  • 0
  • 0
Paintin' growth

D
Paintin' growth

  • 1
  • 0
  • 29
Spain

A
Spain

  • 2
  • 0
  • 30
Machinery

A
Machinery

  • 6
  • 3
  • 93

Forum statistics

Threads
198,101
Messages
2,769,614
Members
99,562
Latest member
jwb134
Recent bookmarks
0
Joined
Aug 29, 2017
Messages
9,318
Location
New Jersey formerly NYC
Format
Multi Format
About a year ago I purchased one of the GTX 980 from Japan and can confirm it came to me quickly and 100% new in box. All the documents are in Japanese so you will need to download english ones online. It shows up in my Vuescan software as a V800 so I am assuming that the V800 V850 and GTX-980 are all the same hardware and the only difference is what it was shipped with in terms of packaging, documentation, software, and film holders. IF my memory serves me correctly the V850 originally came with 2 each of some of the film holders as a 'bonus' over the V800? The GTX-980 comes with one each - but they are the ones with a clear plastic element in the holder that has a surface treatment that I assume is to combat Newton's Rings.

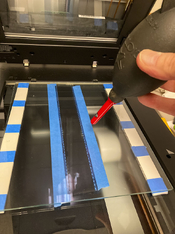
Note that the film holder has some adjustable "feet" that is used to calibrate the focal plane. I purchased one of Vlads Test Targets for medium format and calibrated my focus and found it to be right in the middle of the adjustable feet settings. The plastic holder frames are a bit finicky if you ask me. It is sometimes a struggle to get them snapped shut and then when I open them I feel like I am going to break them. As of now I am not going to go after the ones you can get on the aftermarket because they seem expensive for what you get. As I understand it the optical path is different when using items placed directly on the glass vs those placed in a holder. There are two different focal planes - I think the setting in Vuescan between print and transparency scanning selects the focal plane to use, but I might be wrong on how this works.

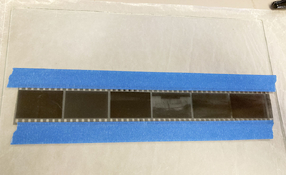
I have heard people claim that there is no reason to use this Epson scanner above the 1600 dpi setting because it can't get higher resolution. So, I also performed a test using the test targets to see if the resolution of the Epson hardware can really get to 6400 dpi. I scanned a small portion of the test target (the smallest details on the target) multiple times in a row without physically changing anything at 1600, 3200 and 6400 dpi. It is easy to see the resolution increase from 1600 to 3200 AND there is an increase in resolution from 3200 to 6400 but from my eye the difference is less noticeable. This suggests to me that there is higher resolution than 3200 but that maybe the test target itself, the focus, or something else in the optical path is decreasing the sharpness. The machine outputs a file with 6400 dpi but it is only judged to my eye to be a little sharper than the 3200 dpi version. It doesn't really matter though because my computer chokes on a 6X7 negative scanned at 6400 dpi scanned to a RAW file.

The V850 will output 6400 or 3200 in resolution. But you're only seeing the pixels. There is no difference in actual data from a 2400 scan, which is what I use.

Also, you didn;t specify if you added sharpening. The V850 program nominally sets increased sharpness to the auto scan routine, even on manual. You have to uncheck it. Did you?
 
Joined
Aug 29, 2017
Messages
9,318
Location
New Jersey formerly NYC
Format
Multi Format
the 3.25 mm you state. Is that 3.25 mm from the glass of the scanner to the under side of the ANR glass or to the negative? I am assuming 3.25 mm to the ANR glass and so to get a measurement to the plane which the negative is in we would have to add the thickness of your ANR glass?

IF you ever calibrated the v850 holder for the focal plane were the slider ramps near the center? IF yes then I could start my focus calibration for a similar ANR Glass device based on your 3.25mm

I hate it that the Epson 120 holders are not long enough to hold one more frame of 6X7 negative ... then it would match the typical medium format storage sleeve.

Any tricks you have discovered on how to keep dust under control? There are several planes to keep dust free to get a good scan (the glass of the scanner bed, 2 sides of a negative carrier, 2 sides of a negative, and the glass of the "door" on the scanner that has the back light in it.

thanks for any thoughts you might have

The Epson V850 film holders are nominally focused at 3.0mm with clicks varying that by 0.5mm. See pix.
 

Attachments

  • V850 height adjustment picture.jpg
    V850 height adjustment picture.jpg
    241.2 KB · Views: 49

George Collier

Subscriber
Joined
Feb 23, 2005
Messages
1,363
Location
Richmond, VA
Format
Multi Format
OK, Luftfeder, finally got to it. The following text is what I do, maybe more than you want but I keep it for such discussions.
The images show what things look like, please ask if you want more detail.
If the film needs cleaning, I do that first with PEC-12 and cotton.
Then I wipe with an orange Ilford anti-static cloth, every surface.
When dusting with the Giotto, I just do every surface, as the parts are put together, always just before they come together. Either with holders or the glass/tape thing, I get very little dust in the scan, and my typical 35mm size is 16" on the short side at 300 res.

I bought a new V850Pro 2-3 years ago and kept testing the film holders, wishing (like others) that the 6x6 one would hold 4 frames. I found the best settings for the leveling feet, different on different size holders (I have 35mm, 6x6, and 4x5 film to scan, all B&W). I also tried scanning directly on the glass (e-down) with ANR glass on top. With none of these options do I use the sharpening function of the software (Silverfast).
I’ve been scanning for 30 years or so, with all kinds of scanners, some professionally, and arrived at the feeling that I might not be getting the best scan sharpness. The film holders are inconsistent and kind of tinkertoy. I could not make contact with the BetterScanning guy (he still doesn’t list the 850 on his site), so I contacted another anr glass guy whose site is Scan-Tech, who sells glass and will talk to you. I bought a piece of glass 8x10 and decided to shim it up from the scanner glass and reach the height of best sharpness.
I did this with 2 feeler gauge sets I bought on line. I took them apart, cleaned off the oil, and started at just under 3mm in height (approximately where the film sits with a holder), using the various gauges in combinations, two equal stacks, one on either edge of the glass, with the neg (a good grain-sturdy tri-x and rodinal neg from the 70s) with the neg in between the stacks. The neg is taped base side to the anr glass in the sprocket hole areas. The natural curve keeps it flat to the glass. (This also works with 4x5 and 6x6mm)
I found the height of 3.25mm was best (all measurements were confirmed with a micrometer, purchased with the feeler gauges), and that from 3.15 - 3.35 was a decent range, but 3.25 is the sharpest (for my scanner). It is also sharper than scanning on the glass itself. And, what’s nice - the height is the same for all formats, no film holders involved. I made permanent spacers using 3/4” wide .0625” thick extruded aluminum strips from a hardware store, 10” long, binding up with pieces of a high quality dense digital paper stock, reaching the right thickness, including the blue painters’ tape that binds it all together. (the same tape used to hold the neg to the glass - no residue.) I place a spacer on either side of the scanner glass, 8” apart, so I can scan anything in between, format is irrelevant, and I can mount 2 4x5 negs for scanning (holder holds only one), and 4 6x6cm negs.
*Also, scanning with the glass and tape allows more freedom framing the image, and often, if sky or even toned untextured areas run to the edge of the frame (where the border of the image would be), the Epson film holder creates a dark area running parallel to the long edge - created by the holder somehow (some kind of reflection?), which will not happen taped to the glass.
My approach to scanning is one image at a time, like printing in the darkroom, so I’m not looking for rapid multi frame scanning of rolls of film, but rather the best scan I can get. (Everything is black and white). I scan to tiffs, 16 bit, open in Raw from the bridge (I like the way it sharpens, much nicer than in PShop), open and work in PShop the rest of the way. On extreme dynamic range images, I do a second scan of highlight or shadow areas, paste in over the other scan in PShop and mask out what I don’t want from the second, although the Silverfast double scan feature for shadow areas does a great job most of the time.
Opening the tiff scan in Raw allows me to tweak the ends of the range by opening up the shadows or compressing the highlights before opening in PShop for final editing.
 

Attachments

  • Glass neg rocketblast.jpg
    Glass neg rocketblast.jpg
    182.7 KB · Views: 34
  • Glass w_neg.jpg
    Glass w_neg.jpg
    138.8 KB · Views: 35
  • Ilford cloth glass.jpg
    Ilford cloth glass.jpg
    200.4 KB · Views: 34
Joined
Aug 29, 2017
Messages
9,318
Location
New Jersey formerly NYC
Format
Multi Format
OK, Luftfeder, finally got to it. The following text is what I do, maybe more than you want but I keep it for such discussions.
The images show what things look like, please ask if you want more detail.
If the film needs cleaning, I do that first with PEC-12 and cotton.
Then I wipe with an orange Ilford anti-static cloth, every surface.
When dusting with the Giotto, I just do every surface, as the parts are put together, always just before they come together. Either with holders or the glass/tape thing, I get very little dust in the scan, and my typical 35mm size is 16" on the short side at 300 res.

I bought a new V850Pro 2-3 years ago and kept testing the film holders, wishing (like others) that the 6x6 one would hold 4 frames. I found the best settings for the leveling feet, different on different size holders (I have 35mm, 6x6, and 4x5 film to scan, all B&W). I also tried scanning directly on the glass (e-down) with ANR glass on top. With none of these options do I use the sharpening function of the software (Silverfast).
I’ve been scanning for 30 years or so, with all kinds of scanners, some professionally, and arrived at the feeling that I might not be getting the best scan sharpness. The film holders are inconsistent and kind of tinkertoy. I could not make contact with the BetterScanning guy (he still doesn’t list the 850 on his site), so I contacted another anr glass guy whose site is Scan-Tech, who sells glass and will talk to you. I bought a piece of glass 8x10 and decided to shim it up from the scanner glass and reach the height of best sharpness.
I did this with 2 feeler gauge sets I bought on line. I took them apart, cleaned off the oil, and started at just under 3mm in height (approximately where the film sits with a holder), using the various gauges in combinations, two equal stacks, one on either edge of the glass, with the neg (a good grain-sturdy tri-x and rodinal neg from the 70s) with the neg in between the stacks. The neg is taped base side to the anr glass in the sprocket hole areas. The natural curve keeps it flat to the glass. (This also works with 4x5 and 6x6mm)
I found the height of 3.25mm was best (all measurements were confirmed with a micrometer, purchased with the feeler gauges), and that from 3.15 - 3.35 was a decent range, but 3.25 is the sharpest (for my scanner). It is also sharper than scanning on the glass itself. And, what’s nice - the height is the same for all formats, no film holders involved. I made permanent spacers using 3/4” wide .0625” thick extruded aluminum strips from a hardware store, 10” long, binding up with pieces of a high quality dense digital paper stock, reaching the right thickness, including the blue painters’ tape that binds it all together. (the same tape used to hold the neg to the glass - no residue.) I place a spacer on either side of the scanner glass, 8” apart, so I can scan anything in between, format is irrelevant, and I can mount 2 4x5 negs for scanning (holder holds only one), and 4 6x6cm negs.
*Also, scanning with the glass and tape allows more freedom framing the image, and often, if sky or even toned untextured areas run to the edge of the frame (where the border of the image would be), the Epson film holder creates a dark area running parallel to the long edge - created by the holder somehow (some kind of reflection?), which will not happen taped to the glass.
My approach to scanning is one image at a time, like printing in the darkroom, so I’m not looking for rapid multi frame scanning of rolls of film, but rather the best scan I can get. (Everything is black and white). I scan to tiffs, 16 bit, open in Raw from the bridge (I like the way it sharpens, much nicer than in PShop), open and work in PShop the rest of the way. On extreme dynamic range images, I do a second scan of highlight or shadow areas, paste in over the other scan in PShop and mask out what I don’t want from the second, although the Silverfast double scan feature for shadow areas does a great job most of the time.
Opening the tiff scan in Raw allows me to tweak the ends of the range by opening up the shadows or compressing the highlights before opening in PShop for final editing.

How does Silverfast increase the dMax of the scanner with a second scan to open up the shadows without creating noise?
 

Luftfeder

Member
Joined
Sep 23, 2021
Messages
12
Location
USA
Format
Hybrid
OK, Luftfeder, finally got to it. The following text is what I do, maybe more than you want but I keep it for such discussions.
The images show what things look like, please ask if you want more detail.
If the film needs cleaning, I do that first with PEC-12 and cotton.
Then I wipe with an orange Ilford anti-static cloth, every surface.
When dusting with the Giotto, I just do every surface, as the parts are put together, always just before they come together. Either with holders or the glass/tape thing, I get very little dust in the scan, and my typical 35mm size is 16" on the short side at 300 res.

I bought a new V850Pro 2-3 years ago and kept testing the film holders, wishing (like others) that the 6x6 one would hold 4 frames. I found the best settings for the leveling feet, different on different size holders (I have 35mm, 6x6, and 4x5 film to scan, all B&W). I also tried scanning directly on the glass (e-down) with ANR glass on top. With none of these options do I use the sharpening function of the software (Silverfast).
I’ve been scanning for 30 years or so, with all kinds of scanners, some professionally, and arrived at the feeling that I might not be getting the best scan sharpness. The film holders are inconsistent and kind of tinkertoy. I could not make contact with the BetterScanning guy (he still doesn’t list the 850 on his site), so I contacted another anr glass guy whose site is Scan-Tech, who sells glass and will talk to you. I bought a piece of glass 8x10 and decided to shim it up from the scanner glass and reach the height of best sharpness.
I did this with 2 feeler gauge sets I bought on line. I took them apart, cleaned off the oil, and started at just under 3mm in height (approximately where the film sits with a holder), using the various gauges in combinations, two equal stacks, one on either edge of the glass, with the neg (a good grain-sturdy tri-x and rodinal neg from the 70s) with the neg in between the stacks. The neg is taped base side to the anr glass in the sprocket hole areas. The natural curve keeps it flat to the glass. (This also works with 4x5 and 6x6mm)
I found the height of 3.25mm was best (all measurements were confirmed with a micrometer, purchased with the feeler gauges), and that from 3.15 - 3.35 was a decent range, but 3.25 is the sharpest (for my scanner). It is also sharper than scanning on the glass itself. And, what’s nice - the height is the same for all formats, no film holders involved. I made permanent spacers using 3/4” wide .0625” thick extruded aluminum strips from a hardware store, 10” long, binding up with pieces of a high quality dense digital paper stock, reaching the right thickness, including the blue painters’ tape that binds it all together. (the same tape used to hold the neg to the glass - no residue.) I place a spacer on either side of the scanner glass, 8” apart, so I can scan anything in between, format is irrelevant, and I can mount 2 4x5 negs for scanning (holder holds only one), and 4 6x6cm negs.
*Also, scanning with the glass and tape allows more freedom framing the image, and often, if sky or even toned untextured areas run to the edge of the frame (where the border of the image would be), the Epson film holder creates a dark area running parallel to the long edge - created by the holder somehow (some kind of reflection?), which will not happen taped to the glass.
My approach to scanning is one image at a time, like printing in the darkroom, so I’m not looking for rapid multi frame scanning of rolls of film, but rather the best scan I can get. (Everything is black and white). I scan to tiffs, 16 bit, open in Raw from the bridge (I like the way it sharpens, much nicer than in PShop), open and work in PShop the rest of the way. On extreme dynamic range images, I do a second scan of highlight or shadow areas, paste in over the other scan in PShop and mask out what I don’t want from the second, although the Silverfast double scan feature for shadow areas does a great job most of the time.
Opening the tiff scan in Raw allows me to tweak the ends of the range by opening up the shadows or compressing the highlights before opening in PShop for final editing.

Thank you George,

Regarding cleaning: I have been doing pretty much the same thing (orange anti-static cloth, antistatic brush, rocket blower) except I have not used any PEC-12 fluid in the process. Typically I have scanned within a few days after developing so I have not thought I needed a fluid cleaning step but I might give that a try - maybe some dust gets on the wet negatives as they drip over my kitchen sink and might adhere more tightly to the surface when it is wet/soft than the dry methods can dislodge. I do live in a 130 year old house so it is inherently not the cleanest air and have thought about trying to make a dust-free tent contraption kind of like the darkroom tents you see.

Regarding the scanning. I have a piece of ANR glass I purchased and used when I made a camera scanning unit but was never satisfied with the camera scanning results vs the Epson 850. I may re-purpose my ANR glass and try to duplicate your process (I think I purchased it from Scan-Tech). I have used Vlads Test Target for my focus calibration in the past and would use this to find the right focal plane starting near 3.5mm because that seems to be the best setting on the factory holders. I use VueScan and scan to a RAW format as well.

Have you ever tried wet mount and do you know if PEC-12 can be used for wet mount?

David
 

Luftfeder

Member
Joined
Sep 23, 2021
Messages
12
Location
USA
Format
Hybrid
The V850 will output 6400 or 3200 in resolution. But you're only seeing the pixels. There is no difference in actual data from a 2400 scan, which is what I use.

Also, you didn;t specify if you added sharpening. The V850 program nominally sets increased sharpness to the auto scan routine, even on manual. You have to uncheck it. Did you?

Dear Alan,

not sure I follow the text:
"The V850 will output 6400 or 3200 in resolution. But you're only seeing the pixels. There is no difference in actual data from a 2400 scan, which is what I use."

Are you saying it is interpolating the pixels for resolutions higher than 2400? That it physically samples at 2400 and then outputs higher resolution through interpolation of the pixels? Without "sharpening on" I would assume that this interpolation would increase any image fuzziness (by placing a grey pixel between a white and black one) Do I have my logic correct?

I will check my sharpening setting next time I scan but I use VueScan and think I tried to turn everything off to just get the hardware output.

I know modern post processing software can essentially upscale the resolution by doing the same kind of interpolation. If I am interpreting your comment correctly is it your suggestion to scan at 2400 and do any upscaling (if needed) in post?

I have not directly compared the scan speed/sound between the different resolutions but my memory tells me that there is a speed and sound difference at these higher resolutions suggesting to my ears that the physical scanner is making smaller increments. I will have to check this out, maybe the speed difference is due to software latency as it interpolates?

Also going from memory from what I have read on the V850 (but maybe the sources were wrong) that it uses two different physical light paths for the reflective vs transparency scanning and that they operate with different base resolution capabilities - with the transparency resolution being higher. This dual light path necessitates the negatives needing to be held about 3 mm above the scanner bed because of the focal plane of that light path whereas the focal plane of the reflective scan is at the scanner bed glass. Is this correct to your knowledge? It would make sense to me that I would want higher resolution system for transparency scanning vs reflective scanning.

thank you

David
 

koraks

Moderator
Moderator
Joined
Nov 29, 2018
Messages
21,735
Location
Europe
Format
Multi Format
Are you saying it is interpolating the pixels for resolutions higher than 2400? That it physically samples at 2400 and then outputs higher resolution through interpolation of the pixels? Without "sharpening on" I would assume that this interpolation would increase any image fuzziness (by placing a grey pixel between a white and black one) Do I have my logic correct?

If you want to understand this, it gets very technical very fast, and the fact of the matter is that we don't know for sure. The only thing that all testing shows is that there's no (significant, reproducible) actual gain in resolving power above ca. 2400dpi.

To get down a little into the technical thickets: you have to distinguish between horizontal and vertical resolution, for starters. Horizontal resolution I define as resolution on the axis of the scanning head and sensor. The digital resolution along this axis is fixed by the number of pixels on the sensor itself. The real-world resolving power is further limited by the optical path, focus etc. The digital resolution remains the hard limit, but the soft limit of optical resolving power is arguably even more restrictive. I think the digital (sensor) resolution of the Epson flatbeds tops out at 4800dpi, but the actual resolving power is nowhere near this number.

On the other axis, i.e. the direction that the carriage travels in, the resolution is governed by either the step size of the stepper motor or the sample frequency if the motor is run continuously - I think it's stepped, so the step size is the relevant parameter here. If you do the calculus, a 4800dpi resolution corresponds to a step size of around 5um. It's easy to recognize that this kind of accuracy is arguably difficult to manage and I severely doubt that any flatbed scanner comes even close to this. So it's much more likely that a much larger step size is used (maybe as large as 1200 dpi) and that the data are combined with the horizontal samples and then interpolated on that basis.

If you think this through, you realize that there are several ways in which the actual resolving power of the system is limited, and on the other hand there are also several strategies that can be employed to artificially increase the (apparent) output resolution. To the best of my knowledge, there is no publicly accessible data on either of these sides of the equation for Epson flatbed scanners. What I do know is that credible resolving power tests generally end up with a figure around 2000dpi-2200dpi in the best case, but down to ca. 1200dpi in some cases (e.g. here). My personal experience with the older 4990 (similar resolving power as the v850, maybe slightly inferior) is that there's no net benefit in scanning at higher resolution than 2400dpi. And even at that resolution, the output is decidedly soft/fuzzy even under optimal conditions.
 

George Collier

Subscriber
Joined
Feb 23, 2005
Messages
1,363
Location
Richmond, VA
Format
Multi Format
Several questions here -
I don't ever need the PEC-12 with newly processed negs, maybe because when I built the darkroom (my house is 100 years old), I built a drying space attached to the wall. It has silk screen panels in the doors to allow air movement without dust and is closed on all sides except the bottom (to allow dripping). There is no movement in the darkroom once the film is hung so dust is minimal. I suspect hanging over the kitchen sink may be a problem. Some folks rig something in the bathroom (shower area) and run the shower ahead of time to minimize dust. Another solution is a large pvc tube (5-6") split in 2, tape-hinged on one side of the split with cross hanging arrangement on one end to be the top, hung on a wall, or a tube made of any material. Somehow get the wet film isolated from the room for drying.
I've never used a wet mount method, but I doubt that PEC12 can be used for that - it evaporates quickly and wet mount is more of an oil, I believe.

Alan - I don't think Silverfast claims to increase D-Max, I think it increases shadow detail in a second pass (you select whether you want it or not) by reallocating the response to detail in the neg and the transition into midtone values.
 

_T_

Member
Joined
Feb 21, 2017
Messages
408
Location
EP
Format
4x5 Format
It appears they are claiming it decreases the D-Min thus increasing the dynamic range and reducing the appearance of noise. Noise caused by the scanner that is, not the appearance of film grain. They say it does this by increasing exposure time.


koraks

Moderator
Moderator
Joined
Nov 29, 2018
Messages
21,735
Location
Europe
Format
Multi Format
Alan - I don't think Silverfast claims to increase D-Max, I think it increases shadow detail in a second pass (you select whether you want it or not) by reallocating the response to detail in the neg and the transition into midtone values.
How does Silverfast increase the dMax of the scanner with a second scan to open up the shadows without creating noise?
By definition the scanner has no dmax. It has a specification of the maximum optical density that it can still scan. This may sound like a case of semantics, but the distinction is relevant to the question. What happens with a high-density sample is that the scanner basically doesn't see much light anymore. This means that the signal is small and hence, after A/D conversion, what remains is a data width of just a few bits in which tonal differences can be discerned. In other words: density resolution (not to be confused with spatial resolution) is really limited. In practice, this is visible if you try and scan an extremely dense negative (try the densest steps on a Stouffer T2115 transmission step tablet for instance, those >2.0logD) or the darkest parts of a slide, and then increase contrast in that part of the scan to see the tonal differentiation. You'll notice that the result gets incredibly grainy. The grain you're looking at really isn't grain, but rather digital noise that results from thermal effects in the scanning sensor and the A/D conversion. The idea behind multiple pass scanning is that this thermal noise is averaged out across different scans (samples). In principle, this should give a slightly cleaner signal - at least to an extent.

See also the video that @_T_ posted above; you can quite easily rig up an experiment to demonstrate this even without using Silverfast, and instead doing multiple scans and then overlaying them in GIMP or Photoshop.
 
Joined
Aug 29, 2017
Messages
9,318
Location
New Jersey formerly NYC
Format
Multi Format
Dear Alan,

not sure I follow the text:
"The V850 will output 6400 or 3200 in resolution. But you're only seeing the pixels. There is no difference in actual data from a 2400 scan, which is what I use."

Are you saying it is interpolating the pixels for resolutions higher than 2400? That it physically samples at 2400 and then outputs higher resolution through interpolation of the pixels? Without "sharpening on" I would assume that this interpolation would increase any image fuzziness (by placing a grey pixel between a white and black one) Do I have my logic correct?

I will check my sharpening setting next time I scan but I use VueScan and think I tried to turn everything off to just get the hardware output.

I know modern post processing software can essentially upscale the resolution by doing the same kind of interpolation. If I am interpreting your comment correctly is it your suggestion to scan at 2400 and do any upscaling (if needed) in post?

I have not directly compared the scan speed/sound between the different resolutions but my memory tells me that there is a speed and sound difference at these higher resolutions suggesting to my ears that the physical scanner is making smaller increments. I will have to check this out, maybe the speed difference is due to software latency as it interpolates?

Also going from memory from what I have read on the V850 (but maybe the sources were wrong) that it uses two different physical light paths for the reflective vs transparency scanning and that they operate with different base resolution capabilities - with the transparency resolution being higher. This dual light path necessitates the negatives needing to be held about 3 mm above the scanner bed because of the focal plane of that light path whereas the focal plane of the reflective scan is at the scanner bed glass. Is this correct to your knowledge? It would make sense to me that I would want higher resolution system for transparency scanning vs reflective scanning.

thank you

David

See Koraks explanation about interpolation or other method results. Scanning higher than 2400 will just slow the scan down wasting your time, not improve resolving power. If you need more pixels, interpolate in post after scanning at 2400. Sharpen the image a lot in post.

Yes, use the film holder to get use of the better film sensor. Check each of the holders for best focus setting height. I then marked each holder's best height with a magic marker. Most were the default 3.0mm marked by the factory on the holders.
 

Shaps

Subscriber
Joined
Mar 29, 2024
Messages
35
Location
Hawaii
Format
Medium Format
Nick Carver on UTube has some excellant videos on using Siverfast and Epson scanners.
i recenrly picked up a 6x17 camera and am getting good results on an old Epson V700 using a V850 carrier with ANG resin/glass.
i’ve used Leaf 4x5, Nikon , and Epson flatbed scanners. The epson used correctly and carefully will give decent scans.
 
Photrio.com contains affiliate links to products. We may receive a commission for purchases made through these links.
To read our full affiliate disclosure statement please click Here.

PHOTRIO PARTNERS EQUALLY FUNDING OUR COMMUNITY:


Ilford ADOX Freestyle Photographic Stearman Press Weldon Color Lab Blue Moon Camera & Machine
Top Bottom