Easy way to perforate 35mm

20250427_154237.jpg

D
20250427_154237.jpg

  • 1
  • 0
  • 28
Genbaku Dome

D
Genbaku Dome

  • 3
  • 1
  • 40
City Park Pond

H
City Park Pond

  • 0
  • 1
  • 47
Icy Slough.jpg

H
Icy Slough.jpg

  • 1
  • 0
  • 46
Roses

A
Roses

  • 8
  • 0
  • 127

Recent Classifieds

Forum statistics

Threads
197,502
Messages
2,759,990
Members
99,519
Latest member
PJL1
Recent bookmarks
0

hrst

Member
Joined
May 10, 2007
Messages
1,293
Location
Finland
Format
Multi Format
I wrote earlier I'm building a 35mm perforator from scratch. It works quite well for acetate, but may not be for great importance even if I posted instructions how to make one, as it will be a project that takes much time and requires tools not available for everyone.

Instead, I have found a simple and easy medium- or low-cost solution for a hobbyist to perforate our own film coatings. Whereas I found out that products sold as "35mm perforators" are very expensive special products, there are 35 mm motion print splicers that are actually meant for joining film ends together with tape, but some of them have perforator pegs to perforate through the tape. Correct search term is "35 mm splicer".

The one I bought from the USA was Dr. Leo Catozzo model available on Ebay quite often. You don't have to pay so much for them if you wait for good deals, but I was able to get one very quickly for 150 USD. I know they go for less every now and then. Note that all 35 mm splicers do not have the perforators, but at least the Catozzo model does.

This one does 5 adjacent perforations at a time. For perforating non-perforated film, registration pins from either side should be removed, which is very easy to do. Then, the actual perforating can be done in dark and is quite quick and easy to do with nitrile gloves etc.

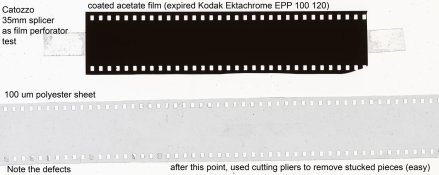
I have attached a scan of polyester sheet (the same I have coated on) and an acetate film (cut from 120 Ektachrome film) perforated with this tool.

Polyester is hard to perforate perfectly, but remaining pieces can be cut off with small cutting pliers or scissors.

A bigger version of scan is available at http://www.students.tut.fi/~alhonena/splicer_big.jpg
 

Attachments

  • splicer.jpg
    splicer.jpg
    115.4 KB · Views: 2,212

holmburgers

Member
Joined
Aug 13, 2009
Messages
4,439
Location
Vienna, Austria
Format
Multi Format
Wow, what a great idea.

Would you be able to post a picture of said splicer? Have you gotten a long enough test sample yet and loaded it into a cartridge to test its transport in a camera?

Although I've yet to make emulsions, the allure of being able to make my own 35mm film might drive me to it sooner. (though i'm sure the difficulties are many!)
 

fschifano

Member
Joined
May 12, 2003
Messages
3,201
Location
Valley Strea
Format
Multi Format
I am trying to figure out why you'd want to do that. What practical purpose does it serve?
 
OP
OP
hrst

hrst

Member
Joined
May 10, 2007
Messages
1,293
Location
Finland
Format
Multi Format
holmburgers, search Ebay for "Leo Catozzo splicer", you'll find pictures. For instance, http://cgi.ebay.com/Dr-Leo-Catozzo-...lm_Cameras&hash=item2eafddf2ea#ht_4814wt_1138 . I find no reason why it wouldn't run in a normal 35mm camera. The requirements are not so high in still photography. Motion picture is different, though, as precise registration is must and the perfs must endure the film tension and driving force.

fschifano, well, DIY film does not serve any practical purposes, which is true for most hobbies, including photography for most if not almost all of us here. That's why they are called hobbies. I find it very interesting to be able to do my own film.
 

holmburgers

Member
Joined
Aug 13, 2009
Messages
4,439
Location
Vienna, Austria
Format
Multi Format
hrst, thanks for the link.

Have you been making emulsions? If so, do you plan to attempt a 35mm film at some point?

And fschifano, you shouldn't have to try to hard to see the utility of this. Granted there are many manufacturers of excellent 35mm film, but what if someday there were not? A camera makes a lousy paperweight, despite what people say. And besides, no one uses paper anymore....
 
OP
OP
hrst

hrst

Member
Joined
May 10, 2007
Messages
1,293
Location
Finland
Format
Multi Format
Have you been making emulsions? If so, do you plan to attempt a 35mm film at some point?

Yes, last time we made emulsion was this; (there was a url link here which no longer exists) . And yes, we plan on making 35mm. I didn't buy this splicer just to test it :tongue:.
 

holmburgers

Member
Joined
Aug 13, 2009
Messages
4,439
Location
Vienna, Austria
Format
Multi Format
Ahh, I recall seeing that. Thanks for the reminder. Can't wait to see the results, and if you're selling any, I'll take a roll :D
 

dwross

Member
Joined
Feb 13, 2004
Messages
1,258
Location
Oregon Coast
Format
Multi Format
hrst,

Thanks for posting this. The idea of making 35mm is a lot of fun to think about. It certainly rounds out the emulsion-making picture. I suspect you got a really good deal on your splicer. The ones listed right now are considerably more expensive. But, never say never! I'll be checking ebay regularly. I think you found the hot Xmas toy of 2010 :smile:

A reminder note: If anyone is really interested in making roll film, and can forgo 35mm during the learning curve, 120 isn't perforated and is straightforward to produce, load on reels and in the camera, shoot and process.
 
OP
OP
hrst

hrst

Member
Joined
May 10, 2007
Messages
1,293
Location
Finland
Format
Multi Format
My friend got the Catozzo splicer for something like $80 IIRC, but he said it takes time to find a deal like that :smile:. Mine was "200 USD or best offer" and my offer of 150 USD was accepted. And, Catozzo is not the only one that has perforator claws. Just look at the pictures, some of them may show the claws.
 
Last edited by a moderator:

bsdunek

Member
Joined
Jul 27, 2006
Messages
1,617
Location
Michigan
Format
Multi Format
When 8mm movie film was phasing out, I decided to build a perforator to convert 16mm film to double-8. I did the design, but machine shops wanted quite a bit to machine all the parts for me. Ended up not doing it, but sometimes wish I had. Of course, B&W double eight is still available, and that is all I could use anyway if I wanted to develop it myself. Oh, well.
 

Scheimpflug

Member
Joined
Jun 22, 2010
Messages
51
Location
New Zealand
Format
Multi Format
Then, the actual perforating can be done in dark and is quite quick and easy to do with nitrile gloves etc.

Yes, last time we made emulsion was this; (there was a url link here which no longer exists) . And yes, we plan on making 35mm. I didn't buy this splicer just to test it :tongue:.

If you are making & applying the emulsion yourself, is there any reason not to perforate the film base first, in the daylight, and then apply the emulsion afterwards?

It seems like a lot of extra work to have to perforate it in the dark... :smile:
 

Rick A

Subscriber
Joined
Mar 31, 2009
Messages
9,853
Location
Laurel Highlands
Format
8x10 Format
Sorta reminiscent of the 2000 elections, hanging chads as it were.
 

dwross

Member
Joined
Feb 13, 2004
Messages
1,258
Location
Oregon Coast
Format
Multi Format
Cute! And just when I thought there weren't any more toys to buy:smile:.

To address two points: You wouldn't need to work in total darkness, unless you had panchromatic emulsion (probably unlikely). It's very easy to see in red light, especially if you're lit with red LED's. Unless you had a magic loop coating machine, you'd need to coat first, let the emulsion dry, and then cut out the film strip and perforate it. If you perforated first, the emulsion would fill in the holes. Dry emulsion is almost as tough as plastic.

Attachment: The selvage from a 32" strip of 120 film.

d
 

Attachments

  • CutOutFilmStrip.jpg
    CutOutFilmStrip.jpg
    275.1 KB · Views: 719
OP
OP
hrst

hrst

Member
Joined
May 10, 2007
Messages
1,293
Location
Finland
Format
Multi Format
If you are making & applying the emulsion yourself, is there any reason not to perforate the film base first, in the daylight, and then apply the emulsion afterwards?

As Denise said, it's not possible because the emulsion flows in the perforations (and outside the film), making a mess. I coat with a coating blade and the requirement for usable coating is that the film base is flat (without any holes :smile: ) and wider than the coating blade so that the blade runs on the film base, inevitably leaving some uncoated area on the edges.

So, the easiest way is to coat a wider coating, for example, 15 cm wide coating on 20 cm wide film base, and then cut it down to e.g. 4 slices of 35 mm film, and then perforate. You'll also get more than one roll of film with one coating, which is very nice because hand-coating on the table restricts the length quite a bit (I'd say 135-24 is practical maximum).

It seems like a lot of extra work to have to perforate it in the dark... :smile:

Well, the coating has to be done in the "dark" anyway (and the final steps in emulsion making, after sensitizing dyes are added), and perforating is quite easy compared to that. This is why ortochromatic film is so much easier to make, as you can actually use red safelight. If you are going to do panchromatic, it's better to buy night vision goggles and use IR light. I have bought the goggles so I can do panchromatic one day, but it will take time before I'm at that point. I have actually done nothing regarding emulsion making in a past few months, but I'll be back at it again soon.
 

vedmak

Member
Joined
Sep 12, 2009
Messages
328
Location
Chicago
Format
Analog
I have 2 boxes of unperforated Agfa Copal, can any of the lucky splicer owners consider perforating those for me? Pm me for details :smile:
 
OP
OP
hrst

hrst

Member
Joined
May 10, 2007
Messages
1,293
Location
Finland
Format
Multi Format
The perforator I showed here is not very fun to use for larger amounts of film, and the result is not that good. I wouldn't consider using it for perforating long, existing rolls of non-perforated film... But, for your own coatings, it's completely different! When you have already done a huge amount of work when making the emulsion from scratch, and coating it, and it's your very own product and the quantity is low, then this kind of makeshift perforating is next to nothing to perform :D. Everything's so relative...
 

dwross

Member
Joined
Feb 13, 2004
Messages
1,258
Location
Oregon Coast
Format
Multi Format
I have actually done nothing regarding emulsion making in a past few months, but I'll be back at it again soon.

Great to hear! You were making real progress. Looking forward to seeing more of your accomplishments!
 
OP
OP
hrst

hrst

Member
Joined
May 10, 2007
Messages
1,293
Location
Finland
Format
Multi Format
Great to hear! You were making real progress. Looking forward to seeing more of your accomplishments!

Thank you for your supporting words!

I'm sure I will never give up emulsion making and coating, it's just so interesting and so much fun. And, it's nice to have this community here to share results with.

It is just that I have a bunch of other interests, too, to take my attention away from emulsions, but then after some time, I start feeling I want to get back to emulsions again for a while.

Heck, if I dedicated all of my time for emulsions, I'd already have a 3200 ISO color neg film with the grain of Ektar and sharpness of Technical Pan!! :D That'd be boring!

Currently I'm at the point that I should make my working prototype of corona treatment killing machine a bit more compact, reliable and safe, so the troubles in coating and the time wasted there would go down. I have already made my emulsion making so automated using the syringe pump...
 

holmburgers

Member
Joined
Aug 13, 2009
Messages
4,439
Location
Vienna, Austria
Format
Multi Format
You're building a coronoa discharge machine? Is that for subbing the substrate? I'm sure you mention it somehwere, but are you using polyester or an acetate film?

Last night I coated some of Photoformulary's melinex with a simple gelatin solution (DCG dye-transfer matrices) and this morning was shagrin to find that the gelatin peeled right off!

Is it possible I coated the wrong side? I used the side that they indicated, but it's possible that someone made a mistake at some point (myself a likely candidate) because both sides look nearly identical.
 

dyetransfer

Member
Joined
Jun 18, 2007
Messages
67
Format
ULarge Format
You probably did coat the wrong side of the Melinex. There is an antistatic coating on the back side, and the subbing layer is on the front side. There is a way to identify the subbed side, there is an embossed 'E' on the edge. I don't remember if the 'E' is right reading with the subbing layer facing you, or wrong reading. I always just ran my fingernail along the surface - the anti-static side is slick, and the subbed side has some friction, some drag. You should be able to identify it easily using the fingernail test.

Regards - Jim Browning
 

holmburgers

Member
Joined
Aug 13, 2009
Messages
4,439
Location
Vienna, Austria
Format
Multi Format
Thanks Jim, I think you're exactly right. The side I coated it on definitely had that "anti-static" feeling. Take two...
 
OP
OP
hrst

hrst

Member
Joined
May 10, 2007
Messages
1,293
Location
Finland
Format
Multi Format
holmburgers, oh yes, take a look at (there was a url link here which no longer exists)
 

holmburgers

Member
Joined
Aug 13, 2009
Messages
4,439
Location
Vienna, Austria
Format
Multi Format
hrst, that's awesome. I remember seeing that a while back, but at the time I had no idea what it was!
 
Photrio.com contains affiliate links to products. We may receive a commission for purchases made through these links.
To read our full affiliate disclosure statement please click Here.

PHOTRIO PARTNERS EQUALLY FUNDING OUR COMMUNITY:


Ilford ADOX Freestyle Photographic Stearman Press Weldon Color Lab Blue Moon Camera & Machine
Top Bottom