• Welcome to Photrio!
    Registration is fast and free. Join today to unlock search, see fewer ads, and access all forum features.
    Click here to sign up

DVD of making and coating

Somewhere...

D
Somewhere...

  • 5
  • 2
  • 102
Iriana

H
Iriana

  • 7
  • 1
  • 164

Recent Classifieds

Forum statistics

Threads
202,750
Messages
2,845,060
Members
101,501
Latest member
David99
Recent bookmarks
0
Coating with a blade

I've been asked by so many, how the blades work in detail.

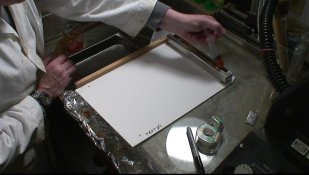
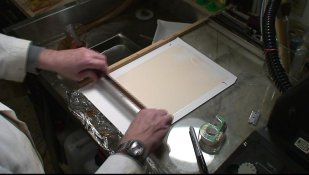
Here are two still frames taken during a practice session for the DVD. I am using 10% gelatin, tinted with food dyes for visibility.

The first picture shows the blade being charged with 12 ml of "emulsion", and the second one shows the action of drawing the blade across the paper to create a finished 8x10 coating. Defects are to be expected at the top and bottom of the 'run'. In fact, coating defects of this nature occur even with a full production coating machine due to starup and shutdown.

The black marker lines on the coating indicate to me, in the dark, where the good and bad coating can be found. I always coat wider and longer than the desired coating size.

PE
 

Attachments

  • Charging the blade.jpg
    Charging the blade.jpg
    68.3 KB · Views: 259
  • Coating in progress.jpg
    Coating in progress.jpg
    66.6 KB · Views: 265
Ron,

This just rocks! I'm so glad you are making this video!
 
Good gosh, Ron! This looks amazing, like something I would watch even if I didn't have an interest in emulsion making (which I do). Are you taking deposits? :D

- Justin
 
Guys;

Thanks for all the nice comments.

I want you to know that I know how to make and coat more elegantly than what you see above, but what I'm trying to do is make it nearly foolproof and doable in a small home darkroom.

Therefore, it will al be done with a minimum of chemicals and equipment. In fact, the most expensive item is the hotplate/stirrer you see in my post 22 above. And, of course the silver nitrate! That is also expensive.

Well, just to let you know that to satisfy myself that the IR and heavy red safelights were 'safe' I just finished processing two prints and a wedge spectrogram of the emulsion made during the shooting session and it is absolutely normal.

PE
 
I'm glad VLC worked. The image quality looks pretty good on these.
I can't wait for the DVD to come out :smile: I think the term "Captive Audience" doesn't even come close...
 
In post #26, I show the coating blade in actual use, but I'm still getting off-line comments and questions about this re: how does it really work and why is it better, or something to that effect.

Well, first, the blade has a well that is 1/2" deep by the width of coating desired + a fudge factor for selvedge. So, an 8" blade is actual 8.25" wide and the well is therefore 1/2" x 1/2" x 8.25". The well will hold about 40 ml allowing gaps of the endcap up to 20 or 40 mil. This is to allow coatings of carbon which requires more fluid.

The edge towards the operator is heavy. For an 8" blade it weighs about 2 pounds (1 kg). That serves two purposes. One is to keep the motion smooth from inertia and another is to keep the paper spread out and level as the blade advances. The end cap is adjusted to have gaps from usually 5 mil to 20 mil or even higher, but above about 20 mil, the surface tension is not enough to hold the emulsion in the well and it will leak.

It is designed to work with between 5% and 12% gelatin for optimum coating and is designed to work at about 65 - 75 deg F. If you overheat, the paper will wrinkle and the emulsion will run especially on film support. The blade should be at about 105F when you pour in the emulsion. A cold blade will set up the emulsion and cause streaks and defects.

The tolerance of the blade is 0.001" and any blade out of tolearance is a reject.

Now, if the leading edge towards the operator were to be missing, that is if it was just an undercut blade and not a contaniner, then the puddle of emulsion poured on paper will spread and will cause swell and create a huge defect at the start of the 'run'. As the paper swells, the paper moves closer to the blade and the blade scrapes off emulsion leaving too little causing streaks in the middle. If the blade is adjusted unevenly, you will see more or less emulsion at the edges. But, basically the blade is designed to allow surface tension of gelatin with the right viscosity to 'pull' the emulsion into evenness. Doing this takes practice. So this is why I suggest and demonstrate on the DVD, the use of the blade in the light with dyed gelatin to learn before you commit with emulsion.

These blades were used at Kodak in the 20s to coat up to 42" wide film and paper with trough coaters. I am currently coating up to 16"x20" sheets and I admit that beyond 8x10 the difficulty goes up. Typically, with an 8x10, I use an 11x14 sheet to allow for edges and over and under run.

The bottom line is that this is an art and takes practice, and the larger the blade the more practice.

PE
 
Ron,
Absolutely fantastic that you are making this technology available to us. Can you hear my audible drooling for the DVD? I think I have all the chemistry on hand including about 100 gms of cadmium chloride inherited from my grandfather. Now to just move this farther up the todo list. Many thanks.

Richard
 
Well, 3 more hours today, and another 2 or so tomorrow should pretty much wrap things up.

Today, we finished the taping of the ISO 40 ortho film and iso washing. I will have stills of that tomorrow or the day after to post. We also have a lot more to show.

PE
 
Ortho emulsion being made

Here are some pictures for you.

The first is of the reactor ready for addition of silver nitrate and ammonia. The reactor contains KBr, KI, and PA Gelatin. This is a special gelatin that allows washes to be done more easily.


The second is a picture of the emulsion being washed. The coagulum (emulsion + gelatin) is hanging as a mass from the stirring rod while the salts remain behind in the water. This wash is repeated several times with cold distilled water, and then the emulsion is reconstituted and diluted to the proper concentration and then sulfur sensitized and coated.

PE
 

Attachments

  • Ortho ready to go.jpg
    Ortho ready to go.jpg
    41.9 KB · Views: 186
  • Ortho iso wash.jpg
    Ortho iso wash.jpg
    71.3 KB · Views: 206
Ron,

This stuff is Fascinating!!! Can't wait for the DVD. Thanks!
 
Two hours of tape finished today at 12:30 PM. We will have to reshoot some scenes and edit, so a finish date of mid February is in sight. I'll post some interesting pics here as I go through the footage (meterage?).

PE
 
PE,

I have to ask....is a book of some sort going to accompany the release of the DVD?

Bob M.
 
Sounds great PE. I'm looking forward to making a purchase! I am not able to attend one of your workshops and this sounds like a good alternative for me.
Emulsion.
 
Great to hear that you're making good progress. Good luck with the edit.

...as I go through the footage (meterage?)...

Odd one that. It's often struck me as interesting that "footage" still seems to be the word of choice, whether you're shooting DV or 35mm... and regardless of whether you're in a metric or imperial environment.
 
Wel, what I am trying to do now is integrate the DVD with the Lab portion of the book, so that you can go to either and cross reference what you are seeing or reading. This is not as easy as it sounds, but I am trying to organize this 'mess'.

PE
 
This is what I was asking on the AZO thread, I have to admit I haven't looked at the this forum before now. I can see that you are right on top of the DVD and instructions. Good luck, looking forward to seeing it and the book.
Curt

My correction, I was looking at one thread and saw that I did make a comment. I'll have to pay more attention, this is an interesting forum.
 
Last edited by a moderator:
Final editing starts next Monday and will take 3 days. There are 2 scenes to shoot/reshoot.

I've devised a method to cross index the text to the DVD and to give highlight still photos in the text from the DVD. Still working on it. Why do you think I'm on APUG so much? :wink: I'm working on word and video files.

PE
 
Put me down for one as well!

It's hard enough for me to buy bulk film as it is, but I'd be willing to plunk down some dollars for the book and DVD. I've been combing through the various threads with avid interest as I was only recently made aware of the efforts of PE and others. FWIW, a possible ASA of 40-80 on film would be very useful and I'm sure some dedicated soul will be able to make something usable from that tantalizing high speed recipe. I know there's tons of information I still need to learn, and even more that will take experimentation. I'm not sure I'll ever catch up to the rest of you, but I hope I won't be too far behind.

Keep up the great work PE, you're an inspiration!
 
Well, after one full day of trying to move proprietary Sony HDTV into Roxio V10, we had to give up. HDV Split to the rescue. It turns the proprietary Sony files into an M2T file that Roxy understands. The Sony file is not true M2T file, even if the extension is the same, and so you get no sound at all.

After that it was smooth sailing. Ahahahahaha. No, it was not.

It was grueling and after working all day (we still have about 2 more hours today), the file is so big I have to create a DVD of just 20 minutes of HDTV. It probably will require 3 DVDs for the information in 3 sections. One is introduction to coating, another is simple Azo type emulsion making and the third is film making and materials testing. But we are making progress.

Thanks for all of your interest.

PE
 
BTW, with 47 responses, and part of them my answers to questions or updates, this gives me a very very tiny market. Has anyone taken note of this fact? Out of 20,000+ members, probably less than 0.2% are interested in this type of work.

PE
 
PE,

You should probably also post this on the Large Format forum. I doubt the 35mm or color crowd have any interest in this. I think those of us that shoot LF and are interested in alternative processes are your main group of potential customers.
 
Photrio.com contains affiliate links to products. We may receive a commission for purchases made through these links.
To read our full affiliate disclosure statement please click Here.

PHOTRIO PARTNERS EQUALLY FUNDING OUR COMMUNITY:


Ilford ADOX Freestyle Photographic Stearman Press Weldon Color Lab Blue Moon Camera & Machine
Top Bottom