Dr. Jolly's solarization developer

Trail

Trail

  • 0
  • 0
  • 18
IMG_6621.jpeg

A
IMG_6621.jpeg

  • 0
  • 0
  • 65
Carved bench

A
Carved bench

  • 0
  • 3
  • 124
Anthotype-5th:6:25.jpg

A
Anthotype-5th:6:25.jpg

  • 6
  • 4
  • 156

Recent Classifieds

Forum statistics

Threads
198,065
Messages
2,769,082
Members
99,550
Latest member
thedotbot
Recent bookmarks
0

luxikon

Member
Joined
Feb 13, 2008
Messages
138
Location
Germany
Format
Multi Format
I want to try the Sabattier effect on Fomapan 100, APX 100, FP4+, or HP5+. It would be helpful to know the normal developing times for one (or all) of these films in Jolly's solarization developer 1+3. Who can tell?
 
Last edited by a moderator:

bdial

Subscriber
Joined
Jan 2, 2005
Messages
7,449
Location
North East U.S.
Format
Multi Format
Bob Carnie has been doing some incredible work with that stuff. If he doesn't pick up on the thread, try sending him a note.
 

Bob Carnie

Subscriber
Joined
Apr 18, 2004
Messages
7,731
Location
toronto
Format
Med. Format RF
Power Control Unit.jpg Flasher.jpg Flasher.jpg Sink Link.jpg

I was asked in a PM by the OP to describe my working method, and rather than do it by PM I would prefer to put it here so those interested can see.

I follow Mr Jolly's formula for film solarization to a tee and am very grateful he wrote such a wonderful article.

pinch sodium sulfite
metol- 144 g
sodium sulfite - 450 g
sodium carbonate - 420g
sodium bromide - 56g

12 litre of water at 120 degree- then bring down to 70 degree for processing

FILM SOLARIZATION

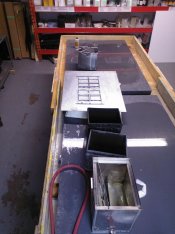
I put all 12 litres of dev in the first stainless steel tank you see which is the farthest from the camera , I load all my film in holders and can do two hangers or 8 sheets at a time.
I use a 5 minute time with a flash half way between, by laying the two hangers on the steel plate between the dev and the fix and turn on the light.
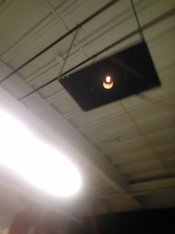
I use a flasher as shown connected to a power unit which can double or triple power .. that is connected to a timer... the flash is always between 2-5 seconds.
I have adapted the flasher unit with current bulbs and have bought enough to last my life...I use Mr16 dichro cool eye bulbs

When doing my work I set up the camera and do four test neg's bracketing on what I think is correct exposure... then go into the darkroom and process, flash and fix.
by doing this each time I shoot objects its like having polaroids .. I look for the exposure that gives me the best maki lines..
Then I load up two exposures slightly different of each object so I always have two versions to choose from .
For the best maki line ( black border) one needs to slightly underexpose so I have found this testing to be a good method .
Calculating the flash time is a bit tricky and I would suggest shooting two or three sets of brackets, then try two or three different runs with different flash density.
Try to keep your time between two and four seconds and get back into the dev and agitate quickly to avoid flow marks.

On a typical day I will load twenty to thirty holders with film and pick objects around the same size and use hot lights only so I can see the lighting, as well I have
found for my work a blue neutral background works best.
I have also found that simple objects with flat surfaces, like rubber duckies work well... Maybe thats why Man Rays nudes look so wicked.

PRINT SOLARIZATION

for this I split the developers into two baths with the flasher over the second developer. To the second developer I add 450 grams of Potassium Bromide
this in my layman language changes the grains structure of the flashed areas of the prints, that when split toned,(I use three toners- sepia, selenium then blue)
will give more grain structure differences thus more colour possibilities.
I use a flash that will create a nice white maki line , lately I have been pulling the print in the second developer to taste, much like lith prints.
The developers are split equally time wise , a tip would be to just have the image emerging well in the first developer, if its too light the effect is way to strong, and if too dark the image will not get maki lines.
I use dodging and burning to my advantage to create areas of real and unreal.
It is very important to agitate well, in both baths as you will get flow marks and use an acid stop bath.
My current paper is Ilford MG4 matt.

It should be obvious to some that if you solarize the neg's then the prints you will get both maki lines and that is the line of approach I am taking now on my current work. Lately I am exposing two subject matters hoping to get 10 decent portfolio images from each group, between shooting,processing and portfolio printing it takes about two months.


Obviously I am a huge fan of Man Ray, and when I started this project which is now called Alchemy of Light , I tried not to mimic his work and for years, never looked at his work as to not be influenced in my own. I believe Man Ray only did film solarizations and not print. I do think Ed Buffalo did a lot of print solarizations.

Every thing Mr Jolly wrote on the subject has proven out to me to be correct, I have been doing this now for about 10 years and its uncanny how correct he was on all aspects of the chemistry, exposure and effect.

I am very open to discussing this fascinating process with any worker willing to give it a go. I enjoy this process more than any work I am doing as it involves a camera and my favourite place the darkroom
BTW I only use 4x5 and 8x10 Ilford FP4
The cameras I use are as follows
110 year old 8x10 studio Camera
4x5 sinar plus sometimes extended bellows for closeups
4x5 graflex modified twin lens pass port camera where I can put two images on one film
8x10 sinar with extended bellows for close up and vertical work.

You can see some of my work patersoncarnie.com or if you are in the Calgary area next month our work is being exhibited at Endeavour Art Gallery during the Exposure photo festival.

Bob
 

Jim Noel

Member
Joined
Mar 6, 2005
Messages
2,261
Format
Large Format
When Man Ray was alive the films were quite different. He was able to achieve true solarization through extreme over-exposure in the camera. I did a little of this in the 30's and 40's. The characteristic curve is part of a bell curve. with extreme over-exposure the curve would go over the top and back down producing a negative with a full bell curve. Sometimes this would happen accidentally as it did with Adams "Black Sun".
 

Jim Jones

Subscriber
Joined
Jan 16, 2006
Messages
3,740
Location
Chillicothe MO
Format
Multi Format
When Tech Pan was available, I exposed it at about EI 25. The first step in processing is a Photoflo pre-wash. Omitting this step can cause uneven development. Then I place the film in a cut-down film hanger to keep the film flat on the bottom of the developer tray. A sheet of completely exposed and developed film is inserted behind the Tech Pan to eliminate reflections of the film hanger through the back of the Tech Pan. The film is developed for about 45 seconds with constant agitation for the first 30 seconds. Thereafter the film is not agitated until in the stop bath. At about 45 seconds the film is flashed with a 15 to 40 watt lamp a few feet above the tray. Exposure should be kept to a minimum length. A small electronic flash is also good for this. I hold a diffuser just above the tray during flashing so any particles floating on the developer won't be imaged on the film. This might not be necessary if I'd only keep my darkroom clean enough. After flashing the development is continued for about another 45 seconds. Processing is then completed as with any other film. I use 4x5 Tech Pan, but 35mm Tech Pan should work well with some inconvenience and much savings in film. You'd have to come up with a way of holding the film flat in the bottom of the tray. Conventional film lacks enough contrast to solarize well. I've also used litho film, but always had trouble with pinholes in the emulsion. Also, it is slower than Tech Pan. It has the advantage of being insensitive to red light, so the processing can be monitored by safelight.
 

Bob Carnie

Subscriber
Joined
Apr 18, 2004
Messages
7,731
Location
toronto
Format
Med. Format RF
I'd like to see some of your work Jim, not many people have gone down this route of creating images.
 
OP
OP
luxikon

luxikon

Member
Joined
Feb 13, 2008
Messages
138
Location
Germany
Format
Multi Format
Thanks for the detailed information.

I'm not a native English speaker so I don't understand what 'pinch sodium sulfite' means.

I tried the process yesterday but either my sodium sulfite (6 years old) was oxidized or my flashing was too week, got no Macki lines.
I used a paper flasher from RHD and I increased flashing up to 20 sec. May be the lamp is too week. I'm going to build a device similar to yours where I can change both time and intensity.

I've to add that I took the negatives with a camera. Is it better to use the sandwich method in the darkroom?

What kind of film is best?
 
Last edited by a moderator:

Bob Carnie

Subscriber
Joined
Apr 18, 2004
Messages
7,731
Location
toronto
Format
Med. Format RF
chemist say add a pinch under a gram of Sodium Sulfate before adding in Metol... true chemists can tell you why
You are following the mixture... I hope you are not adding hydroquinone.

I use a grade 4 paper setting my paper is Ilford Warmtone or ILford Mg4
It sounds like your paper flasher needs to be built as I cannot see how you did not get maki lines.
are you doing film.... my film is FP4

anywhere near normal exposure , bracketing up and down should work for film
all you need to do if its print is a multiple density test step on paper and try different powers of lights on paper and you should
be able to find your sweet spot.

I solarize from camera... are you using sheet film??
I do not know what sandwich method means.


Thanks for the detailed information.

I'm not a native English speaker so I don't understand what 'pinch sodium sulfite' means.

I tried the process yesterday but either my sodium sulfite (6 years old) was oxidized or my flashing was too week, got no Macki lines.
I used a paper flasher from RHD and I increased flashing up to 20 sec. May be the lamp is too week. I'm going to build a device similar to yours where I can change both time and intensity.

I've to add that I took the negatives with a camera. Is it better to use the sandwich method in the darkroom?

What kind of film is best?
 

Bob Carnie

Subscriber
Joined
Apr 18, 2004
Messages
7,731
Location
toronto
Format
Med. Format RF
Yes I wondered about that as well, but the Metol seems to mix well so I never added more.

QUOTE=Michael R 1974;1450804]This is a common mixing practice with developers containing Metol and Sodium Sulfite. Measure out the total Sulfite, take a "pinch" of it (between your thumb and index finger - same as you would do when a cooking recipe calls for a "pinch" of whatever) and dissolve it. Then add the Metol and dissolve. Then add the rest of the Sulfite.

The reasoning is that Metol will not dissolve in a Sodium Sulfite solution containing more than a small amount of Sulfite. But adding a small amount of Sulfite before the Metol helps scavenge some Oxygen so that the Metol is better preserved while you are dissolving it, before the rest of the Sulfite goes in and "stabilizes" the Metol solution.

Having said all this, the "pinch" is usually the amount called for when mixing say a litre of developer stock - which would usually contain somewhere between 30-100g Sodium Sulfite. Given the 12 litre mix in Bob's recipe above, and the relatively high 12g/litre concentration of Metol, I wonder if the "pinch" of Sulfite has any appreciable effect.[/QUOTE]
 

Jim Jones

Subscriber
Joined
Jan 16, 2006
Messages
3,740
Location
Chillicothe MO
Format
Multi Format
I'd like to see some of your work Jim, not many people have gone down this route of creating images.

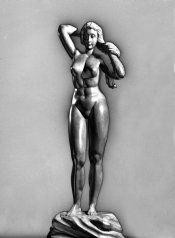
This was shot on Tech Pan with a black background. The background reversed to a grey while the less dark shadows on the statue remained dark. The Mackie lines are black, not white.
 

Attachments

  • VenusS01a.jpg
    VenusS01a.jpg
    153.9 KB · Views: 185
OP
OP
luxikon

luxikon

Member
Joined
Feb 13, 2008
Messages
138
Location
Germany
Format
Multi Format
I just mixed Dr. Jolly's developer and did not add hydroquinone. The negatives were 6x9 sheet film. With sandwich I meant contact printing.
At the moment I can't continue the experimentation till I get some new Metol the next days.
 

Bob Carnie

Subscriber
Joined
Apr 18, 2004
Messages
7,731
Location
toronto
Format
Med. Format RF
Very nice Jim , great maki lines I like the way the black bleeds into the background.. Do you think this was due to the Tech Pan?
QUOTE=Jim Jones;1450831]This was shot on Tech Pan with a black background. The background reversed to a grey while the less dark shadows on the statue remained dark. The Mackie lines are black, not white.[/QUOTE]
 

Bob Carnie

Subscriber
Joined
Apr 18, 2004
Messages
7,731
Location
toronto
Format
Med. Format RF
If you took this neg and did the paper method you would get a white maki as well which is very cool as well.

QUOTE=Jim Jones;1450831]This was shot on Tech Pan with a black background. The background reversed to a grey while the less dark shadows on the statue remained dark. The Mackie lines are black, not white.[/QUOTE]
 

Bob Carnie

Subscriber
Joined
Apr 18, 2004
Messages
7,731
Location
toronto
Format
Med. Format RF
Truck web size.jpg doll web size.jpg HulaPoper websize.jpg

Here are three more that I exposed in the last couple of weeks, These are not scans from real prints but interpertations, so they are not exactly
how the main series is looking.
 
OP
OP
luxikon

luxikon

Member
Joined
Feb 13, 2008
Messages
138
Location
Germany
Format
Multi Format
As far as now my experiment results in a complete reversal of image tones on my negatives, as well as beginning Mackie lines at EI 200. I exposed 6x9 sheet film Fomapan 100 (ASA 100) at EI 125, 160, and 200 with lower contrast at higher EI after development. But the negatives show remarkable fog. Normally the base and fog on this film has a density of 0.02 but these negatives have a b&f of 1.90 to 1.55, decreasing with increasing EI.
I developed for 7 min in Dr. Jolly's developer with intermittend light (2 sec.) at 3,5 min.
To get better results I intend to keep all variables constant and only change the intensity of the second exposure. Or would you suggest a better approach?
 

Bob Carnie

Subscriber
Joined
Apr 18, 2004
Messages
7,731
Location
toronto
Format
Med. Format RF
Dude - remarkable fog is what you are after..... to coin a phrase from my past commercial lab days... that negative looks flat as piss on a plate...

If you do every thing right your negative will be flat and very non promising as a great neg to print from. Once you have the maki lines then you need to print with about a grade 4 paper. Being able to split the tones and create a image is your challenge and for what its worth , I spent 8 years making prints until I got the look I was dreaming of. I have hundreds of prints on the wrong paper with the wrong tone I can sell you ... cheap..

It sounds to me that you are shooting live, which means going out with your camera and then processing later or next day.... If you are doing this then you will need to bracket your exposures as I do not think its possible to hit the sweat spot consistantly.. I am building a trailor to pull behind me when I travel to process on location,, much like my hero Bill Schwab and his wet plate trailor.
As stated earlier in this thread , I shoot a series of negatives with a lighting setup in a makeshift studio, then immediately process and flash to see which fstop and shutter speed is correct for getting good maki lines, and even then I bracket two sheets of film, and I do not change my lighting for the duration of the shoot so I have some consistancy.

I think 7 min development is too long btw , I use 5 min and flash half way.

Don't give up , it may take you 8 years but it would be worth the journey down the worm hole.

before you blast through all types of film I suggest one thing..

practice on paper set at grade 4 until you can get a white maki line every time within two tests.
Use only one film, they are all good in my opinion and FP4 works very well.
Follow Jollys formula to the letter,,, until you are so shit hot good you feel compelled to make your own variation.

also have fun or give up as it is very ass backwards process and can confuse the best of us.

Bob


As far as now my experiment results in a complete reversal of image tones on my negatives, as well as beginning Mackie lines at EI 200. I exposed 6x9 sheet film Fomapan 100 (ASA 100) at EI 125, 160, and 200 with lower contrast at higher EI after development. But the negatives show remarkable fog. Normally the base and fog on this film has a density of 0.02 but these negatives have a b&f of 1.90 to 1.55, decreasing with increasing EI.
I developed for 7 min in Dr. Jolly's developer with intermittend light (2 sec.) at 3,5 min.
To get better results I intend to keep all variables constant and only change the intensity of the second exposure. Or would you suggest a better approach?
 
OP
OP
luxikon

luxikon

Member
Joined
Feb 13, 2008
Messages
138
Location
Germany
Format
Multi Format
Hi,

to get unvariable conditions I created a table top arrangement with constant light situation. I took the pictures of an object with increasing underexposure and developed immediately in my darkroom and printed with extreme gradation.

This is such an amazing process that I can imagine it will fazinate me for a long time too. It's like starting darkroom work anew.

Your information about fog and flatness is very helpful.

Klaus
 

Bob Carnie

Subscriber
Joined
Apr 18, 2004
Messages
7,731
Location
toronto
Format
Med. Format RF
Controlled lighting will help in the beginning steps... I am wary of going out with a camera for a few days then trying it ... I would really have to do an exposure sweep to be comfortable.look for the minus density maki lines.

have fun
Hi,

to get unvariable conditions I created a table top arrangement with constant light situation. I took the pictures of an object with increasing underexposure and developed immediately in my darkroom and printed with extreme gradation.

This is such an amazing process that I can imagine it will fazinate me for a long time too. It's like starting darkroom work anew.

Your information about fog and flatness is very helpful.

Klaus
 
Photrio.com contains affiliate links to products. We may receive a commission for purchases made through these links.
To read our full affiliate disclosure statement please click Here.

PHOTRIO PARTNERS EQUALLY FUNDING OUR COMMUNITY:


Ilford ADOX Freestyle Photographic Stearman Press Weldon Color Lab Blue Moon Camera & Machine
Top Bottom