Dodging tools

Chiaro o scuro?

D
Chiaro o scuro?

  • 0
  • 0
  • 152
sdeeR

D
sdeeR

  • 2
  • 0
  • 174
Rouse St

A
Rouse St

  • 1
  • 0
  • 206
Untitled

A
Untitled

  • 3
  • 2
  • 233

Recent Classifieds

Forum statistics

Threads
199,196
Messages
2,787,697
Members
99,835
Latest member
Onap
Recent bookmarks
0

octofish

Member
Joined
Sep 19, 2011
Messages
28
Format
35mm
Hi All,

So I feel really silly asking this question but it's been bugging me.

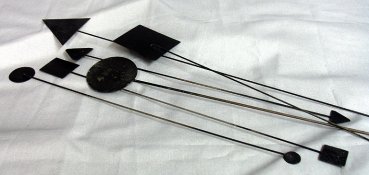
How do people use those dodging tools that are like regular little shapes on sticks?

I have been using cut out masks to dodge and am struggling to figure out the point of those dodging tools. The areas I find myself dodging are very rarely a circle or a square or a star or whatever. Do you sort of play it over the area moving it back and forth?

If so, how do you get a handle on what say a 10 second dodge actually means exposure wise given that the tool is only over a certain part of the image for part of the total dodge time?

Reading on here and elsewhere though, they seem really common and cut out masks seem to be just a weird hassle that people try to avoid. I'm just a bit puzzled as to what people are actually doing with them!
 
OP
OP

octofish

Member
Joined
Sep 19, 2011
Messages
28
Format
35mm
Oh wait a sec... Is it that you mostly use them for areas that are only a bit bigger than the tool itself (or you hold it up higher) so the part of the middle of the dodge area gets the full dodge, while the bits at the edges where you are moving through get a partial exposure, and you get a nice gradation?

What about long skinny areas?
 

Gerald C Koch

Member
Joined
Jul 12, 2010
Messages
8,131
Location
Southern USA
Format
Multi Format
You change the area that is being shaded by the tool by moving it closer or farther away from the paper. The tool must be kept in constant motion so it doesn't create a defined shadow on the print. Some experienced printers may use just their hand as a tool. You can also make your own tool out of cardboard to fit a certain area in a print. The reverse of dodging is burning where a hole in a piece of cardboard is used to give a section of a print more exposure. It's best you read a book on printing for more information. An older but good one is by Lootens "On Photographic Enlarging and Print Quality" but there are many others.
 
Last edited by a moderator:

Nige

Member
Joined
Sep 8, 2002
Messages
2,317
Format
Multi Format
you can also turn the shape on an angle to make a different shape. I tend to make shape specific dodgers but use a generice 'hole' for burning.
 

Reinhold

Advertiser
Joined
Aug 20, 2003
Messages
911
Location
Washougal, Washington
Format
Multi Format
Ever played "shadowgrams"?
It's surprising the variety of shapes you can create with your hands.
The problem is that all too often hands are too big, and you can't reach out into the center of the print.
That's why we tape something on the end of a stick or wire to put a shadow over a hot spot out in the middle of the print.
As others have said, tilting and/or rotating the dodger at various heigths above the easel can create a wide variety of shapes and shadow densities.
Here's a brocure I include with my 8-piece dodger set that gets a lot of favorable comments:
(there was a url link here which no longer exists)

www.Re-inventedPhotoEquip.com
 

Attachments

  • Dodgers.JPG
    Dodgers.JPG
    163.4 KB · Views: 402
  • Brochure.pdf
    718.4 KB · Views: 385
Joined
Sep 10, 2002
Messages
3,596
Location
Eugene, Oregon
Format
4x5 Format
You can make a lot of complicated shapes with one dodging tool just by moving it higher/lower, back and forth and rotating it in relation to the light. Use your imagination to visualize the shapes you can make with just one tool this way. Reinhold's brochure gives some basic examples of shadow shapes you can get from one tool.

For exposure, I always think of my dodging as a percentage of the entire exposure (e.g., dodge that flower 10%). For dodges that require moving around a lot during the dodging, I try to estimate the total percentage that is being dodged overall. I find, that unless I've overexposed my negative a lot and there's a lot of shadow detail I'm not using, that a 15% dodge is about all I can do without affecting the blacks adversely when dodging a dark shadow area.

I have a set of different size round and square/rectangular dodgers that I made myself. This I add to regularly with special shapes for particular applications. I use my hands a lot too. Sometimes I have so many dodging operations that it becomes a real choreographed "dance of dodging" during the entire basic exposure. Complicated dodges need to be "rehearsed" and are a real creative part of the "performance" of print-making.

Best,

Doremus

www.DoremusScudder.com
 
Joined
Jan 21, 2003
Messages
15,708
Location
Switzerland
Format
Multi Format
I use three dodging tools:

1. A flat piece of black opaque paper that bends. I can make all sorts of shapes with it, as well as angle it so that it becomes just a thin 'string' shadow on the paper surface. Sky is the limit with this tool.
2. A round piece of opaque paper, about 1.5inch diameter, taped to a piece of metal wire. I can make a round shape, or an oval shape with this. I also use it to dodge bigger areas by holding it close to the print surface and moving it around.
3. My hands. As has been mentioned, it is surprising what shapes you can contort your hands to become, as a shadow.

I have never felt that I need anything else.
 

Ric Johnson

Member
Joined
Jan 26, 2007
Messages
57
Location
Twin Cities,
Format
4x5 Format
No reason to buy dodging tools (buying dodging tools are a waste of money), make your own. How? Take a wire twist-tie with paper, burn off all the paper except for 1/16" (or 1/8") and start with that. The wire itself will never create a shadow so it's almost foolproof. Or maybe a tooth-pick, Q-tip, Tootsie Pop stick, harder then a twist-tie but still works. The main thing is keep the stick as small as possible.
 

ROL

Member
Joined
Oct 27, 2005
Messages
795
Location
California
Format
Multi Format
The wire itself will never create a shadow...

If you keep it moving!

... and yes, quite easy to make and and adjust to any size or shape required. Although I have to admit, even I am tempted by Reinhold's excellent looking tools.
 
Joined
Mar 18, 2005
Messages
4,942
Location
Monroe, WA, USA
Format
Multi Format
No reason to buy dodging tools...

Don't know about that. Reinhold's set of generic dodging tools looks pretty nice to me. Higher quality than any I might make.

I have a set on my Xmas wish list. Don't know what Santa has in mind, though...

:smile:

Ken
 

Toffle

Member
Joined
Mar 27, 2007
Messages
1,930
Location
Point Pelee,
Format
Multi Format
That Clyde Butcher video (first one posted) is fantastic. Thanks for posting David!

I had the pleasure of touring Clyde's darkroom last year. The scale of the operation is, of course, larger than any of us would aspire to, but what impressed me, (beyond the open-armed welcome I received from Clyde's wonderul family and staff) was how thoughtfully laid out the whole studio was. Anyone who came to work in my darkroom would have quite a time locating tools and materials. Clyde's darkroom is designed so that the printer can quickly get to work and make prints. It was quite a lesson for me.

As with others here, I use only a few tools, but twist and turn and angle and dangle and raise and lower and shimmy and shake them into position so I don't have to switch tools in a single exposure.
 

MattKing

Moderator
Moderator
Joined
Apr 24, 2005
Messages
53,251
Location
Delta, BC Canada
Format
Medium Format
I still have and use a custom-made (by me) dodging tool that I first used in the 1970s to dodge the head and shoulders of a person in a print.

It consists of a cut out portion of a print - the head and shoulders of one of my high school teachers :smile:.
 
OP
OP

octofish

Member
Joined
Sep 19, 2011
Messages
28
Format
35mm
Wow, ok ... that IS better. I was missing the whole twisting the tool bit, as well as moving it closer and further to the lens. Much more control than just a cutout that matches the shape.

Thanks particularly for those clips David. They're great.

I'm all fired up to get back in the dr now!

Thanks guys.
 

DavidBrunell

Member
Joined
Jul 8, 2012
Messages
230
Location
Lake Orion,
Format
Multi Format
Dodging and burning really is half the fun of making a print for me. I practice what I am going to do a few times on a dummy sheet before I make my first exposure; your hands kind of remember to a certain extent after doing it a few times. I made my tools out of foam core and shish kabob skewers!
 

Blighty

Member
Joined
Oct 11, 2004
Messages
914
Location
Lancaster, N
Format
Multi Format
I tend to cut out masks that represent the area I'm dodging (or burning) and some of them can be quite intricate. These are attached to very thin bits of wire used for flower arranging purposes. They are used close to the paper and moved enough to hide the wire shadow and to eliminate any harsh change in tone. If you angle the wire such that it isn't in direct contact with the paper, you can virtually avoid any chance of it casting a shadow. I have, on occasion, used various parts of my anatomy as dodging tools but I can't manage to keep the required shape long enough :D
 

David Brown

Member
Joined
Feb 16, 2004
Messages
4,055
Location
Earth
Format
Multi Format
That Clyde Butcher video (first one posted) is fantastic. Thanks for posting David!

Thanks particularly for those clips David. They're great.

You're both welcome. I just figured a few pictures (video) was worth 1000 words ... :cool:

I really thought there were better ones out there besides the Butcher. But, in the aggregate, I think they got the point across.

I agree that making your own tools is viable. I don't have Reinhold's set of pre-made tools, but I do have (and occasionally use) and old Testrite set. For burning, I have a stack of black construction paper and a pair of scissors.
 

piu58

Member
Joined
May 29, 2006
Messages
1,532
Location
Leipzig, Germany
Format
Medium Format
Dodging tools from black paper/cardboard are easier to use if one side is white. You can identify the are youd dodge. I use adhesive labesl for making the black paper white.
 

MartinP

Member
Joined
Jun 23, 2007
Messages
1,569
Location
Netherlands
Format
Medium Format
Good point Uwe, and a handy source for dark/light sided material is 120 backing-paper. Ilford and Kodak, at least, have the number side of the paper in white or yellow respectively and this makes things much easier to identify when dodging.
 

Toffle

Member
Joined
Mar 27, 2007
Messages
1,930
Location
Point Pelee,
Format
Multi Format
Dodging tools from black paper/cardboard are easier to use if one side is white. You can identify the are youd dodge. I use adhesive labesl for making the black paper white.

Not to hijack the thread, but I just thought I'd mention that it's always a small shock when I start to dodge/burn an 8x10 contact print and realize that I'm looking in the wrong spot to judge my lines. It's a little harder to figure out, but not usually a problem. I keep thinking that I'm going to mark the edges of my printing frame for reference, but I've never actually done it.
 
Photrio.com contains affiliate links to products. We may receive a commission for purchases made through these links.
To read our full affiliate disclosure statement please click Here.

PHOTRIO PARTNERS EQUALLY FUNDING OUR COMMUNITY:


Ilford ADOX Freestyle Photographic Stearman Press Weldon Color Lab Blue Moon Camera & Machine
Top Bottom