DIY 5x7" film developer tank

Recent Classifieds

Forum statistics

Threads
201,035
Messages
2,818,007
Members
100,487
Latest member
Luis Costa
Recent bookmarks
0
OP
OP
radiant

radiant

Member
Allowing Ads
Joined
Aug 18, 2019
Messages
2,135
Location
Europe
Format
Hybrid
I recently ordered one for myself so when it arrives I can take some measurements for you.

I would appreciate it. I can then sketch a B-style reel for it to see if it has enough space.
 

Mainecoonmaniac

Member
Allowing Ads
Joined
Dec 10, 2009
Messages
6,297
Format
Multi Format
I also do the pre-wash to 'warm up' the tank. I was lucky to get the motor base with mine.
Did you remove the fins from the lid? They're known to cause streaks where the developer sloshes against them.
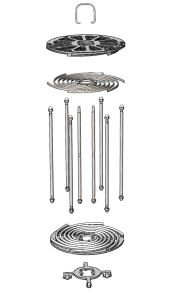
I didn't know that. Thanks for the tip! I did put drops of hot glue on the bottom to prevent the film from sticking to the bottom the tray.
 
OP
OP
radiant

radiant

Member
Allowing Ads
Joined
Aug 18, 2019
Messages
2,135
Location
Europe
Format
Hybrid
I have got working design for 4 sheet Paterson version done. I test printed small slice and fitted sheet to a slot and it seems to be in good position.

The thing is that printing one takes 1 day + 13 hours at 0.4mm nozzle and at 0.2mm layer height :smile: It weights 366g.


Näyttökuva 2021-1-13 kello 22.04.32.png
 
OP
OP
radiant

radiant

Member
Allowing Ads
Joined
Aug 18, 2019
Messages
2,135
Location
Europe
Format
Hybrid
.. and I calculated that it takes quite exatcly 1 liter of liquid to fill the tank to the upper film level with 3D printed part in place. Probably a bit less would be really needed.
 

Donald Qualls

Subscriber
Allowing Ads
Joined
Jan 19, 2005
Messages
12,502
Location
North Carolina
Format
Multi Format
You could save filament and time (and improve the dye removal on the base side) if you make the partitions grids instead of solid. May require some supports, but that's still cheaper in filament and time than solid walls. Also, the external cylinder could be rings -- more savings, and you'll cut down on carry-over by reducing trapped solutions.
 
OP
OP
radiant

radiant

Member
Allowing Ads
Joined
Aug 18, 2019
Messages
2,135
Location
Europe
Format
Hybrid
I was thinking of same idea but the rings eventually cause the infill to stop on each layer and extra "outer" layer must be done therefore.

I made really crudimentary "cheese" version to test out the speed difference:

Näyttökuva 2021-1-13 kello 22.35.09.png
 
OP
OP
radiant

radiant

Member
Allowing Ads
Joined
Aug 18, 2019
Messages
2,135
Location
Europe
Format
Hybrid
That's really neat, vedostuu.

Thanks Andrew! But we need to see if this really works in development action first :D

I will probably start the print on cheese version tomorrow morning and see in the evening how everything is going and decide if I want to pursue this crazy marathon to the end :D
 

Andrew O'Neill

Moderator
Moderator
Allowing Ads
Joined
Jan 16, 2004
Messages
12,676
Location
Coquitlam,BC Canada
Format
Multi Format
Thanks Andrew! But we need to see if this really works in development action first :D

I will probably start the print on cheese version tomorrow morning and see in the evening how everything is going and decide if I want to pursue this crazy marathon to the end :D

I look forward to the results! Good luck!
 
OP
OP
radiant

radiant

Member
Allowing Ads
Joined
Aug 18, 2019
Messages
2,135
Location
Europe
Format
Hybrid
I look forward to the results! Good luck!

Luck wasn't on my side :sad: I printed something like 18 hours and of course something wild happened and the print failed. I really don't know what, suddenly there was a spagetti on top of the print. Nozzle was open when I stopped the print, everything seemed normal. I suspect that my stepper motors overheated and lost steps, maybe? Hopefully not permanent.

Also after having a long (half) versio I found that there was loading problems with the sheet - not enough tolerances to overcome small inaccuracies on layers.

I'm still tempted do try this 6 sheet version with minimum thin walls (optimized for the nozzle):

Näyttökuva 2021-1-16 kello 11.07.17.png
 

Donald Qualls

Subscriber
Allowing Ads
Joined
Jan 19, 2005
Messages
12,502
Location
North Carolina
Format
Multi Format
You know, before 3D printers, I'd have probably gone to the local model airplane/train shop (most of which have now gone the way of local camera stores) and bought a few sheets of polystyrene to fabricate something like that. Probably cost less and might take less time than printing one (though I'd have my hands on the project longer than with a printer, it might not be longer once you figure in the time spent with the 3D CAD). If I didn't already have a good 4x5 solution, or if I shot larger film, I might still order in a couple bags of Plastruct polystyrene sheet and rectangle stock and try to find a bottle of methylene chloride (filler-free) solvent glue to give it a try.
 
OP
OP
radiant

radiant

Member
Allowing Ads
Joined
Aug 18, 2019
Messages
2,135
Location
Europe
Format
Hybrid
You know, before 3D printers, I'd have probably gone to the local model airplane/train shop (most of which have now gone the way of local camera stores) and bought a few sheets of polystyrene to fabricate something like that.

One of my hobby is RC planes, I have cut multiple wings from polystyrene by hot wire. But I don't see that as solution for this; to get a rigid structure you need quite thick walls.
 

Donald Qualls

Subscriber
Allowing Ads
Joined
Jan 19, 2005
Messages
12,502
Location
North Carolina
Format
Multi Format
One of my hobby is RC planes, I have cut multiple wings from polystyrene by hot wire. But I don't see that as solution for this; to get a rigid structure you need quite thick walls.

Not foam, this is solid material, also used to injection mold the part trees for plastic display models. Reasonably rigid in thicknesses of .2 mm or more (though in the US is usually sold by inch thickness -- 1/32 or .030 is common). Not as good chemically as ABS, but it does work in developing tanks. The Plastruct brand has been commonly used in model railroading, both for scenery and custom modification/fabrication of rolling stock, for decades.
 
Last edited:
OP
OP
radiant

radiant

Member
Allowing Ads
Joined
Aug 18, 2019
Messages
2,135
Location
Europe
Format
Hybrid
Not foam, this is solid material, also used to injection mold the part trees for plastic display models. Reasonably rigid in thicknesses of .2 mm or more (though in the US is usually sold by inch thickness -- 1/32 or .030 is common). Not as good chemically as ABS, but it does work in developing tanks. The Plastruct brand has been commonly used in model railroading, both for scenery and custom modification/fabrication of rolling stock, for decades.

Ah, sorry I mixed up with the extruded stuff. Yes that could be one choice! However I don't where to get such thin sheets. Our local plastic supplier has only 1mm available.

Heureka moment: I've bought many Ikea picture frames and removed the "plastic glass" from those and now I check and it is polystyrene.
 

Donald Qualls

Subscriber
Allowing Ads
Joined
Jan 19, 2005
Messages
12,502
Location
North Carolina
Format
Multi Format
Just to follow up, the Jobo Multitank 5 is approx. 13.3cm in diameter. Of course the issue is you need a relatively high volume of chemistry for non-rotary processing.

Of course, if you use a replenished developer (Xtol, Flexicolor LORR, etc.), needing a couple liters to cover your film isn't a big deal, you still only need to replenish based on the film area developed. I have two liters of Xtol tank solution, because my Yankee Agitank takes 1630 ml to cover 4x5, whether it's one sheet or twelve -- but if I process a single sheet, I only need 17.5 ml of replenisher.
 

B&W MAN

Member
Allowing Ads
Joined
Jul 1, 2019
Messages
10
Location
china
Format
Large Format
You know, before 3D printers, I'd have probably gone to the local model airplane/train shop (most of which have now gone the way of local camera stores) and bought a few sheets of polystyrene to fabricate something like that. Probably cost less and might take less time than printing one (though I'd have my hands on the project longer than with a printer, it might not be longer once you figure in the time spent with the 3D CAD). If I didn't already have a good 4x5 solution, or if I shot larger film, I might still order in a couple bags of Plastruct polystyrene sheet and rectangle stock and try to find a bottle of methylene chloride (filler-free) solvent glue to give it a try.

This is B&W KING 5X7 Stainless Steel Developing Tank Core. It can mount up to six films at a time to complete film development.
Now his upper and lower pieces are cast, and the rest are machined. In the assembly process also need manual adjustment and polishing.
I was curious to see if it was possible to 3D print these parts and achieve something more elaborate than mechanical assembly.

upload_2021-12-31_23-33-21.png


upload_2021-12-31_23-30-48.png
 

Attachments

  • upload_2021-12-31_23-28-37.png
    upload_2021-12-31_23-28-37.png
    218.3 KB · Views: 62
  • upload_2021-12-31_23-29-40.png
    upload_2021-12-31_23-29-40.png
    361.1 KB · Views: 66

Donald Qualls

Subscriber
Allowing Ads
Joined
Jan 19, 2005
Messages
12,502
Location
North Carolina
Format
Multi Format
I expect the top and bottom plates, as well as the central separator and a modified base swivel, could be 3D printed -- effectively, everything except the vertical rods and their securing nuts. You'd want to use ABS, nylon, or PETG for best water tolerance. You could probably design a center column that would let you eliminate the studs that join the top and bottom, though I'm doubtful whether you could ever print this design in one piece without major modification to the separator. The Mod54 (which fits into a large Paterson plastic tank) is a good example of what would work for a design intended for 3D printing.
 

Romanko

Member
Joined
Sep 3, 2021
Messages
890
Location
Sydney, Australia
Format
Medium Format
You should be able to 3D print it using three parts: top and bottom plates and the spirals. I would just take the part in the middle of the design on B&W Man's picture and extrude it to the full length. You might want to add some openings/slots to the spirals to reduce material and facilitate the flow of solutions. I would also add something to prevent the film sheets from sliding off their tracks (could happen during twist agitation). A rubber-band is a low-tech solution but there should be a nicer way of achieving the same result.
I am considering designing a similar holder for 9x12 cm sheet film.
 

Donald Qualls

Subscriber
Allowing Ads
Joined
Jan 19, 2005
Messages
12,502
Location
North Carolina
Format
Multi Format
The B&W King tanks and carriers are essentially copies of the Nikor 4x5 stainless tank -- not dimensionally the same because the tanks are slightly taller to accommodate the nuts on the studs, but generally similar. The 5x7 cage pictured above would require redesign to fit over the core of a Paterson type tank, and likely would also need its sheet capacity reduced because the Paterson tank is smaller diameter than the coreless Nikor-like one that cage was designed to fit.
 
Photrio.com contains affiliate links to products. We may receive a commission for purchases made through these links.
To read our full affiliate disclosure statement please click Here.

PHOTRIO PARTNERS EQUALLY FUNDING OUR COMMUNITY:


Ilford ADOX Freestyle Photographic Stearman Press Weldon Color Lab Blue Moon Camera & Machine
Top Bottom