I picked up film photography recently after finding a good deal on a darkroom set in my area. I've been plugging away at it over the past couple weeks, identifying and correcting mistakes, working my way to rendering a decent print. I'm just about there, but I've encountered a new problem, and I'm stumped.
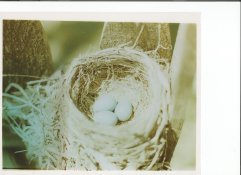
After getting some decent prints, I noticed that there was a line of discoloration -- a darker, yellowish line running across half the print on each one. In the attached scan, you can see it starting from the bottom of the print on the left side, running straight up into the middle of the print. To make sure that it wasn't a light leak in the camera itself, I rotated the negative in the negative carrier and did another print. If the discoloration was in the same spot on the image, it would mean a light leak in my camera. But when the print was finished, sure enough, it was on the opposite side, meaning (at least to my understanding) that it's some sort of issue with the enlarger itself. I gingerly opened up the lamp chamber, gave all the lenses a wipe with a microfiber rag, and made sure everything was where it was supposed to be. I apparently only made the problem worse. Now, not only is the line of yellow discoloration still there, but now it's accompanied by a much larger blue discoloration taking up almost the left third of the print.
I have tried both open tray and tank development since it started, as well as different negatives. The results all have the same discolorations. I am using a Saunders 670 DXL enlarger and Fuji Crystal Archive paper. I'm very anxious to get this problem resolved, as after this I feel like I can start developing prints I can send and share with friends and family. Also, I know that the scanned print is very sloppy -- white dust specs, needs some color correcting etc. -- but my only goal in rendering this print was in troubleshooting my more pertinent problem.
I look forward to hearing any of your comments and suggestions. Thanks for reading, and cheers!