AndrewBurns
Member
Hey all, first off I'm making this thread here because this alt-process area of the forum seems the most active, although my process is not 100% analogue and so I don't know if this should be put into the hybrid area. Technically this could be done in a purely analogue way and the thread is more about the chemistry of the process rather than the method of exposure, so I figured it would fit.
As you may know I've been playing with a UV projector/enlarger for a while now and one aspect I've been keen to explore is making exposures through a sheet of glass, which is something you can't do with a contact-printing process without introducing a lot of blur from light diffusion through the thickness of the glass (unless you had a perfectly collimated light source).
I've tried this with PVA-SbQ so far and it works well, although the process of coating the glass with the PVA-SbQ emulsion doesn't work nearly so well yet which is why I'm looking at carbon. I'm calling this a direct carbon process rather than carbon transfer because there is no transfer, I pour the carbon glop directly onto the glass sheet, expose the image through the glass so that the gelatine hardens from the glass surface upwards, and then develop the glass plate in hot water, leaving only the layer of gelatine that hardened onto the glass surface.
I figured that this technique might allow me to side-step some of the issues with the tonal threshold of continuous-tone carbon printing, particularly when using DAS as the sensitiser like I am. My theory is that the very thin layers of hardened gelatine making up the highlights of a normal carbon transfer print, which are likely to break away and be lost during the image transfer or development, are more likely to stick around in this technique because they're hardened directly onto a rigid support and are never put under any mechanical stress. So far I think my results are promising, although I don't think I'll completely eliminate it (but hopefully move it high enough up the scale that it's not an issue).
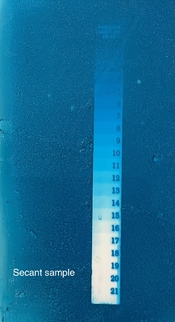
Here's a test print of my best result to-date, backed by a piece of white paper. Ignore the few bubbles and specs of dirt that managed to land on the print during development... The tonal scale is a bit dark-heavy and needs an adjustment to be linear, impossible to know if this is related to my process or a characteristic of the LCD screen in my projector.

The dmax is not particularly great, and this is the issue I've been struggling with the most. I've tried increasing the pigment concentration, which seemed to make things worse. I tried decreasing the gelatine loading while keeping the same amount of ink to make a very thin high-contrast tissue and that also didn't seem to work. This most recent attempt was made with the following recipe:
(Wet percentage values)
10% Gelatine
2.5% Sugar
1.2% Pebeo indian ink
0.3% DAS
86% Water
Poured to a wet height of between 1.2 and 1.5mm thick (basically as thick as I could using surface tension, to go thicker would require some dams).
My UV source is about 380 nm, which should have reasonable penetration into the glop. I've tried a range of exposures and it seems that the dmax just plateaus at a certain point, like the gelatine only hardens to a tiny fraction of the total layer thickness. Before developing the dry glop layer is basically entirely opaque so if I managed to harden through most of the thickness my dmax should be very high. I'm suspicious that the problem is due to the low power of my UV projector (current exposure time for ~8x10" is 40 minutes), possibly there's a certain threshold for UV energy below which the DAS just can't harden the gelatine no-matter how long you expose it for, in which case I'm not sure what I could do. The low dmax is particularly bad if you try to back-light the glass, because then the light only travels through the pigment layer in one direction, as opposed to when you put the glass on a piece of paper and the light has to travel through the pigment twice (once to get to the paper and once when reflecting back off the paper).
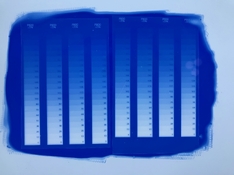
Here's the same glass but backlit by an LED pad, as you can see the contrast is much lower.

My eventual goal for this process is to create 4 different glass plates of a single image, each with either the C, Y, M or K layer of a colour separation. I'll then stack these glass plates on top of each other and backlight with LEDs. I think that this could result in an interesting effect where the colour layers combine to create a correct-looking image when viewed straight-on, but shift relative to each other when viewed from different angles. I'm hopeful that this will allow me to deal with lackluster dmax, as the shadows of the final image will be built up of 4 different pigment layers rather than just one and so should have much higher optical density.
Any thoughts on ways that I could improve my shadow density? Every other aspect of the process is super nice and easy, without having to transfer the image between substrates there are a lot fewer steps and a lot less to go wrong.
As you may know I've been playing with a UV projector/enlarger for a while now and one aspect I've been keen to explore is making exposures through a sheet of glass, which is something you can't do with a contact-printing process without introducing a lot of blur from light diffusion through the thickness of the glass (unless you had a perfectly collimated light source).
I've tried this with PVA-SbQ so far and it works well, although the process of coating the glass with the PVA-SbQ emulsion doesn't work nearly so well yet which is why I'm looking at carbon. I'm calling this a direct carbon process rather than carbon transfer because there is no transfer, I pour the carbon glop directly onto the glass sheet, expose the image through the glass so that the gelatine hardens from the glass surface upwards, and then develop the glass plate in hot water, leaving only the layer of gelatine that hardened onto the glass surface.
I figured that this technique might allow me to side-step some of the issues with the tonal threshold of continuous-tone carbon printing, particularly when using DAS as the sensitiser like I am. My theory is that the very thin layers of hardened gelatine making up the highlights of a normal carbon transfer print, which are likely to break away and be lost during the image transfer or development, are more likely to stick around in this technique because they're hardened directly onto a rigid support and are never put under any mechanical stress. So far I think my results are promising, although I don't think I'll completely eliminate it (but hopefully move it high enough up the scale that it's not an issue).
Here's a test print of my best result to-date, backed by a piece of white paper. Ignore the few bubbles and specs of dirt that managed to land on the print during development... The tonal scale is a bit dark-heavy and needs an adjustment to be linear, impossible to know if this is related to my process or a characteristic of the LCD screen in my projector.
The dmax is not particularly great, and this is the issue I've been struggling with the most. I've tried increasing the pigment concentration, which seemed to make things worse. I tried decreasing the gelatine loading while keeping the same amount of ink to make a very thin high-contrast tissue and that also didn't seem to work. This most recent attempt was made with the following recipe:
(Wet percentage values)
10% Gelatine
2.5% Sugar
1.2% Pebeo indian ink
0.3% DAS
86% Water
Poured to a wet height of between 1.2 and 1.5mm thick (basically as thick as I could using surface tension, to go thicker would require some dams).
My UV source is about 380 nm, which should have reasonable penetration into the glop. I've tried a range of exposures and it seems that the dmax just plateaus at a certain point, like the gelatine only hardens to a tiny fraction of the total layer thickness. Before developing the dry glop layer is basically entirely opaque so if I managed to harden through most of the thickness my dmax should be very high. I'm suspicious that the problem is due to the low power of my UV projector (current exposure time for ~8x10" is 40 minutes), possibly there's a certain threshold for UV energy below which the DAS just can't harden the gelatine no-matter how long you expose it for, in which case I'm not sure what I could do. The low dmax is particularly bad if you try to back-light the glass, because then the light only travels through the pigment layer in one direction, as opposed to when you put the glass on a piece of paper and the light has to travel through the pigment twice (once to get to the paper and once when reflecting back off the paper).
Here's the same glass but backlit by an LED pad, as you can see the contrast is much lower.
My eventual goal for this process is to create 4 different glass plates of a single image, each with either the C, Y, M or K layer of a colour separation. I'll then stack these glass plates on top of each other and backlight with LEDs. I think that this could result in an interesting effect where the colour layers combine to create a correct-looking image when viewed straight-on, but shift relative to each other when viewed from different angles. I'm hopeful that this will allow me to deal with lackluster dmax, as the shadows of the final image will be built up of 4 different pigment layers rather than just one and so should have much higher optical density.
Any thoughts on ways that I could improve my shadow density? Every other aspect of the process is super nice and easy, without having to transfer the image between substrates there are a lot fewer steps and a lot less to go wrong.