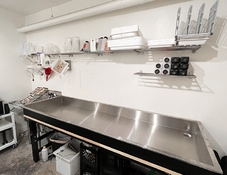
I‘ve been fortunate enough to find a small affordable art studio that I’m converting to a darkroom with free permission to do just about anything I need. The space has a small slop sink which is great, but I’ve opted to install a 30”x96” stainless steel sink next to it. Most days will be 8x10 prints but I do have plans for some larger 16x20” print runs and the occasional 20x24” piece.
My sink was delivered yesterday (it’s beautiful) and now I’m at a place where I have to learn how to install the drain. There’s one drain pipe for the existing sink in the room, I’d like to have this sink connect to that same drain pipe. Is that frowned upon?
I’m planning on running a faucet to the middle of the sink with a quick connect hose that can reach both ends of the sink. I have an 11x14 print washer that will live semi permanently in the far edge of the sink.
My sink is just resting on top of the workbench. Do I need to build a box for the sink so it’s not resting directly on the wood top? Should I be concerned about condensation or anything like that? My workbench is adjustable in height, I can raise one side up 1” so the sink has an appropriate 1/8” decline per foot. I have the sink oriented with the drain in the back right corner, assuming I would attach the drain pipe to the back wall and run it lengthwise back underneath the sink to the original slop sinks drain.
Simple questions I’m sure, but hey I’m a photographer not a handyman! I’d love to get some ideas of how to tackle this part of the build. Thanks!