Hi APUG'ers,
So I've started to use my darkroom to wet print! *yay* I love it.
I've made two prints I'm happy with. The third was a wasted effort as the frame was blurred (slow shutter/lack of light/handheld). I'm trying to print my 4th print and I've made many attempts #epicfail
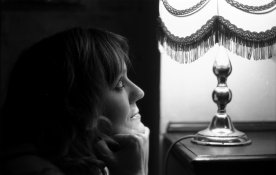
The image I'm trying to print is attached to this post.
(this is a scan from the negative with minor levels adjustment).
So after finding my base exposure and processing a print using the exposure I found suited my taste, I found I wanted to keep the face and burn the rest into black. *thumps head* It's actually a really nice image with a dimly light face surrounded by a vast area of black.
The left side behind/above the head: (+3s). The highlight to the bottom left of the hands (left shoulder): (+6s). The lamp? *headbutts brick wall* I've tried a low grade (0, 1, 3) so not to accentuate the contrast: 45 seconds, 60 seconds. I still see the lamp. I've tried 45 seconds to the entire right side and a further 30 seconds to the upper right side, both at the aforementioned grades, I still see the lamp. I've tried higher grades (3.5, 4 - exposure times for my colour head are the same for all grades, i found this out from initial tests), using the same exposure times mentioned before. I've tried using the lens wide open using the same exposure times, I still see the lamp.
I thought about doing my burning in on the left of the frame, removing the negative carrier and then just exposing the right side with bare light, but something stopped me.
Forgive my frustration, my naivety, my questions and what not. I am reading books. I promise. I just need a little help.
I'm printing on Ilford MGIV RC Pearl in Bromophen for 2mins @ 20 degrees. I'm exposing at f/5.6 (unless wide open at f/2.8) using a Schneider 50mm lens and a Kaiser VCP 6001 colour head. I'm setting my grades using the Durst Y/M settings from the ilford pdf document.
How can I get the right side of the frame to sheer black? Am I missing the obvious?
Cheers
Jay
So I've started to use my darkroom to wet print! *yay* I love it.
I've made two prints I'm happy with. The third was a wasted effort as the frame was blurred (slow shutter/lack of light/handheld). I'm trying to print my 4th print and I've made many attempts #epicfail
The image I'm trying to print is attached to this post.
(this is a scan from the negative with minor levels adjustment).
So after finding my base exposure and processing a print using the exposure I found suited my taste, I found I wanted to keep the face and burn the rest into black. *thumps head* It's actually a really nice image with a dimly light face surrounded by a vast area of black.
The left side behind/above the head: (+3s). The highlight to the bottom left of the hands (left shoulder): (+6s). The lamp? *headbutts brick wall* I've tried a low grade (0, 1, 3) so not to accentuate the contrast: 45 seconds, 60 seconds. I still see the lamp. I've tried 45 seconds to the entire right side and a further 30 seconds to the upper right side, both at the aforementioned grades, I still see the lamp. I've tried higher grades (3.5, 4 - exposure times for my colour head are the same for all grades, i found this out from initial tests), using the same exposure times mentioned before. I've tried using the lens wide open using the same exposure times, I still see the lamp.
I thought about doing my burning in on the left of the frame, removing the negative carrier and then just exposing the right side with bare light, but something stopped me.
Forgive my frustration, my naivety, my questions and what not. I am reading books. I promise. I just need a little help.
I'm printing on Ilford MGIV RC Pearl in Bromophen for 2mins @ 20 degrees. I'm exposing at f/5.6 (unless wide open at f/2.8) using a Schneider 50mm lens and a Kaiser VCP 6001 colour head. I'm setting my grades using the Durst Y/M settings from the ilford pdf document.
How can I get the right side of the frame to sheer black? Am I missing the obvious?
Cheers
Jay