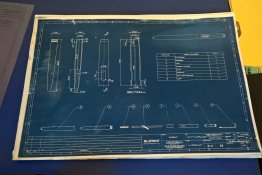
I started cyanotypes using the sun, which gave me nice sharp resolution (making engineering drawing blueprints).
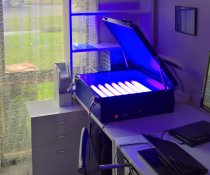
So then I recently bought a big 8 BL tube UV lightbox, thinking that it would be the ultimate...
… how wrong I was.
The paper is fully flat in contact with the glass...
… and I even built a little box, in an attempt to channel the light more perpendicularly through the negative...
… but no cigar.
My prints are all blurry towards the edges (sharpish at the centre, although still not as good as the sun).
My gut says that the problem is with:
The glass is 115mm above the tubes with the current setup.
Anyone else had this problem with their UV lightbox and solved it?
Should I change the tubes, get a face tanning sun lamp, or try a more directional light source (if such exists)?
Nick
So then I recently bought a big 8 BL tube UV lightbox, thinking that it would be the ultimate...
… how wrong I was.
The paper is fully flat in contact with the glass...
… and I even built a little box, in an attempt to channel the light more perpendicularly through the negative...
… but no cigar.
My prints are all blurry towards the edges (sharpish at the centre, although still not as good as the sun).
My gut says that the problem is with:
- too diffuse light (radiating at oblique angles and spreading the shadow vs the crisp shadow produced by the sun)
- the wrong UV tubes (dunno what they are, some 20W Chinese BL tubes that came with the unit off eBay)
- possibly the glass (too thick at 5mm)
The glass is 115mm above the tubes with the current setup.
Anyone else had this problem with their UV lightbox and solved it?
Should I change the tubes, get a face tanning sun lamp, or try a more directional light source (if such exists)?
Nick
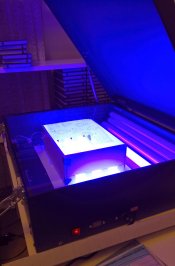


 Then again, if I can do this, so can you. No special tools needed apart from a drill, saw and a screwdriver and all the bits and pieces were from the local hardware store.