Cyanotype development - more sensitive method

Table for four.

H
Table for four.

  • 4
  • 0
  • 25
Waiting

A
Waiting

  • 1
  • 0
  • 39
Westpier

A
Westpier

  • 1
  • 2
  • 41
Westpier

A
Westpier

  • 2
  • 0
  • 30
Morning Coffee

A
Morning Coffee

  • 6
  • 0
  • 71

Recent Classifieds

Forum statistics

Threads
197,580
Messages
2,761,450
Members
99,408
Latest member
Booger Flicker
Recent bookmarks
0

Jan de Jong

Subscriber
Joined
Jul 20, 2022
Messages
61
Location
Germany
Format
Analog
Hello All,

I have been trying cyanotype development based on using FAC + Tartaric acid as coating for exposure.
Then development with Ferricyanide in form of brushing it on the exposed paper.
My results are what I was looking for, a lot faster so I can finally have details of fresh leaves etc.
Now my problem, does it make sense I seem to have sort of lost the recipe since today I was unable to reproduce the same result. That could be because the sun was not shining so bright.

Print using only the FAC + tartaric acid coating : FAC + tartaric acid
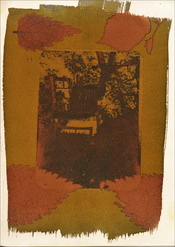
Print using a layer of Cyanotype and 2nd layer of FAC+ tartaric acid.: 2layer-for-darker-background

Any other persons have had results with this?

recipe more or less:
1st layer - normal cyanotype
2nd layer - apply when first has dried - FAC (same as in cynotype) `+ tartaric acid (probably 2 grams / 10ml of FAC solution)

Exposure time was about 10 minutes for example nr 2 still showing all the details of the leaves under the leave. Leave was fresh picked from the Wallnut tree.

Any suggestions or have I stumbled on something already known?
52955479842_2360d2a1cf_k.jpg
52956456465_e822e8db7e_k.jpg


please let me know

regards
Jan.
 

koraks

Moderator
Moderator
Joined
Nov 29, 2018
Messages
20,935
Location
Europe
Format
Multi Format
I really like that second print, although the detail in the leaf on the first one is also really nice. The second one has that deep blue background that just goes off into the depths, which is really nice.

Other than that, I'm not quite sure what your question is, but I'd suggest to keep on doing what you've been doing, cause you're doing something right :smile:
 
OP
OP
Jan de Jong

Jan de Jong

Subscriber
Joined
Jul 20, 2022
Messages
61
Location
Germany
Format
Analog
I really like that second print, although the detail in the leaf on the first one is also really nice. The second one has that deep blue background that just goes off into the depths, which is really nice.

Other than that, I'm not quite sure what your question is, but I'd suggest to keep on doing what you've been doing, cause you're doing something right :smile:

Thank you, yes it all went in one go very well yesterday, but today I could not reproduce it. It was like the magic sensitivity increase is no longer there.
I have tried also if the magic was simply brushing on ferricyanide on a normal Cyanotype, but to no avail.

I will keep trying in the next days because I have managed to find what I was looking for, indeed the deep blue background plus the details in the bright area of the leaves.

regards
Jan.
 

koraks

Moderator
Moderator
Joined
Nov 29, 2018
Messages
20,935
Location
Europe
Format
Multi Format
For what it's worth, there are many spins on the cyanotype concept, with variations in sensitizer chemistry and also light sources. I'm sure something in that complex of possibilities will give your desired deep blue dmax and good detail in the leaves.

When I did a lot of cyanotype, I found that New Cyanotype was much faster than the classic formula. It also gave just as good deep blues. Boy Classic and New Cyanotype are sensitive to what paper you use; New mote so than Classic. Some papers will give that really deep blue easily, while others never produce more than a mid-scale pale sky blue.

I never did much in the way of coating multiple layers in top of each other etc. I found that with a suitable choice of materials (esp paper) and some basic control of chemistry mixing and exposure it was pretty easy to get nice deep blues. But it's been a while since I spent significant time with this process. It's still nice and very appealing, though. I like what you're doing with it.
 

nmp

Member
Joined
Jan 20, 2005
Messages
1,995
Location
Maryland USA
Format
35mm
Hi, Jan:

Here you again inventing something again....🙂

But actually this separating the ferric photosensitizer and the ferricyanide has been done before - may have even been Herschel, the inventor of cyanotype who was reported (or mis-reported, according to Mike Ware in Cyanomicon) to have tried doing it this way in his early experiments. Much later, there was cyanotype Rex from Terry King who used ferric oxalate as the first layer followed by developing with ferricyanide. There was also this article that did a similar de-constructed process in order to improve on the contrast. There are a few others as well.

Anyway, I agree with @koraks - those are really nice cyanos. The details in the leaf is amazing.

Sorry I can't help you with your failure in the second try. Don't tell me the smoke from Canadian wild fires have reached Germany. I would try the third time and see which way it goes.

:Niranjan.
 
Last edited:
OP
OP
Jan de Jong

Jan de Jong

Subscriber
Joined
Jul 20, 2022
Messages
61
Location
Germany
Format
Analog
Thank you Koraks and Niranjan,

Indeed it is a variation on cyanotype Rex. I have tried this last year using a 2nd bath of ferrycyanide, but as others also describe this gets blue in a single go and also the print washes off mostly. Using the brush seems to solve that.
I did not think using 2 coats where the first is normal cyanotype layer and the second the more sensitive FAC would work, but it did. So that is the way to explore further.
Using tartaric acid instead of oxalic acid was because it looks to me a safer alternative.

I will let it rest for a few days now and then see if I can get the same process going again. I just did not get the speed improvement yesterday which worked instantly the day before though.

regards
Jan.
 

nmp

Member
Joined
Jan 20, 2005
Messages
1,995
Location
Maryland USA
Format
35mm
Indeed it is a variation on cyanotype Rex. I have tried this last year using a 2nd bath of ferrycyanide, but as others also describe this gets blue in a single go and also the print washes off mostly. Using the brush seems to solve that.

In this case, since both ferric and photo-produced ferrous are soluble in water, when the print in dunked in ferricyanide solution, dissolution of ferrous occurs simultaneously with formation of Prussian blue. Hence, a lot of it is lost in the solution. Brushing minimizes this loss, hence a better outcome. In the standard water-developed cyanotype, this would occur too but because ferrycyanide is mixed in at the paper surface, ferrous ions can not travel too far without encountering a ferricyanide ion so the Prussian blue molecules (most of them anyway, with the probability improved further if an acidic water is used as a developer) formed stays on the paper.

The dunking process works better with cuprotypes, on the other hand, because the cuprous/thiosulfate complex is insoluble in water so it stays on the paper as ferricyanide goes about its business. I suspect, Terry King preferred ferric oxalate for same reason in cyanotype Rex- ferrous oxalate being insoluble in water.

You could also try rod-coating instead of brushing, might be even less disruptive. It is what I do in cuprotypes with a 20% ferricyanide solution.

I did not think using 2 coats where the first is normal cyanotype layer and the second the more sensitive FAC would work, but it did. So that is the way to explore further.
Using tartaric acid instead of oxalic acid was because it looks to me a safer alternative.

I think the sensitivity improvement here comes not necessarily from inclusion of tartaric acid but exclusion of ferricyanide from the sensitizer. The latter absorbs the UV light to a significant extent, making less of it available for photo-reduction of FAC - resulting in lowering of the overall photo-efficiency of the process. Also limiting the photo-efficiency is the self-masking effect by Prussian blue formed during exposure. Both of these are absent in the ferricyanide-developed process.

I will let it rest for a few days now and then see if I can get the same process going again. I just did not get the speed improvement yesterday which worked instantly the day before though.

Have you considered making yourself a UV box which will provide you with a consistent exposure so you wouldn't have to wonder if the Sun was bright enough or not on a particular day.


:Niranjan.
 
Last edited:
OP
OP
Jan de Jong

Jan de Jong

Subscriber
Joined
Jul 20, 2022
Messages
61
Location
Germany
Format
Analog
Niranjan, thank you for your thought and suggestions on this!

I have to do more detailed test prints to find out. Just odd I seemed to have it all right the first time round. I will have to make tests with FAC without and with the tartaric acid. Seems the PH is important in this case, so will measure that and use that as variable also.


You could also try rod-coating instead of brushing, might be even less disruptive. It is what I do in cuprotypes with a 20% ferricyanide solution.
Considered yes but not applied here yet. I will try, because it will allow to apply in a single movement the ferricyanide, also considering here to lower the PH of the mix.

UV box I have but prefer to work with the sun, although that is another variable I know. Sun is just a bit faster for the experiments.

So in my further tests I will check FAC alone, then lower the PH using Citric and Tartaric acid.
Next make a test with these variable and on the same paper using the double coating with normal Cyanotype as first layer. If I have thest 3 or 4 next on one print I should be able to dial in the concentrations and PH further.

Also will look to the ferrycianide solution and its PH.

Can't believe I had it all dialed in the first time correct as the outcome was exactly what I was looking for.

I will keep you updated, should be soon.

Regards
Jan.
 

nmp

Member
Joined
Jan 20, 2005
Messages
1,995
Location
Maryland USA
Format
35mm
Can't believe I had it all dialed in the first time correct as the outcome was exactly what I was looking for.

That's pretty typical. I do it all the time. You get this new idea and in the excitement, you do the experiment extempore using your intuition as the guide - little bit of this and a little bit of that. And viola - it is a success....now what did I do? You probably didn't write down everything as at the time you didn't even know what the important variables were.

Repeating it is always the hard part. It's there somewhere which I am sure you will figure out. I recommend to simplify the experimentation and only focus on major variables at a time.

:Niranjan.
 

NedL

Subscriber
Joined
Aug 23, 2012
Messages
3,370
Location
Sonoma County, California
Format
Multi Format
You already are heading towards the two things I was going to mention: photo-sensitivity of FAC is somewhat affected by pH, so the amount of tartaric acid you add could change the speed a little. My impression is that citric acid might also make the FAC a little faster than tartaric, but I've never tested that very carefully.

Other thoughts/speculation/guesses that might be related to the "slow down" you observed:

  • The color of the leaf matters a lot! And how much moisture is in it!
  • angle of sun and time of day...
  • amount of moisture in the paper matters. more humid prints out faster.
  • As sunlight reduces ferric to ferrous, the oxygen in the air is working against you and oxidizing it back to ferric! So, if you are putting glass over the leaf, if it is looser and lets more air in, it might slow things down.
 
OP
OP
Jan de Jong

Jan de Jong

Subscriber
Joined
Jul 20, 2022
Messages
61
Location
Germany
Format
Analog
Thank you Niranjan and NedL.

Indeed doing experiments with method makes sense. I thought I had done that by taking pictures of the steps.
Today I have done further tests. Still not found the method back. Chemistry and water looks all still the same. Made several times new solutions.

By the end of the day I started adding Copper Sulfate to the mix, a pinch only. This results in this process to a nice pink for all unexposed parts. But to my surprise I found in a long exposure it starts to reverse.
I now think that I have made my exposure where it no longer works too long. Contrary what you would think it seems to remove the shadow details.

I am adding 2 examples 1 blue more or less normal blue print of a 9-13 negative and then the same using the copper sulfate to the same FAC+Tartaric acid mix.
Besides that it gives beautiful colors from blue through yellow to red, it also clearly shows that the lighter parts of the negative are reversed back to negative on the print.

52962847978_eb09158e12_k-jpg.340892

picture showing 9 by 13cm negative and 4 fresh leaves which are much denser. The leaves are copper red, The negative shows solarisation or reversal in the shadow zone. for example behind and under the chair.
In any case this is the most interesting multi color cyanotype - cuprotype I have ever done without any toning.


52962762620_3433e247ba_c.jpg


So my next test has to be making a exposure test strip with shorter times. Hope I will get to this tomorrow. (using UV lamp unit)

Hope not to bother you too much with this, but I am still looking get back to what I had achieved on Wednesday😂

Regards
Jan.
 

Attachments

  • 52962847978_eb09158e12_k.jpg
    52962847978_eb09158e12_k.jpg
    1 MB · Views: 88
  • 52962847978_eb09158e12_k.jpg
    52962847978_eb09158e12_k.jpg
    1 MB · Views: 721

nmp

Member
Joined
Jan 20, 2005
Messages
1,995
Location
Maryland USA
Format
35mm
So looks like you are making 3 different compounds here:

1. Copper ferr-I-cyanide which would form all over due to reaction between copper sulfate and ferricyanide which is responsible for the solarization

2. Prussian blue - ferric ferrocyanide

3. Copper ferro-O-cyanide (via ferrous to cuprous to cupric,) as in cuprotypes.

Now you went and made it more complicated....🙂


:Niranjan.
 
Last edited:
OP
OP
Jan de Jong

Jan de Jong

Subscriber
Joined
Jul 20, 2022
Messages
61
Location
Germany
Format
Analog
Now you went and made it more complicated....🙂

Yes that is true, but I am unable to find back the method so started doing some variations.

I am able to do to this using inktjet glossy paper, but no longer with the paper I was using originally. The exposure times are short 3-5 minutes. However that type of paper can only be in water short else it will give some type of jelly mottling. Probably the gelatin on layer dissolving.

I have done a test to see if the tartaric acid has any influence and it does seem to bring in detail.

So for now that leaves only some experiments with the orginal papers to see if I perhaps used the back side of the sheets...?

The variations with using copper sulfate however, not what I was after, are promising. With the Cyanotype rex method it seems to make almost elemental shining layer.


Cuprotype - Cyanotype Rex example

I am afraid that is all for now , thank you for your comments.

Best regards
Jan.
 
OP
OP
Jan de Jong

Jan de Jong

Subscriber
Joined
Jul 20, 2022
Messages
61
Location
Germany
Format
Analog
Just to revisit this, I think I have found what is critical to this to reproduce results, and that is to add more of the tartaric acid, in fact so much that you may see some tiny crystals on the dried emulsion of FAC + tartaric acid.
Additionally adding some tartaric acid to the developer of Ferricyanide also.

Exposure is about 3 to 5 times faster than using the traditional cyanotype formula.

As it sticks less good to paper washing has to be done more careful though.
Also still have some issues where this seems more prone to bleaching some of the lighter blue parts on drying.

Best regards
Jan.
 

NedL

Subscriber
Joined
Aug 23, 2012
Messages
3,370
Location
Sonoma County, California
Format
Multi Format
Just to revisit this, I think I have found what is critical to this to reproduce results, and that is to add more of the tartaric acid, in fact so much that you may see some tiny crystals on the dried emulsion of FAC + tartaric acid.
Additionally adding some tartaric acid to the developer of Ferricyanide also.

Exposure is about 3 to 5 times faster than using the traditional cyanotype formula.
.....

I lost track of this thread. This is very interesting. Tartaric acid seems ( to me ) highly variable. I got some from B&S that I'm not sure is even tartaric acid ( and I don't know how to dispose of it, because I don't know what it is! ). 3 different sources of food-grade tartaric acid have behaved very differently for me in VDB.

Out of curiosity, where did you get your tartaric acid?
 
OP
OP
Jan de Jong

Jan de Jong

Subscriber
Joined
Jul 20, 2022
Messages
61
Location
Germany
Format
Analog
Out of curiosity, where did you get your tartaric acid?


I had ordered food-grade E334. Interesting I had not thought about that it could have different behavior. It was 500gr from an Ebay seller. As I only intend to use if for alternative processes and not for food, I have not given that a further thought.

I have to work on it more because I really liked the result it has given me.
 

NedL

Subscriber
Joined
Aug 23, 2012
Messages
3,370
Location
Sonoma County, California
Format
Multi Format
Thanks! I'm planning to try your approach. Right now I need to use the sun for my cyanotypes because my UV lamps aren't enough ( I use paper negatives, and need more exposure than with clear film or transparency material ). It might be a little while before I try it but it would be nice to be able to print inside on dark winter days.
 

NedL

Subscriber
Joined
Aug 23, 2012
Messages
3,370
Location
Sonoma County, California
Format
Multi Format
I'm going to try a test today under my UV lamps. I mixed equal parts 25% FAC and 9% tartaric acid. It occurred to me that it might be a good idea to let the print dry naturally after painting on the pot ferri. That might give the prussian blue more of a chance of being in the paper fibers instead of washing off. Once the prussian blue is formed, I can't think of a reason why it can't air dry. We'll see!
 

NedL

Subscriber
Joined
Aug 23, 2012
Messages
3,370
Location
Sonoma County, California
Format
Multi Format
I tried 65 minutes under my lamps ( 55 minutes is my standard for sepia prints with paper negatives made this way ). I painted on 5 drops of 10% pot ferri mixed with 1 drop of 9% tartaric acid. It kind of "absorbed" the pot ferri as I painted it on... I could have used more but I didn't try putting on a second coat because I didn't want to smudge the prussian blue. I looks very promising and if nothing else it's sure fun to see the image emerge as you paint the pot ferri on :smile: I'll try washing it in about an hour.

Edit, later:

It looked pretty much perfect, like most of my prints do before adding H2O2 to darken them... but then the H2O2 didn't do anything! I guess when you paint the pot ferri on to "develop", it's fully oxidized. Still, I think the approach will work with a little more effort to dial everything in.
 
Last edited:
OP
OP
Jan de Jong

Jan de Jong

Subscriber
Joined
Jul 20, 2022
Messages
61
Location
Germany
Format
Analog
but then the H2O2 didn't do anything! I guess when you paint the pot ferri on to "develop", it's fully oxidized.
I agree, it seems the pot ferri coating with the tartaric acid combination is able to develop all, at the moment of application. Leaving it for a bit before washing probably also helps. I still have the issue that even after rinsing it looks good, in some cases the finer structures bleach back to white.
There maybe I have to consider that my tap water has a Ph 8.
Besides some good results I still have not found back a reliable way to reproduce the good results however.

My exposures are a lot shorter, using a face tanner with 4 tubes at about 10 cm distance. 25-30 minutes to expose through the dried leaf.
 

nmp

Member
Joined
Jan 20, 2005
Messages
1,995
Location
Maryland USA
Format
35mm
It looked pretty much perfect, like most of my prints do before adding H2O2 to darken them... but then the H2O2 didn't do anything! I guess when you paint the pot ferri on to "develop", it's fully oxidized. Still, I think the approach will work with a little more effort to dial everything in.

So in the classic cyano, the Prussian blue printed out during exposure undergoes further photo-reduction to Prussian white which is responsible for the solarization observed at higher exposures. It is this Prussian white that oxidizes back to Prussian blue with peroxide treatment. Hence the density boost. When K ferri is applied post-expsoure, there is no Prussian white to be had, hence no density boost to be had.

It would be a whole another story if one used k ferro instead of k ferri.

:Niranjan.
 

NedL

Subscriber
Joined
Aug 23, 2012
Messages
3,370
Location
Sonoma County, California
Format
Multi Format
That makes sense! The color on this test print looks really nice, even if it's not the deepest darkest indigo blue, it's plenty dark enough to make a nice print. As far as I could tell, not much of the prussian blue washed out ( no blue in the water ). I washed about an hour and a half after "developing" with pot ferri.

I had the impression that it took just a little longer to wash the yellow out, but my wash water was a little colder than usual. I always add a little CA to my wash water.

Planning to try again with a full-sized print. I'm pretty happy with this because it means I can make prints in the evening or on rainy days.
 

NedL

Subscriber
Joined
Aug 23, 2012
Messages
3,370
Location
Sonoma County, California
Format
Multi Format
Follow-up. Last night I made a full sized print, with a 2 hour exposure. The print is a little overexposed, so that's fantastic. Now I can make prints indoors. Agree with Jan de Jong, it's around 3 to 5 times faster. Thanks to Jan de Jong for getting me to try this! :smile:

I got fooled a little: as you paint on the pot ferri "developer", you see an image emerge almost instantly, but there is a little delay before it reaches full blue. I didn't know that and went over a few parts of the print several times with the brush, which drags the prussian blue around a little bit. Next time I'll try to cover the print with pot ferri as smoothly and quickly as I can, and then wait a little before looking for places where it is thin or any streaks. This effect is subtle and you probably wouldn't notice the smeared prussian blue if you didn't look carefully. I just ordered a new 1-1/2" mottler brush to use for painting on the pot ferri ( don't want to contaminate the one I use for VDB/sepia since I'm not sure how it will wash )
 
OP
OP
Jan de Jong

Jan de Jong

Subscriber
Joined
Jul 20, 2022
Messages
61
Location
Germany
Format
Analog
Now I can make prints indoors

Good news! I have tried again to recover the process better, but not there yet. I hope you help me recover a workable procedure.

The Prussian white is interesting, because that is probably where after drying the blue goes when the less exposed parts are fading again in some cases. Would toning that with green tea for example bring it back?
I have to try that next when I have time.
 

NedL

Subscriber
Joined
Aug 23, 2012
Messages
3,370
Location
Sonoma County, California
Format
Multi Format
After drying, I did not notice any fading ( but I've only tried twice so far! ), the blue color changes a little and I think the dried print is a little darker ( this can happen because as the paper dries the pigments get compressed a little ). I will try some variations and report anything interesting here in this thread. It's a fun process! Thanks again!
 
Photrio.com contains affiliate links to products. We may receive a commission for purchases made through these links.
To read our full affiliate disclosure statement please click Here.

PHOTRIO PARTNERS EQUALLY FUNDING OUR COMMUNITY:


Ilford ADOX Freestyle Photographic Stearman Press Weldon Color Lab Blue Moon Camera & Machine
Top Bottom