Crown Graphic replacement parts

Recent Classifieds

Forum statistics

Threads
199,347
Messages
2,790,043
Members
99,877
Latest member
revok
Recent bookmarks
0

siguii

Member
Joined
Aug 16, 2014
Messages
59
Format
Multi Format
I was just given a very beat-up 4x5 Crown Graphic, and I'm excited to try my hand at shooting large format. However this camera has some issues. The lens (an Ektar 127mm f4.7) has heavy cleaning marks, the rangefinder seems to be out of calibration, the spring back was cracked (but I managed to fix it with JB-weld), it's missing a few screws, and the inner yoke guide rails (I think that's what they're called?) have snapped and need to be replaced, among other things. Is there a good source for replacement parts for these cameras, besides ebay?
 

shutterfinger

Member
Joined
Feb 25, 2013
Messages
5,020
Location
San Jose, Ca.
Format
4x5 Format
Ebay is your best source for replacement parts.
Side Kalart, Hugo Meyer or top Graphic rangefinder?

The body guide blocks break when the bed is closed without fully retracting the yoke (rails) into the body. Design varies by vintage. Easy to make.

Covered at least a half dozen times on Graflex.org help board.
 
OP
OP

siguii

Member
Joined
Aug 16, 2014
Messages
59
Format
Multi Format
It's a side Kalart rangefinder.

I figured that was how the guide blocks must have broken, but I'm still not sure where to find replacements. It sounds like a fairly common problem.
 
Last edited by a moderator:

shutterfinger

Member
Joined
Feb 25, 2013
Messages
5,020
Location
San Jose, Ca.
Format
4x5 Format
This service manual, http://www.graflex.org/manuals/45-Pacemaker-Speed-and-Crown-Graphic.pdf , is the correct one for your camera.

The early version, 1947-1952?, body guide blocks are attached with 2 screws and have shims under them to align them with the rails. The later version of the body guide blocks have set screws to adjust their height for alignment with the rails and are attached with 2 screws. Both styles have 2 alignment pins also.
The bellows have to be removed to get access to the guide blocks. Both sides are identical so they can be switched to the other side of the camera if only the front 1/4 to 1/3 is broken off. If 1/2 or more of the guide lip is broken off consider making a new one. They are machined aluminum.
 
OP
OP

siguii

Member
Joined
Aug 16, 2014
Messages
59
Format
Multi Format
The entire guide lip is broken off. I don't have access to machine tools, unfortunately, but I'll try to see what I can do. I did already download that service manual and I'm finding it pretty helpful. (I wish more camera service manuals were readily available online!) How hard is it to remove the bellows?
 

shutterfinger

Member
Joined
Feb 25, 2013
Messages
5,020
Location
San Jose, Ca.
Format
4x5 Format
How hard is it to remove the bellows?
Depends on whether it has the crimped at the film plane, moderate difficulty, or the newer snap in, much easier, version. The body release cable should be disconnected at the body and the front standard, bellows, cable removed as an assembly. On reassembly the position of the cable bracket is important for correct body release operation.

To make a bed guide you need a block of aluminum the outside dimensions of the guide, a hacksaw with a fine cut blade, a drill, drill bits, and possibly a Dremel with cutoff wheel and router base. A hammer and center punch will help but are not required.
Use the hacksaw or Dremel to size the piece of aluminum and to cut the grove for the rail edge. Drill the alignment holes and screw holes. Drill and tap the set screw holes if needed. Paint flat black, install when dry.
 

Jon Shiu

Subscriber
Joined
Dec 2, 2003
Messages
3,293
Location
Mendocino, California
Format
Plastic Cameras
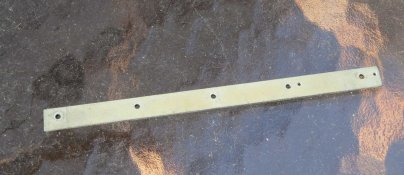
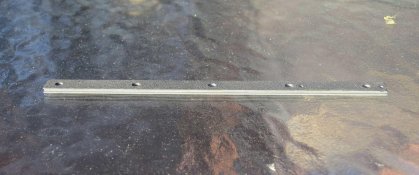
I do have a long guide piece, if you are interested:
railbrack2.jpg
railbrack3.jpg

Jon
 
OP
OP

siguii

Member
Joined
Aug 16, 2014
Messages
59
Format
Multi Format
Thanks to John Shiu for providing that guide rail. I was able to cut and re-drill it to make the replacement rear rails (albeit somewhat crudely due to my wobbly drill press) and installed them without too much trouble. Removing the bellows was moderately difficult but didn't prove to be a problem either. I also figured out how to calibrate the rangefinder. I even managed to fix the lens shutter, which wasn't working on B or T. I will say these things are a breeze to repair compared to a lot of other cameras I've tinkered with, and I'm glad there are actually service manuals available. All it needs is a few more screws and I think I'm set!

Can't wait to get some film and shoot with this thing.
 
Photrio.com contains affiliate links to products. We may receive a commission for purchases made through these links.
To read our full affiliate disclosure statement please click Here.

PHOTRIO PARTNERS EQUALLY FUNDING OUR COMMUNITY:


Ilford ADOX Freestyle Photographic Stearman Press Weldon Color Lab Blue Moon Camera & Machine
Top Bottom