Copal MXV Shutter cleaning - slotted screws around shutter stuck, any way around this?

Waiting

A
Waiting

  • 0
  • 0
  • 6
Westpier

A
Westpier

  • 0
  • 0
  • 10
Westpier

A
Westpier

  • 0
  • 0
  • 11
Morning Coffee

A
Morning Coffee

  • 3
  • 0
  • 50

Recent Classifieds

Forum statistics

Threads
197,578
Messages
2,761,389
Members
99,406
Latest member
filmtested
Recent bookmarks
0

Ellyrion

Member
Joined
Jun 22, 2022
Messages
33
Location
London
Format
35mm
shutter.jpg


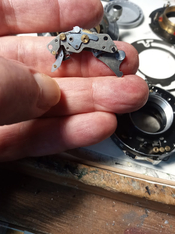
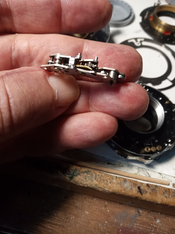
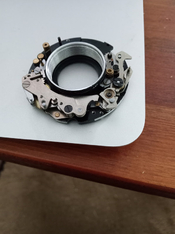
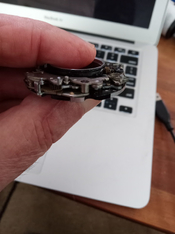
Hi all. I'm in the process of resurrecting a Yashica Mat TLR with a Copal MXV shutter. The camera exterior is in need of some TLC but the main issue is the shutter speeds - all of the speeds under 1/500 are slow. From my research around it seems like this issue can be fixed by cleaning the speed escapement in the shutter (flushing out with 99.9% Isopropyl alchohol + ultrasonic cleaning) - however my issue is that i am unable to remove 2/3 of the slotted screws that hold it in place: they just wont budge and cause my screwdriver to cam out and strip the top of them, but one screw comes out just fine.

I had some real issues with the brass slotted screws on the exterior of the camera being similarly stiff but was able to force them loose with more pressure and an application of wd-40 to them overnight, however I really don't want to do any of that to these fragile shutter mechanisms. I am using a Wera 0.3x1.8mm screwdriver and whilst it doesn't fill the entire width of the slotted screw it works perfectly on one of them and in this () video it is used effectively to remove these exact screws.

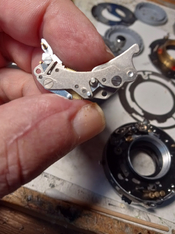
Any advice on how to get these two screws loose would be much appreciated, for reference it is the outer two screws in this photo that won't budge. Would a very very very sparing application of penetrating oil work, or perhaps a soldering iron to heat the screw? Or is it a lost cause? Would love to hear people's thoughts!

Thanks :smile:
 

BrianShaw

Member
Joined
Nov 30, 2005
Messages
16,357
Location
La-la-land
Format
Multi Format
It might be worth considering better screwdrivers that properly fit the screws.
 

Tel

Subscriber
Joined
May 9, 2011
Messages
940
Location
New Jersey
Format
Multi Format
Out comes the slow-speed escapement! Ditto the above: get a good set of screwdrivers and use one that precisely fits the screw head. Once you've damaged the slot your project may be DOA. And a little bit of acetone or the application of heat (I use a soldering iron with a clean tip) might free the screw. Obviously, don't apply heat and acetone at the same time....

As I recall, these screws are not reverse threaded, so that is not likely the problem. Acetone is used in nail polish remover and available in most drugstores; look for the product that is 100% acetone. Whatever you do, don't put oil in a shutter.
 

gone

Member
Joined
Jun 14, 2009
Messages
5,505
Location
gone
Format
Medium Format
I'd go w/ the acetone or a tiny bit of that WD-40 used sparingly. You're going to clean things up in there anyway, I'd chemically clean it. Camera innards often have screws that my screwdrivers don't fit exactly for some reason, and in the past I've had to take a file to them to get a precise fit.

The screwdriver not only needs to fit the slot in the screw exactly, it also doesn't need to have any sort of angle at the tip. The sides of the tip should be almost straight, w/o any sort of slant to the edges/sides. Using a screwdriver that is even a little bit too small or worn will cause issues.
 

Tel

Subscriber
Joined
May 9, 2011
Messages
940
Location
New Jersey
Format
Multi Format
I'm concerned about which screws you plan to remove. The two to the left (with red arrows) look like the screws that hold the escapement mechanism together. If so, do NOT remove them. If they are the ones I think they are, your escapement mechanism will dissolve into a pile of tiny gears and springs. You want to remove the screws that secure the escapement to the shutter main plate below it.

Edit: I found a similar escapement in a Copal Zero taken off a Mamiya TLR lens. It looks almost exactly like yours. So the screw that shows on the far right in your photo is definitely one that secures the mechanism to the plate below it. And the one on the far left (with the red arrow) passes through the mechanism and into the plate below. So, it might be that you want to remove the left and right screws, leaving the middle one in place. If your escapement is the same as mine, be very careful after you've removed it that it doesn't fall apart: basically, the middle screw is the only thing holding it together. I would not pull the left screw out of the escapement; it passes through a brass tube that's a structural part of the escapement and pulling it out might weaken it.
 

Tel

Subscriber
Joined
May 9, 2011
Messages
940
Location
New Jersey
Format
Multi Format
Here's what the escapement looks like underneath. (I used my Wera 0.3x2.0)
 

Attachments

  • IMG_20220622_151842149_HDR.jpeg
    IMG_20220622_151842149_HDR.jpeg
    77.7 KB · Views: 97
  • IMG_20220622_151929178.jpeg
    IMG_20220622_151929178.jpeg
    105.7 KB · Views: 104
  • IMG_20220622_151938864.jpeg
    IMG_20220622_151938864.jpeg
    90.6 KB · Views: 125
Last edited:
OP
OP

Ellyrion

Member
Joined
Jun 22, 2022
Messages
33
Location
London
Format
35mm
It might be worth considering better screwdrivers that properly fit the screws.

Yeah I think I'll grab another set - I thought this Wera one would be good as I saw it in the video. I'm thinking this set based off someones reccomendation

VESSEL VEUS11 902-5 MEGADORA Plain Slotted Screwdriver Set 5 Pieces​

 
Last edited:
OP
OP

Ellyrion

Member
Joined
Jun 22, 2022
Messages
33
Location
London
Format
35mm
Out comes the slow-speed escapement! Ditto the above: get a good set of screwdrivers and use one that precisely fits the screw head. Once you've damaged the slot your project may be DOA. And a little bit of acetone or the application of heat (I use a soldering iron with a clean tip) might free the screw. Obviously, don't apply heat and acetone at the same time....

As I recall, these screws are not reverse threaded, so that is not likely the problem. Acetone is used in nail polish remover and available in most drugstores; look for the product that is 100% acetone. Whatever you do, don't put oil in a shutter.

Yeah I've tried my hardest to not damage the slot but some stripping did occur as i tried a few times with more pressure :/ - these screws are a nightmare! And yeah regarding the oil thing it seems like a good call - how would I use the acetone in this case? Will probably try it out when I get a new set of bigger slotted screwdrivers. Thanks
 
OP
OP

Ellyrion

Member
Joined
Jun 22, 2022
Messages
33
Location
London
Format
35mm
I'd go w/ the acetone or a tiny bit of that WD-40 used sparingly. You're going to clean things up in there anyway, I'd chemically clean it. Camera innards often have screws that my screwdrivers don't fit exactly for some reason, and in the past I've had to take a file to them to get a precise fit.

The screwdriver not only needs to fit the slot in the screw exactly, it also doesn't need to have any sort of angle at the tip. The sides of the tip should be almost straight, w/o any sort of slant to the edges/sides. Using a screwdriver that is even a little bit too small or worn will cause issues.
How would you got about chemically cleaning it? I've been advised to use 99.9% Isopropyl alchohol with an ultrasonic clean
 
OP
OP

Ellyrion

Member
Joined
Jun 22, 2022
Messages
33
Location
London
Format
35mm
I'm concerned about which screws you plan to remove. The two to the left (with red arrows) look like the screws that hold the escapement mechanism together. If so, do NOT remove them. If they are the ones I think they are, your escapement mechanism will dissolve into a pile of tiny gears and springs. You want to remove the screws that secure the escapement to the shutter main plate below it.

Edit: I found a similar escapement in a Copal Zero taken off a Mamiya TLR lens. It looks almost exactly like yours. So the screw that shows on the far right in your photo is definitely one that secures the mechanism to the plate below it. And the one on the far left (with the red arrow) passes through the mechanism and into the plate below. So, it might be that you want to remove the left and right screws, leaving the middle one in place. If your escapement is the same as mine, be very careful after you've removed it that it doesn't fall apart: basically, the middle screw is the only thing holding it together. I would not pull the left screw out of the escapement; it passes through a brass tube that's a structural part of the escapement and pulling it out might weaken it.

Ahhh thank you! That would explain why the middle scew is probably so much easier to turn, given its not connecting the escapement itself to the housing
 

Tel

Subscriber
Joined
May 9, 2011
Messages
940
Location
New Jersey
Format
Multi Format
I usually apply acetone with a cotton swab. It evaporates very quickly though, so you may need to repeat applications. It often works, but not always. Heat might be more effective. I wouldn't use WD-40 on the escapement--it does contain some oil and you don't want to get oil onto those tiny gears. Sad but true: oil always turns into glue eventually (I just pried apart some aperture blades that someone had oiled years ago...). Isopropyl, like acetone, is good to use for cleaning since it evaporates without leaving a residue..

I like my Wera screwdrivers but I did break the tip of one of the smaller ones, so maybe there's something more robust on the market.
 

Dan Daniel

Subscriber
Joined
Jul 4, 2009
Messages
2,833
Location
upstate New York
Format
Medium Format
Uh... the two black head screws on top? Don't remove them. Seriously, DO NOT REMOVE THEM!!!!

They hold the escapement together. It is the far right screw at the bottom and one underneath the gear at the upper left, slightly in from left end, that hold the escapement in the camera. You probably need to push that left gear out of the way while fiddling with the pinion setup on the right end.
 

Tel

Subscriber
Joined
May 9, 2011
Messages
940
Location
New Jersey
Format
Multi Format
Dan, that was my first response too, but this escapement is a strange (read bad) design. I've got one from a copal 0 shutter I took from a Mamiya TLR lens. There is no screw holding down the escapement underneath the cocking arm; the bottom plate of the escapement doesn't extend out there. That screw on the far left of the escapement in the OP's photo goes all the way through the escapement and into a tapped hole on the main plate. If you look at the photos I posted above you can see that that screw goes right through and out the bottom. Here's another picture of the escapement on the main plate, but without the housing or cocking arm in the way. There is a second hole in the bottom plate of the escapement but as you can see it fits over a brass locator stud riveted to the main plate. Strikes me as an awful design choice but that's how they did it.
 

Attachments

  • IMG_20220623_143707862.jpeg
    IMG_20220623_143707862.jpeg
    64.4 KB · Views: 81
Last edited:

Tel

Subscriber
Joined
May 9, 2011
Messages
940
Location
New Jersey
Format
Multi Format
Here's a better angle: the black screw on the right of this photo goes right through the escapement and screws into the main mechanism plate
 

Attachments

  • IMG_20220623_150852957.jpeg
    IMG_20220623_150852957.jpeg
    54 KB · Views: 79
Last edited:

Tel

Subscriber
Joined
May 9, 2011
Messages
940
Location
New Jersey
Format
Multi Format
OK--I stand corrected. I took a look at Mikeno62's video. (I couldn't get it to play from the link here--had to go to youtube and find it.) It looks like the version of this shutter that was used in the Yashicamat had a screw where my Mamiya shutter just has the brass stud. Go figure. Otherwise they're identical....
 

monopix

Member
Joined
Dec 10, 2009
Messages
146
Location
Lincolnshire, UK.
Format
Hybrid
First, comparing these shutters from different cameras, or even from other Yashica cameras, doesn't always help as they do vary even though they are all called MXV shutters (for instance, try comparing a MV shutter on a Yashica Lynx with one on a later Yashica-Mat and you'll find they are very different). In the OP's case, only the two outer screws indicated should be removed. The middle one holds the escapement together.
Second, get the correct screwdrivers. It's the only answer.
Third, you're probably wasting your time. These shutters always run slow and cleaning the escapement usually has minimal effect. You might get a small improvement by removing the shutter blades and cleaning them and also removing the actuator ring and cleaning that but just cleaning the escapement usually doesn't help. The escapement does next to nothing at 1/500th.
Fourth, I don't know how you are measuring the speeds but an understanding of shutter efficiency is required when assessing these shutters. The effective shutter speed varies with aperture and a 1 stop over exposure at f/16 and 1/500th is to be expected. I generally find the over exposure can be, up to, one and a half stops even after the shutters have been serviced. I don't know if that could be improved on by, maybe, replacing the main spring but I never found a source to try. But I'm guessing the main spring is the likely cause of the problem, not anything else.
Attachment from the Kodak professional Photoguide.
 

Attachments

  • shutter speed comp.jpg
    shutter speed comp.jpg
    317 KB · Views: 84
OP
OP

Ellyrion

Member
Joined
Jun 22, 2022
Messages
33
Location
London
Format
35mm
First, comparing these shutters from different cameras, or even from other Yashica cameras, doesn't always help as they do vary even though they are all called MXV shutters (for instance, try comparing a MV shutter on a Yashica Lynx with one on a later Yashica-Mat and you'll find they are very different). In the OP's case, only the two outer screws indicated should be removed. The middle one holds the escapement together.
Second, get the correct screwdrivers. It's the only answer.
Third, you're probably wasting your time. These shutters always run slow and cleaning the escapement usually has minimal effect. You might get a small improvement by removing the shutter blades and cleaning them and also removing the actuator ring and cleaning that but just cleaning the escapement usually doesn't help. The escapement does next to nothing at 1/500th.
Fourth, I don't know how you are measuring the speeds but an understanding of shutter efficiency is required when assessing these shutters. The effective shutter speed varies with aperture and a 1 stop over exposure at f/16 and 1/500th is to be expected. I generally find the over exposure can be, up to, one and a half stops even after the shutters have been serviced. I don't know if that could be improved on by, maybe, replacing the main spring but I never found a source to try. But I'm guessing the main spring is the likely cause of the problem, not anything else.
Attachment from the Kodak professional Photoguide.

How does the aperture effect the shutter speed? They seem like totally different and separate mechanisms on this shutter. As for getting the correct screwdrivers it seems like grinding one down to fit is the only way to go about this - none of the three sets I've tried have worked despite fitting into the slot itself. Any ideas on how to shape one to fit? As for wasting time thats a fair point - but this camera is just going to gather dust and it would be fun to fix! Thanks
 

reddesert

Member
Joined
Jul 22, 2019
Messages
2,319
Location
SAZ
Format
Hybrid
Aperture affects shutter speed because of "shutter efficiency" - at faster speeds, the shutter takes a finite amount of time to open enough to expose the full aperture, so it's giving less exposure (effective faster speed) at f/4 than one might expect.

Is the shutter just a bit slow, really slow, or sticking at the slow speeds? Older shutters are often a bit slow and this can just be compensated for.

If it were me, I would take some electronic contact cleaner, the quick-evaporating no-residue kind (in the US, CRC electronic cleaner or Deoxit are common brands- you want something with very light hydrocarbons and no oil). Shoot or drip it carefully into the escapement, then fire the shutter several times. This is not textbook but it often gets little bits of dirt or oil out. I mostly need to do this to revive sticky slow speed mechanisms. It is better than me damaging a screw or taking something apart that I might not get back together.
 
OP
OP

Ellyrion

Member
Joined
Jun 22, 2022
Messages
33
Location
London
Format
35mm
Aperture affects shutter speed because of "shutter efficiency" - at faster speeds, the shutter takes a finite amount of time to open enough to expose the full aperture, so it's giving less exposure (effective faster speed) at f/4 than one might expect.

Is the shutter just a bit slow, really slow, or sticking at the slow speeds? Older shutters are often a bit slow and this can just be compensated for.

If it were me, I would take some electronic contact cleaner, the quick-evaporating no-residue kind (in the US, CRC electronic cleaner or Deoxit are common brands- you want something with very light hydrocarbons and no oil). Shoot or drip it carefully into the escapement, then fire the shutter several times. This is not textbook but it often gets little bits of dirt or oil out. I mostly need to do this to revive sticky slow speed mechanisms. It is better than me damaging a screw or taking something apart that I might not get back together.

Ahhh I see what you mean! That makes sense - I was thinking of the shutter like a regular SLR shutter. As for the speeds I reckon it falls into the 'a bit slow' category - 1/500 is fine, 1/30 is more like 1/15 and 1/60 is more like 1/30 and so on. The 1 second setting is around 2.6 seconds.

With all that in mind maybe compensating is just the way to go - take a note of all the of the real shutter timings and stick a note of them on the back of the camera. At this point I'm just stripping these screws more and more and have tried 3 different flathead types that all fit to no avail - maybe the acetone or soldering iron method could work?

Out of curiosity - why do you reckon cleaning the escapement if so-often recommended with these shutters? It seems like 80% of the info on getting them running properly again involves some sort of escapement cleaning.

Thanks!
 

Dan Daniel

Subscriber
Joined
Jul 4, 2009
Messages
2,833
Location
upstate New York
Format
Medium Format
There is an adjustment on the top. Using your first photo with red arrows, it is between the middle arrow and the right arrow, There is a slot that runs to the center and is open at the center end. The right leg of this slot establishes the position of the hatchet head shaped black part with a black screw in the middle. The two ends of this part control the speed of the star pallet. BY spreading this slot open a bit, the star pallet will move faster and shutter speeds will get aster.

At least slow speeds will.

Escapement cleaning is recommended because there is often light oil used on the parts and this dries up/collects dirt and needs to be removed. Every little bit helps. And the escapement is usually self-contained and rather simple to get in and out, so it gives people the feeling of having done something good without getting into true watch-level precision.
 
OP
OP

Ellyrion

Member
Joined
Jun 22, 2022
Messages
33
Location
London
Format
35mm
There is an adjustment on the top. Using your first photo with red arrows, it is between the middle arrow and the right arrow, There is a slot that runs to the center and is open at the center end. The right leg of this slot establishes the position of the hatchet head shaped black part with a black screw in the middle. The two ends of this part control the speed of the star pallet. BY spreading this slot open a bit, the star pallet will move faster and shutter speeds will get aster.

At least slow speeds will.

adjustment.jpg


Gotcha - this part right here? How would I go about spreading the slot open? Thanks :smile:
 

Dan Daniel

Subscriber
Joined
Jul 4, 2009
Messages
2,833
Location
upstate New York
Format
Medium Format
Put a scredriver in and twist.

Seriously!

If you can find a slotted driver that is close to the length of the slot and fits in it, put it in. And rotate it so that pressure is applied to the end of the right leg.

This is tricky in a way. It takes just the right pressure to get it to move while not snapping it off. Go very slow, very deliberate, Small steps, see what happens. A second hand on a modern clock that jumps from second to second is actually a decent way to measure 1 second. All in all, if you can get 1 second or a bit faster- 0.90 or so, that's great.

Oh, notice the bevel on the inner edge of the leg you want to bend. The scredriver will want to travel u[ and over. But don't aply pressure down so that you bend the mounts of any parts under the screwdriver!

Small steps. A small bit can make a big difference.
 

tokam

Subscriber
Joined
Nov 7, 2008
Messages
585
Location
Sydney, Aust
Format
Multi Format
How would you got about chemically cleaning it? I've been advised to use 99.9% Isopropyl alchohol with an ultrasonic clean

Be careful when using flammable solvents in an ultrasonic cleaner. They generate heat and the fumes may ignite if they enter the mechanism. My U-S cleaner specifically warns against using flammable solvents.

I have successfully used a solution of CLR, (Calcium / Lime / Rust remover), in water. Give it several bursts of 3 - 4 minutes and then rinse in plain water. If you wish to 'speed dry' the cleaned components at this stage then a quick dip in isopropyl alcohol or methylated spirits, (denatured alcohol) should do the trick.
 
OP
OP

Ellyrion

Member
Joined
Jun 22, 2022
Messages
33
Location
London
Format
35mm
Be careful when using flammable solvents in an ultrasonic cleaner. They generate heat and the fumes may ignite if they enter the mechanism. My U-S cleaner specifically warns against using flammable solvents.

I have successfully used a solution of CLR, (Calcium / Lime / Rust remover), in water. Give it several bursts of 3 - 4 minutes and then rinse in plain water. If you wish to 'speed dry' the cleaned components at this stage then a quick dip in isopropyl alcohol or methylated spirits, (denatured alcohol) should do the trick.

I was going to go the route of putting the escapement in a sealed bag with the isoproyl alchohol and then submerging that in the water in the ultrasonic cleaner. I'll look into that method too - thanks! Although at the moment I cant even get the escapement out - so its looking like I'll have to go the route of electronic cleaner as reddesert suggested or just live with a slow shutter and compensate accordingly. I could go out and buy the stuff I need to grind my screwdrivers down but honestly I dont wanna be sinking even more money into this
 
Photrio.com contains affiliate links to products. We may receive a commission for purchases made through these links.
To read our full affiliate disclosure statement please click Here.

PHOTRIO PARTNERS EQUALLY FUNDING OUR COMMUNITY:


Ilford ADOX Freestyle Photographic Stearman Press Weldon Color Lab Blue Moon Camera & Machine
Top Bottom