One thing to remember is that the lower grades (00, 0, 1) will add density to the lighter (highlight) tones in the image before they start to have any noticeable effect on the midtones or shadows. There is a limit to how far you can push this before halos start to appear, but it can be very effective in bringing out highlight detail without changing the adjacent midtones. I will often cut out a rough dodging or burning mask to selectively burn the highlight area. Higher grades like 4 or 5 will add density to the shadows quickly, before any changes are seen in the highlights.
Another option to try is to pre-flash the paper to get closer to the density threshold for the highlights before exposing with the negative. This may help bring out some density in the sky without affecting the rest of the image.
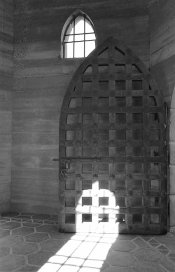
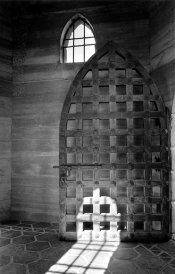
Here's an example I've used before, of the straight print at Grade #2 and the final print using multiple grades with burning and dodging. Base exposure ended up being at grade 4 or 4.5, but the biggest problem was that I lost all detail in the sunlit area at the bottom. I selectively burned in this area at Grade 0 to show some detail, but not look manipulated. Other areas of the print were burned in at Grade 3 to add density.


