

It's been almost 2 years since this thread: https://www.photrio.com/forum/threads/craziness-using-leds-to-print-ra4-and-b-w.171911/
Although it worked (works) quite nicely, I've been working on a new version. Reasons being that I wasn't entirely happy with the programming on the first version, the responsiveness of the user interface, the way I solved the LED drivers (which was kind of haphazard) and also because I found the power output for black & white work just on the low side when using warm-tone papers. But mostly, because, you know...fidgeting
Over the past week or so I've been using the second incarnation, which is a redesign from the ground up, in each and every aspect/detail. It took me a looong time to make this, mostly because I had to learn stuff that I had only vague knowledge of. I had to step up a notch in terms of electrical engineering, in object oriented programming as well, and I had to actually learn PCB routing and manufacturing. It's easier said than done, let's put it that way.
I'm now in the prototype stage and knowing myself, this is also going to be quite close to the final version - because if it works, it works, and that means mission accomplished. So no, this is not going to be a commercial product. That would necessitate another redesign from the ground up and I don't think there's a market to justify such an exercise. Moreover, there are as far as I know two existing products out there that fulfill this need - the Heiland solution for those with serious money to spend and the Intrepid solution for mere mortals.
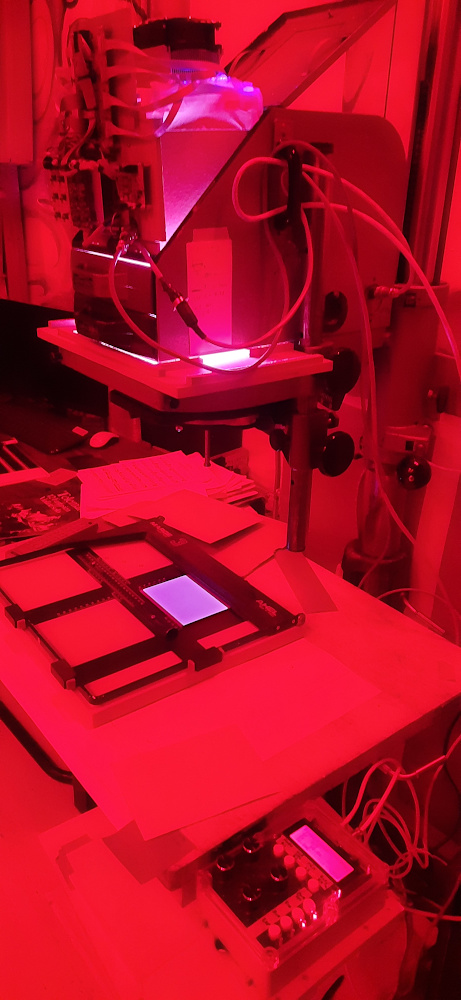
Here's a picture of my contraption as it looks when doing B&W work:
This is the visible part of the light head as mounted on the enlarger:
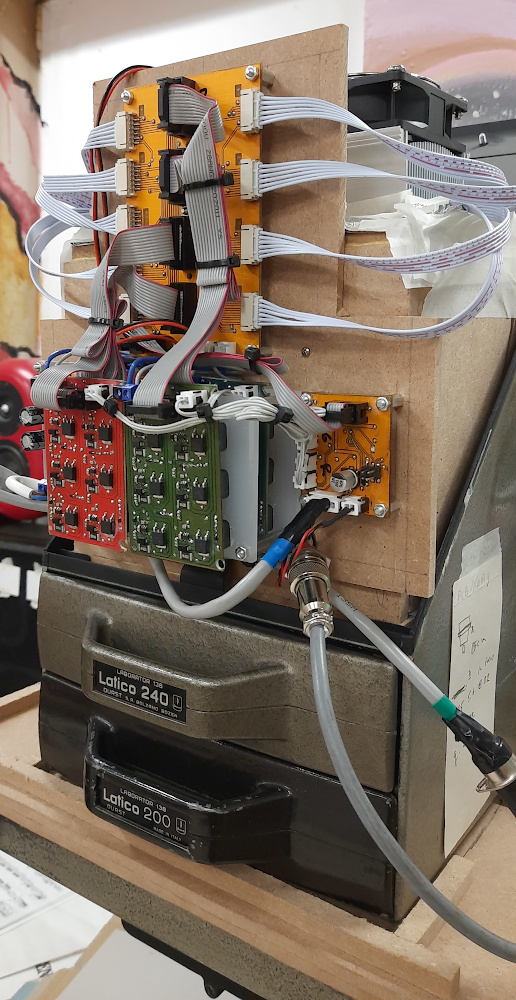
And the controller box:
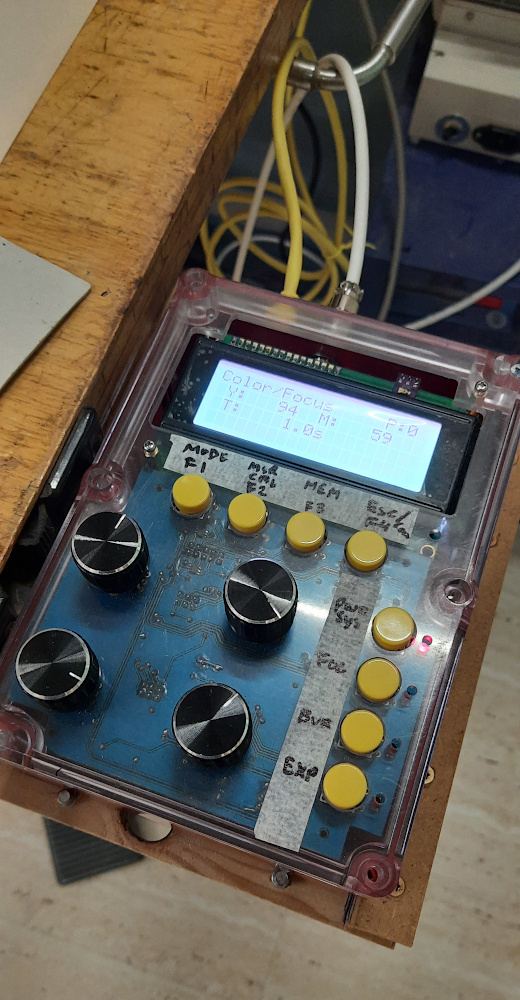
So far I have tested both color and B&W enlarging and both work after dialing in the obligatory exposure parameters, which I have thankfully made a little easier than in the first version. I now have a few configuration menus where I can adjust virtually all relevant parameters on the fly without having to upload new firmware into the device.
The device has a couple of main modes:
* Color for RA4 enlarging
* B&W fixed grade
* B&W split grade (not yet verified as I rarely split grade print anyway)
* RAW mode where I can directly set the 12-bit R, G and B channel values
* Ortho mode that is basically a B&W fixed grade mode, but allowing short exposure times (increments of about 10ms) for faster materials such as ortho and xray film.
The device has all kinds of beeps, blinks and buttons to make it look fancy as you can see. It also has a number of protections and controls under the hood to keep the magic smoke in.
Particularly this bit is worthwhile protecting; the light source itself:
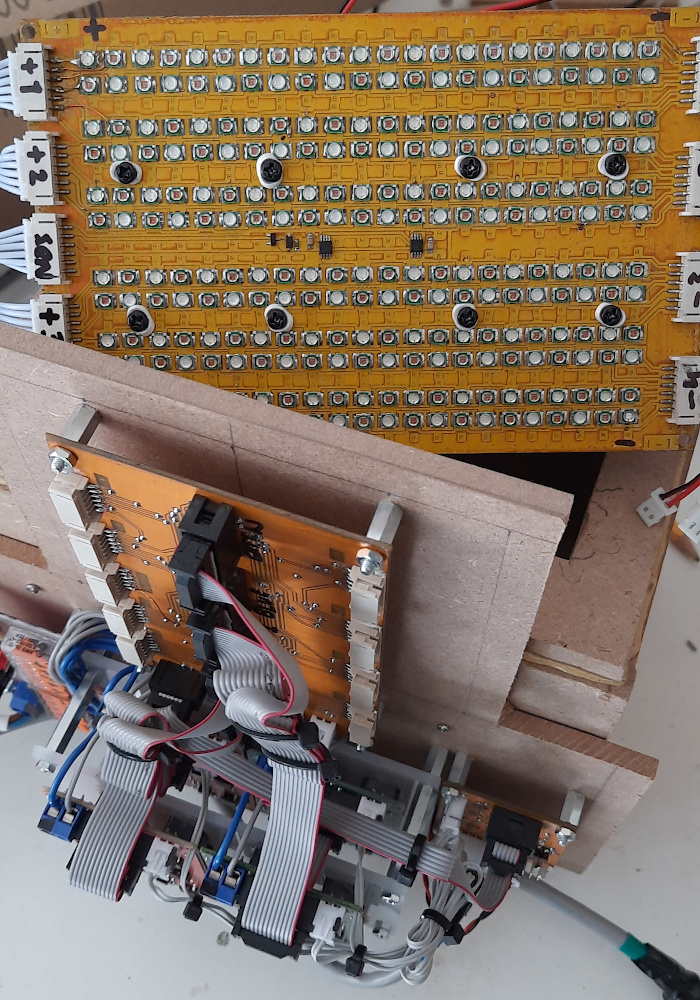
I took inspiration from the Bayer arrays from digital cameras, but emphasized red instead of green as that is what RA4 likes. So each 'pixel site' consists of 2 red leds, 1 blue and 1 green. In total there are 66 of such 'pixels', which allows for nicely even illumination and good light intensity. Total power consumed by the head at full force (during focusing) is around 360W, which is made up of around 100W for both green and blue and the remainder (ca. 160W) red. At some 20cm from the light source there's a glass diffusor to even out the light. I kept the condensors in the Durst 138. Light output turns out to be quite OK; it seems to run 2-3 stops faster than the first version.
Just thought I'd share; if there's any questions, let me know. From the previous thread I know that there's always some mild interest in this kind of tinkering and over time, there may be one or two people who approach me with questions related to the project, so I'm putting this up mostly for amusement purposes and so that those who'd like to discuss know where to find me.
Although it worked (works) quite nicely, I've been working on a new version. Reasons being that I wasn't entirely happy with the programming on the first version, the responsiveness of the user interface, the way I solved the LED drivers (which was kind of haphazard) and also because I found the power output for black & white work just on the low side when using warm-tone papers. But mostly, because, you know...fidgeting
Over the past week or so I've been using the second incarnation, which is a redesign from the ground up, in each and every aspect/detail. It took me a looong time to make this, mostly because I had to learn stuff that I had only vague knowledge of. I had to step up a notch in terms of electrical engineering, in object oriented programming as well, and I had to actually learn PCB routing and manufacturing. It's easier said than done, let's put it that way.
I'm now in the prototype stage and knowing myself, this is also going to be quite close to the final version - because if it works, it works, and that means mission accomplished. So no, this is not going to be a commercial product. That would necessitate another redesign from the ground up and I don't think there's a market to justify such an exercise. Moreover, there are as far as I know two existing products out there that fulfill this need - the Heiland solution for those with serious money to spend and the Intrepid solution for mere mortals.
Here's a picture of my contraption as it looks when doing B&W work:
This is the visible part of the light head as mounted on the enlarger:
And the controller box:
So far I have tested both color and B&W enlarging and both work after dialing in the obligatory exposure parameters, which I have thankfully made a little easier than in the first version. I now have a few configuration menus where I can adjust virtually all relevant parameters on the fly without having to upload new firmware into the device.
The device has a couple of main modes:
* Color for RA4 enlarging
* B&W fixed grade
* B&W split grade (not yet verified as I rarely split grade print anyway)
* RAW mode where I can directly set the 12-bit R, G and B channel values
* Ortho mode that is basically a B&W fixed grade mode, but allowing short exposure times (increments of about 10ms) for faster materials such as ortho and xray film.
The device has all kinds of beeps, blinks and buttons to make it look fancy as you can see. It also has a number of protections and controls under the hood to keep the magic smoke in.
Particularly this bit is worthwhile protecting; the light source itself:
I took inspiration from the Bayer arrays from digital cameras, but emphasized red instead of green as that is what RA4 likes. So each 'pixel site' consists of 2 red leds, 1 blue and 1 green. In total there are 66 of such 'pixels', which allows for nicely even illumination and good light intensity. Total power consumed by the head at full force (during focusing) is around 360W, which is made up of around 100W for both green and blue and the remainder (ca. 160W) red. At some 20cm from the light source there's a glass diffusor to even out the light. I kept the condensors in the Durst 138. Light output turns out to be quite OK; it seems to run 2-3 stops faster than the first version.
Just thought I'd share; if there's any questions, let me know. From the previous thread I know that there's always some mild interest in this kind of tinkering and over time, there may be one or two people who approach me with questions related to the project, so I'm putting this up mostly for amusement purposes and so that those who'd like to discuss know where to find me.

